Monday, 10 December 2012

Today's swatch from the China Glaze Holiday Joy Collection is Pure Joy.


nails nailart nail art polish mani manicure Spellbound China Glaze Holiday Joy Pure Joy color swatch glitter red gold christmas
Two coats of Pure Joy with two coats of top coat

Pure Joy is another of the glitters from this collection. It has a clear base with small red hex glitters and larger gold hex glitters.


nails nailart nail art polish mani manicure Spellbound China Glaze Holiday Joy Pure Joy color swatch glitter red gold christmas
One coat of Pure Joy; no top coat

This has good coverage with one coat. Not enough to be a one coat wonder but really good for a glitter. The small red glitters fill in nicely around the larger gold glitters. The gold glitters did need a bit of dab and drag to get them around the nail but I didn't have to dig for them. They came out of the bottle good; they just didn't want to spread out.

nails nailart nail art polish mani manicure Spellbound China Glaze Holiday Joy Pure Joy color swatch glitter red gold christmas
Two coats of Pure Joy; no top coat


nails nailart nail art polish mani manicure Spellbound China Glaze Holiday Joy Pure Joy color swatch glitter red gold christmas
Two coats of Pure Joy; two coats of top coat

I found that all the glitters of this collection needed two coats of top coat to get a smooth to semi-smooth finish. That said, I think this one was the best at accepting top coat. The glitter lay pretty smoothly on its own and the glitters left very few cracks between them for the top coat to sink between.

nails nailart nail art polish mani manicure Spellbound China Glaze Holiday Joy Pure Joy color swatch glitter red gold layered poinsettia christmas
One thin coat of Pure Joy; layered over two coats China Glaze Poinsettia

And just to show you how well this one layers, I put one very thin coat of Pure Joy over two coats of China Glaze Poinsettia. The only problem I had with this was that no matter how much I dabbed and pushed the glitters wouldn't stick to the polish around my cuticles. Not a big problem at all and the awesome shimmer effect of the red glitter more than made up for this!


Color: Small red hex glitters and larger gold hex glitters in a clear base.
Finish: Glitter
Application: Application was good. The glitter came out of the bottle nicely with no digging needed and only needed a bit of dabbing and pushing to get the gold glitter arranged around the nail. Builds up perfectly so it can be worn alone, but layers over other polish just as nicely.
Coats to Opaque: 2
My Rating (1-5): 4 � 4.5 if pushed. It's not a bad glitter, and it really is perfect for the holidays.

Sunday, 9 December 2012


Perfume is my new obsession, which is becoming a bit expensive! Chlo� Eau De Parfum* is my most recent edition, it's described as having a powdery rose sent with notes of lily, peony,freesia and lychee, as well as amber and cedarwood. Just look at the pretty bottle is comes in!

You only need a couple of sprays of this scent as it's quite strong & lasts for ages. It really lingers on the skin much longer than any other perfume i've tried. Overall, this powdery rose scented perfume from Chloe is a classic. If you like florally, flirty, feminine scents - this is right up your street.

You can pick Chloe up from escentual who have 15% off the RRP. It's �56.95 for 75 ml & comes in three different sizes. 

Have you tried this before?


Friday, 7 December 2012

I'm really sorry about the lack of post yesterday. I was informed that someone on Facebook had stolen some of my nail photos, cut and smudged out my watermark, and was now claiming to have done them. Thank you again, Lacqueerisa, for letting me know! ? My photos have now been removed from her page, and I've informed as many other artists as I could of their stolen work. But enough about that!

nails nailart nail art polish mani manicure Spellbound color swatch China Glaze Holiday Joy Collection Winter Holly glitter green gold purple holo holographic

Today's post is a swatch of Winter Holly from the China Glaze Holiday Joy Collection. Winter Holly is a pretty deep green and gold glitter, very Christmas-y, with flares of holographic glitter mixed in. I also noticed a bit of purple glitter in the pictures but that may just be a trick of the light playing off the holo glitter.

nails nailart nail art polish mani manicure Spellbound color swatch China Glaze Holiday Joy Collection Winter Holly glitter green gold purple holo holographic

Here is one coat of Winter Holly. Two coats fills in nicely and takes care of all the patchiness so don't worry about how thin this goes on. Winter Holly dries pretty matte and will need a good top coat if you want it to really shine. I found my top coat settled around the glitter in visible dimples and needed two coats.

nails nailart nail art polish mani manicure Spellbound color swatch China Glaze Holiday Joy Collection Winter Holly glitter green gold purple holo holographic

I'm not sure how I feel about all the really fine glitters of this collection. Such fine glitter wasn't really made for layering so multiple coats are a must. Since I use two thick coats of glue base for glitters, along with my usual base coat, the added two or three coats of these glitters needed to get full coverage really makes my nails feel heavy and awkward. Along with the mentioned two layers of top coat needed to smooth everything ... personally, I think I'll be wearing these matte. All said though, they're so darn pretty that I can't help liking them!!

Color: Dark green and gold with flecks of holo and maybe purple.
Finish: Ultra-fine glitter; dries matte.
Application: Goes on smooth but patchy with one coat. Fills in nicely with two.
Coats to Opaque: 2-3
My Rating (1-5): 4

So, what do ya'all think of the new blog layout? I tried to keep it winter-y with only one or two Christmas touches.

Wednesday, 5 December 2012

We're up to M in the ABC Challenge. Getting ever closer to Z. :( I will be very sad to see the end of this challenge and may just start over on my own. There are so many amazing designs to do for each letter, and I don't think I'll be happy until I try them all. As for today's letter ...

M is for ... Mistletoe. I call this 'Kiss Me Under the Mistletoe'.

nails nailart nail art polish mani manicure Spellbound Sinful Colors Snow Me White Wet n Wild I Red a Good Book China Glaze Holly-Day L.A. Colors Black White green ABC Challenge M is for Mistletoe Kiss Me Under lips romance love Christmas Holiday glitter Pearl Harbor

This isn't my all time favorite design. I like the idea, but I wish I had thought the design out before jumping in. This is what happens when I don't sketch up my designs first.

nails nailart nail art polish mani manicure Spellbound Sinful Colors Snow Me White Wet n Wild I Red a Good Book China Glaze Holly-Day L.A. Colors Black White green ABC Challenge M is for Mistletoe Kiss Me Under lips romance love Christmas Holiday snow glitter Pearl Harbor

I do like the base polish. I went for a snowy effect using Sinful Colors Snow Me White and Pearl Harbor. Two coats of white with the iridescent glitter of Pearl Harbor creates a light dusting of snow over your nails. Perfect for winter. :)

Tuesday, 4 December 2012

Today's China Glaze Holiday Joy polish is by far my favorite of this collection. It was one I picked up completely on a whim, but I couldn't be happier.

nails nailart nail art polish mani manicure Spellbound China Glaze Holiday Joy Collection Christmas red shimmer glitter ruby Cranberry Splash color swatch review

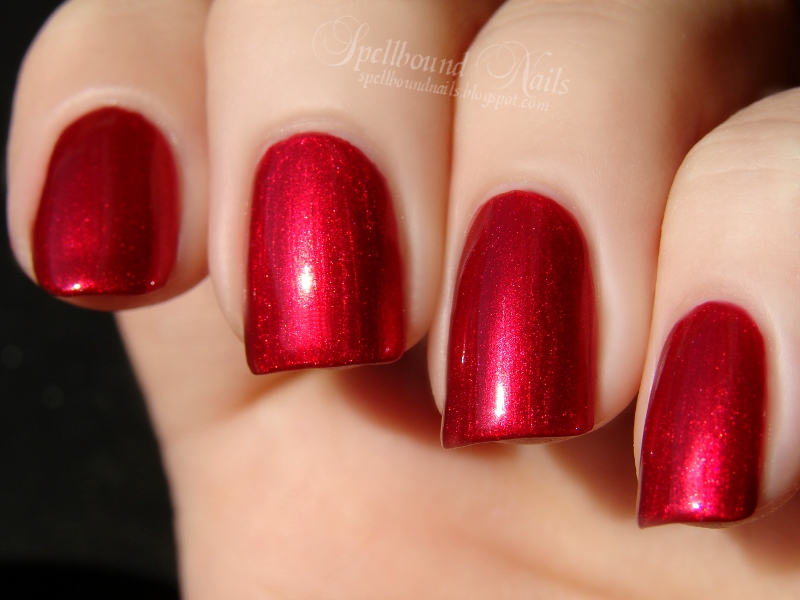
Meet Cranberry Splash, an amazingly beautiful ruby red shimmer. This is two coats of Cranberry Splash, picture taken in the shade. In some lights this polish looks almost liquid on the nails. Its shine is so intense and gorgeous.

nails nailart nail art polish mani manicure Spellbound China Glaze Holiday Joy Collection Christmas red shimmer glitter ruby Cranberry Splash color swatch review

This picture was taken in my lightbox. Polishes like Cranberry Splash, Christmas red with shimmer, are fairly common additions to most holiday collections. However, I find China Glaze has captured the most perfect shade of shimmery red for the holiday season.

nails nailart nail art polish mani manicure Spellbound China Glaze Holiday Joy Collection Christmas red shimmer glitter ruby Cranberry Splash color swatch review

This picture, taken in full sunlight, shows the wonderful shimmery side of Cranberry Splash.

Application was nearly perfect. It went on very smoothly and was easy to control. I find most red polishes have a messy application but Cranberry Splash needed next to no cleanup. There were a few streaks when I wasn't careful enough with the brush, but nothing too noticeable. I simply had to slow down a bit and apply from one side of the nail to the other instead of starting in the middle. This put a stop to any streaking and left behind a perfect finish. A top coat sealed it and gave it a shiny gleam.

All in all, China Glaze Cranberry Splash is a striking polish and will make a lovely addition to your nail polish collection. And just think how beautiful this color will look against some snow or in the presence of a lit and decorated tree during any holiday celebrations.


I'm attempting to start giving better, more thorough reviews instead of my usual 'it's pretty; go buy it'. I'm more than open to ideas on what a good review should include. If there's something you always look for in a review let me know and I'll try to include it in my upcoming reviews. Thank you!

Monday, 3 December 2012

I am finally going to begin posting the swatches for the China Glaze Holiday Joy Collection. I don't own the full collection, but you'll be seeing more than a few of the glitters.

nails nailart nail art polish mani manicure Spellbound color swatch China Glaze Holiday Joy Collection Christmas metallic Blue Bells Ring shimmer silver glitter

First up is Blue Bells Ring, an icy metallic blue. This is two coats, but Blue Bells Ring is a very opaque polish. I definitely could have gotten away wearing just one coat. 

nails nailart nail art polish mani manicure Spellbound color swatch China Glaze Holiday Joy Collection Christmas metallic Blue Bells Ring shimmer silver glitter

I was really pleased with how well this polish went on. It has a super smooth application. It didn't streak or turn gooey while I was applying. It also came off really easily. Be extra careful with any cleanup because the blue comes off first, leaving behind the silver metallic shimmer. That only took a few extra swipes to get up, but you can see near the cuticle of my pinky finger what happens when you get too close to the polish during cleanup.

The only problem I had, big or small, was staining! The blue, once it came in contact with my polish remover, went everywhere. It got all over my hands and fingers and it took an extra cotton ball per hand to get off. It's not a huge con when weighed against so many pros, but I will say don't remove this polish while wearing or even while you're near anything expensive or fancy.

Sunday, 2 December 2012

Holy moly, it's nearly Christmas! Have you bought all your Christmas Presents yet? I've still got quite a few people to buy for, I think a bit of online shopping is in need! I wanted to share with you some new products I've added to the Moonie shop recently. If you have no idea what 'Moonie' is, you're missing out! Have a little read of this post as it explains everything.

Firstly, I've designed a little santa Neil! Perfecting for popping on the Christmas tree. Retails for �2.99 *FREE postage this month.
'Brand new for Christmas 2012. Forget fairies and gold stars,your Christmas tree needs a Neil. 
Lovingly hand crafted from brown jute and felt.'

Next are the new limited edition Christmas Moonies (�6.99), which would make the cutest gift for a skincare lover. It's such a unique, handmade beauty gift - suitable for all ages and skin types.
'Here at Moonie, we think Christmas should be beautifully simple. That's why we've been busy lovingly hand-making some very special Christmas Moonies.
Each Pack contains three natural, un-bleached Moonies which are then carefully hand-wrapped in brown paper, stamped with our exclusive 'Neil' design. Includes a limited edition Christmas Neil adding a festive touch to a perfectly packaged Present.
Moonies are suitable for all ages and skin types making them the ideal Christmas gift.'

I wanted to jazz up the packaging so I designed a Neil stamp and printed it onto brown paper!


 That's everything, happy seasonal shopping! Does anyone else think buying presents for others is the best bit? Make sure your cool enough to follow Neil on twitter here so your the first to know about any special offers or giveaways(hint,hint).
Would love to hear your thoughts on the 2012 Christmas range...View the online shop now :)


Go on. Give someone special a nice face this Christmas.

Friday, 30 November 2012

Today I have another glitter swatch. And I thought, why not start the holiday posts early? This is Faceted from the Sinful Colors Holiday Shimmers Collection.

nails nailart nail art polish mani manicure Spellbound Sinful Colors Color Swatch Faceted glitter bar shimmer Holiday Shimmers collection purple iridescent Wet n Wild On a Trip

I used two very thin coats of Faceted over Wet n Wild On a Trip. I'm not usually a big fan of bar glitter but I love this. It's just the right amount of bar to shimmer.

nails nailart nail art polish mani manicure Spellbound Sinful Colors Color Swatch Faceted glitter bar shimmer Holiday Shimmers collection purple iridescent Wet n Wild On a Trip

Add some character to this mani by doing the first coat of glitter normally and the second with a few side to side swipes. This will turn the bar glitter so it's not all going in the same direction.

nails nailart nail art polish mani manicure Spellbound Sinful Colors Color Swatch Faceted glitter bar shimmer Holiday Shimmers collection purple iridescent Wet n Wild On a Trip bottle

I didn't manage to get any really great pictures of this polish on my nails so here's a picture of the bottle. This glitter is definitely in my Top 5 ... maybe even in my Top 3.

Thursday, 29 November 2012

I'm really sorry for such a late night post guys, but I am so behind on picture editing. Still, I just couldn't put this post off another day. I entered into a Facebook flash giveaway from the Daily Lacquer last week totally not expecting anything, but I won! As one of three winners, I got to choose one bottle of Daily Lacquer's nail polish. Beyond exciting!! I decided to take a chance and ask for Maple Syrup from what was the then upcoming Buddy the Elf Collection. This collection is now out and selling like wildfire along with her Sailor Moon inspired The Lovely Moon Collection and The Holo-Day Lovelies Collection. She totally deserves some major kudos!

nails nailart nail art polish mani manicure Spellbound Maple Syrup Buddy the Elf Collection Daily Lacquer Lacquerista brown bronze gold orange red glitter Indie black Sally Hansen China Glaze green flash giveaway winner Holy Day Holy-Day Chocolate Creme

I can't compete with the awesomeness of Daily Lacquer's bottle photos, but I gave it a shot. I love these bottles. They are just the perfect fit-in-your-hand bottles, and they look pretty too! Made even prettier by that cute glued on bow. What's better than such a personal touch to every bottle?? You just don't get that from big name brands.

nails nailart nail art polish mani manicure Spellbound Maple Syrup Buddy the Elf Collection Daily Lacquer Lacquerista brown bronze gold orange red glitter Indie black Sally Hansen China Glaze green flash giveaway winner Holy Day Holy-Day Chocolate Creme

My first use of this beautiful brown/bronze/gold glitter was over China Glaze Holly-Day. This combination is such a rustic Christmas combo.

nails nailart nail art polish mani manicure Spellbound Maple Syrup Buddy the Elf Collection Daily Lacquer Lacquerista brown bronze gold orange red glitter Indie black Sally Hansen China Glaze green flash giveaway winner Holy Day Holy-Day Chocolate Creme

My next choice was brown. I used Sally Hansen Chocolate Creme. It went on a lot darker with two coats than it looked in the bottle. In the bottle it was a gorgeous chocolatey brown. On my nail it turned black.

However, this color change was a good thing. It shows just what a chameleon Maple Syrup truly is, because it didn't get lost in such a dark color! It actually spiced it up. In my opinion, this glitter can go over anything and look amazing.

Did I mention this is my first Indie polish? I'm happy to say all the hype is well deserved. Maple Syrup went on smoothly. It wasn't thick or gooey and had no overpowering polish scent like a lot of big name brands. The glitter applied really easily. I didn't need to dig at all for the larger glitters. And using two coats of glue before my base coat made removing the glitter a snap ... or rather a peel. :)

Wednesday, 28 November 2012

It's Wednesday again, and you know what that means�another ABC Challenge mani.

L is for ... Lemur Catta aka the Ring-Tailed Lemur!


nails nailart nail art polish mani manicure Spellbound ABC Challenge hand drawn painted L is for Lemur Catta Ring Tailed Ring-Tailed animals primate tail stripes black white green gold orange

I think lemurs are some of the most adorably weird creatures. I think of them as a combination of a koala, a cat, and a dog. Yes, that's silly of me. But they have the furry fluffy coloring of a koala, the slinky graceful body of a cat complete with long twitchy tail and there's something oddly reminiscent of a dog in their face. I think it's the long muzzle-like nose and the big expressive eyes. Look through some pics of ring-tailed lemurs and tell me I'm not right!


nails nailart nail art polish mani manicure Spellbound ABC Challenge hand drawn painted L is for Lemur Catta Ring Tailed Ring-Tailed animals primate tail stripes black white green gold orange

I decided on a green background for these nails. When a lemur isn't in the trees, they're usually bouncing around in the grass. Green seemed like a good idea. I used two coats of Sinful Colors Exotic Green then mixed it with a little white and used my eyeshadow applicator to dab on the lighter green. You know how I love my texturing. :) The rest, lemur face and tail, were all hand drawn.