Showing posts with label White. Show all posts

Tuesday, 24 June 2014

It's collection time again!! This time I take inspiration from the upcoming 4th of July and the national anthem, The Star Spangled Banner, to bring you the ultimate Americana Collection. :)

Available on:


This collection has a little of everything. 2 glitter toppers, 2 shimmered holographics in red and blue, and a creamy white crelly with red and blue glitter.


And did I mention how amazing they look together? I used all 5 to create this amazing mismatched mani - perfect for any patriotic holiday. It is seriously easy too! This is 2 thin coats of Star Spangled on my middle fingers, 3 thin coats of Rockets Red Glare and Twilight's Last Gleaming with one thin coat of Home of the Brave and Bombs Bursting in Air over each respectively.

Stick around to get a look at each polish. :)


Twilight's Last Gleaming is a blue holographic with a chunky blue shimmer. It dries to a matte like finish so a top coat is a must to really bring life back.


Bombs Bursting in Air is one of those very simple polishes that manages to be something amazing! It's a mix of red, white, and blue stars and bar glitter with a dose of rainbow colored shimmer. I am reminded of fireworks exploding in a night sky every time I look at this. Shown here over Carbon Copy from The Neutrals creme collection.


And here is a close-up of how it looks over Twilight's Last Gleaming. That shimmer is just to die for!!


Star Spangled is a creamy white crelly with red and blue hexes and stars that is just sheer enough to showcase every piece of glitter. Shown here is 2 thin coats. The key is keeping your layers thin so you show glimpses of the previous layers glitter. :)


This may look familiar to those of you who have been with me from the start. This is the reformulated Miss 'Merica that was tucked into orders around the 4th of July last year. Now going by Home of the Brave, this polish is a perfect fit for the Americana Collection. It's a mix of red, white, and blue glitter with blue stars. It adds a patriotic touch to any polish. Shown over Hearthstone from The Darks creme collection.


Last but no where near least is Rockets Red Glare. This one is so hard to photograph, and I really didn't manage to capture the true awesomeness of this polish. It is a red holographic with a fine red shimmer. I direct your attention to the mismatched mani at the top of this post as it really shows a lot more of its shimmer and shine in that pic. This polish also dries to a matte like finish so a top coat will really help add shine and sparkle. :)

If you stuck around through the whole post - congrats and I hope you enjoyed the Americana Collection. Do you have a favorite from this collection?

And here's a bit of real life news if you stuck around. One of my nieces just turned 16 yesterday. Where does the time go?? For the first few years of this little girl's life I helped raise her ... so I'm really feeling old. 


Until next time,
? Ashley

Thursday, 19 December 2013

Hello lovelies! Can you believe it's already less than a week until Christmas?? I feel like it was just last week that it was months and months from Christmas. Still, the Christmas spirit seems to have hit me hard ... well, hit me with nail art ideas because my house still isn't decorated and I have done less than no Christmas shopping.

And speaking of nail art ideas ... I think I'm a little obsessed with candy cane stripes. I seriously just want to keep these on until after Christmas; I love them so much!


These are actually really simple to do but there's a lot of waiting involved because the stripes are done with tape and the white polish has to be completely dry before you can start. If you don't wait for it to dry it will dent if you're lucky or ruin all your work at worst.


I think I'm also developing an obsession with OPI The Spy Who Loved Me. It is such a lovely shade of shimmery red and has such wonderful coverage. It also makes perfect candy cane stripes ... and holly berries!

Well, I think that's just about it. I hope you enjoyed yet another of my Christmas manis. :)

Until next time,
- Ashley

*A huge congratulations to Ariel of Lacquer: The Best Medicine for winning my Season of Giving Giveaway!! Her prize is already in the mail. :)

Looking for more holiday manis? Take a look at these!!

Wednesday, 3 July 2013

Hello everyone!! It's been forever since I posted anything. I knew running a nail polish business was going to take time, but I guess I never realized just how much of my blogging time it would eat into. I'm working really hard to keep up with orders, restocks, and developing new releases. Any free time I manage to grasp is spent storing up nail art and swatches so I can start posting again - hopefully within the next few months.

nail art Spellbound Nails Patriotic 4th of July red white blue stripes stars glitter America Independence Day

My patriotic nail art has been getting a ton of stardom lately. My nails can even be found in the July issue of People StyleWatch magazine! If you don't have a subscription to this magazine I recommend getting one. It's one of the best magazines I've read in a long time! I didn't have to search and skim, skipping large portions of the magazine, because every page had something interesting to me.

Spellbound Nails People Style Watch StyleWatch patriotic 4th of July Independence Day red white blue

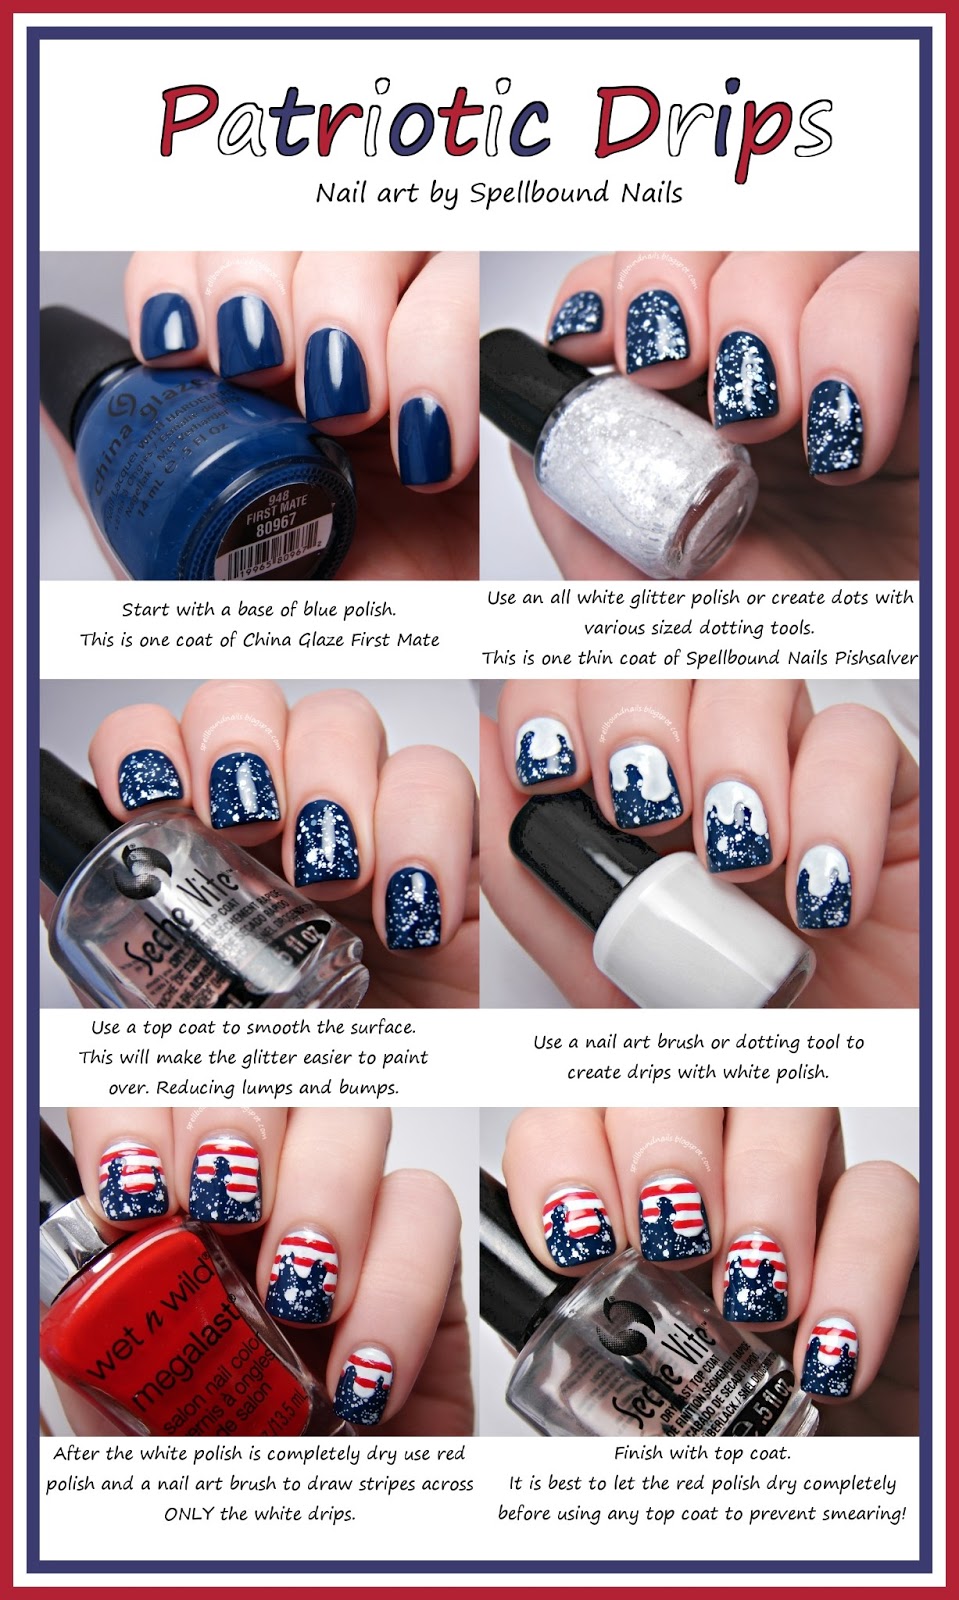
Now, onto the nails!!! With all that interest for my patriotic nails I decided to try something different. I won't claim that I created this - someone, somewhere has probably done this before - but I will say it is something I have never seen before! I would love to see your nails if you decide to try the tutorial, so don't be scared to send them to me. I don't bite. Promise!! :)

Right click and open in a new tab if you're having trouble reading the tutorial.

Patriotic Drips nail art Tutorial Spellbound Nails red white blue stripes glitter America Independence Day 4th of July

That's it for now. For those who don't follow me on Facebook but enjoy my polish I will be having a big restock, complete with a ton of NEW polishes and the return of those sold out polishes some of you may be waiting for! Head over to my Etsy shop tomorrow to see what I've come up with. Hope to see ya there. :)

Thursday, 7 March 2013

And so ends the ABC Challenge. I am terribly sad to see this challenge over. I almost want to start all over again because there are so many letters that I had multiple nail art ideas for. Take Z for example. There's zebras, zombies, and zigzags and the one I went with: 

Z is for ... Zippers

nails nailart nail art mani manicure polish Spellbound Lacquer ABC Challenge Z is for Zipper Zippers tutorial Shimmer Polish Mary black silver white red China Glaze Adventure Red-y L.A. LA Colors Circuits Energy Source Pure Ice Silver Mercedes glitter unzipped

I did this design completely backwards. I was working on swatching Shimmer Polish (swatches coming next week) when I was hit with the idea of zippers opening up to reveal Mary in all it's glittery glory.

I think it turned out pretty great considering I had to draw everything around that small V of Mary you see. To learn how to do a traditional zipper nail and not my backwards version you should definitely check out this picture tutorial found on Beautylish.

Will any of you be joining me for the Inspired by Time Periods Challenge??

Wednesday, 6 March 2013

I am so sad to see the ABC Challenge end. Especially since I am running behind. Still, I'm looking forward to the start of the new nail art challenge: Inspired by Time Periods. This challenge will be hosted in the same group as the ABC Challenge so don't think you're in the wrong place when you click the link! Still, until then, I have Y and Z left to do. Thankfully, this post takes care of Y.

Y is for ... Cracked Eggs and Dripping Yolk.

nails nailart nail art polish mani manicure Spellboud Lacquer ABC Challenge Y is for Cracked Eggs and Dripping Yolk texture sponge L.A. LA Colors White NYC New York Color Matte Me Crazy Sally Hansen Lightening Sun Kissed Seche Vite

I really wanted to finish this challenge the way I started ... by doing the unusual and being different. So I went with yolk.

nails nailart nail art polish mani manicure Spellbound Lacquer ABC Challenge Y is for Cracked Eggs and Dripping Yolk texture sponge L.A. LA Colors White NYC New York Color Matte Me Crazy Sally Hansen Lightening Sun Kissed Seche Vite

I started with two coats of L.A. Colors Energy Source and put a coat of NYC Matte Me Crazy over it to give it a very awesome smoothly matte look. I think this alone would be a totally wearable look!

nails nailart nail art polish mani manicure Spellbound Lacquer ABC Challenge Y is for Cracked Eggs and Dripping Yolk texture sponge L.A. LA Colors White NYC New York Color Matte Me Crazy Sally Hansen Lightening Sun Kissed Seche Vite

Still, we all know eggs aren't really smooth. They're kind of speckled and dimpled if you look close enough. So I took a piece of makeup sponge and dabbed on a bit more white. I know! So much different from my usual eyeshadow applicator.

nails nailart nail art polish mani manicure Spellbound Lacquer ABC Challenge Y is for Cracked Eggs and Dripping Yolk texture sponge L.A. LA Colors White NYC New York Color Matte Me Crazy Sally Hansen Lightening Sun Kissed Seche Vite

After that, I drew on the egg yolk drips with Sally Hansen Lightening and outlined them with a mix of Lightening and Sally Hansen Sun Kissed. I kinda wish I had added a bit of fake light reflection with this mixture too, but I really like the finished look. To make the yolk really shiny and keep the matte look of the egg I actually used a nail art brush to put Seche Vite on just the drips.

Thursday, 14 February 2013

Happy Valentine's Day!!! Welcome to the last Valentine's Day manicure of 2013 � Love Letters.


nails nail art nailart mani manicure polish Spellbound Lacquer holiday Valentine's Day Valentine Love Letters Newspaper newsprint envelopes envelope hearts heart stickers red white black LA Colors Energy Source L.A. Petities Night fun cute sweet lovely

I started with a base of LA Colors Energy Source. This is the best white I've found to date. It can be bought in most Dollar Stores at a great price and it takes a really, really long time to turn thick in the bottle. I used a nail art brush and Petites Night to create the envelopes, sealed them with top coat, and topped with a red heart sticker. The accent nail is a simple newspaper nail. I used the wedding announcements section of the newspaper. :)


nails nail art nailart mani manicure polish Spellbound Lacquer holiday Valentine's Day Valentine Love Letters Newspaper newsprint envelopes envelope hearts heart stickers red white black LA Colors Energy Source L.A. Petities Night fun cute sweet lovely

Here is what the mani looks like without the heart stickers. You could certainly keep them like this, use heart rhinestones, or even just draw the hearts on with polish if you don't have stickers or rhinestones.

Have trouble creating newspaper nails? Don't do them on completely dry nails. Wait until your nails are almost dry before dipping your nails or the newspaper into rubbing alcohol and applying to your nails. You want your nails to be at that point where they're dry to the touch but applying any pressure will leave fingerprints. This degree of 'wetness' will soak up the newspaper ink much better than dry nails. Be sure to apply even pressure across your entire nail or you'll end up with patchy newsprint. If you do have a place on your nail that is blank simply line up another piece of newspaper � being as exact in lining it up as possible, lightly dip a finger of the other hand in alcohol, and use it to hold the newspaper onto the blank spot.

Wednesday, 13 February 2013

Hello everyone and welcome to another ABC Challenge post! This week we're up to the letter W. Coming up with words to use for each letter and then creating a nail art design for that word is harder than it sounds! My mind goes blank every week, so I usually scroll through dictionary sites to find my word of the week. I thought there was absolutely nothing to do this week that I could then link to Valentine's Day, but I finally came up with something. And it has no pink!!

W is for ... Wings of Love.


nails nailart nail art polish mani manicure Spellbound Lacquer ABC Challenge letter W is for Wings of Love bird cage birdcage caged bird love cursive flying fly away heart hearts black white LA Colors Energy Source Petites Night elegant sweet holiday Valentine's Day design

I have wanted to do a caged bird mani forever! And I completely and totally adore how this one turned out!! I started with 3 coats of LA Colors Energy Source. More coats than I usually use, but since so much of the white was going to show I didn't want any chance of this being sheer or patchy. The black is Petites Night. I tried to keep everything connected between nails. The open birdcage, the cursive love, and the bird all leading to the heart. 


nails nailart nail art polish mani manicure Spellbound Lacquer ABC Challenge letter W is for Wings of Love bird cage birdcage caged bird love cursive flying fly away heart hearts black white LA Colors Energy Source Petites Night elegant sweet holiday Valentine's Day design

I love this mani so much that I couldn't seem to stop taking pictures. I tried to choose one from every angle so you can get the full effect.


nails nailart nail art polish mani manicure Spellbound Lacquer ABC Challenge letter W is for Wings of Love bird cage birdcage caged bird love cursive flying fly away heart hearts black white LA Colors Energy Source Petites Night elegant sweet holiday Valentine's Day design


nails nailart nail art polish mani manicure Spellbound Lacquer ABC Challenge letter W is for Wings of Love bird cage birdcage caged bird love cursive flying fly away heart hearts black white LA Colors Energy Source Petites Night elegant sweet holiday Valentine's Day design


nails nailart nail art polish mani manicure Spellbound Lacquer ABC Challenge letter W is for Wings of Love bird cage birdcage caged bird love cursive flying fly away heart hearts black white LA Colors Energy Source Petites Night elegant sweet holiday Valentine's Day design

I actually sacrificed an old nail art brush to do this mani. I couldn't get the lines small and delicate enough for the birdcage and the cursive love with the brushes I have, so I cut some bristles off an old brush to make it thinner! A great use for old brushes and cheaper than buying a thinner brush!!

It looks intricate and elegant, but is actually pretty simple when you break it down by nail. I found the hardest part is actually the birdcage, at least for me. Don't try to twist your hand around to do it right-side-up � this will just make your hands shaky and it's harder/messier to do an 'n' shape with nail polish; it's so much easier to leave your hand pointed straight away from you and just create a U on your nail. Create a smaller U inside that making sure the bottom of your u's touch/overlap and put a line down the middle. Add a line across the bottom, a handle at the top, and an open door on the side.

I really hope you enjoy this mani as much as I do. Check back tomorrow for the last Valentine's Day mani.

Wednesday, 6 February 2013

Is it Wednesday already?? This week is going way too fast! Still, it is Wednesday and you know what that means: ABC Challenge nail art. Can you believe we're up to the letter V already?

V is for ... Vampire's Valentine.

nails nailart nail art polish mani manicure Spellbound Lacquer ABC Challenge holiday Valentine's Day Anti-Valentine's Day V-Day sunbeams Vampire's Vampire starburst tape taping taped blood drips drip heart pink white black red L.A. Colors Energy Source Circuits Sally Hansen Pink Blink Wet n Wild I Red A Good Book NYC New York Color Lincoln Center Venique Runway Sparkle glitter shimmer

I loved last year's Anti-Valentine's Day nails so much that I decided to use it as inspiration for this mani. Honestly, I really can't believe how far I've come in a year.

nails nailart nail art polish mani manicure Spellbound Lacquer ABC Challenge holiday Valentine's Day Anti-Valentine's Day V-Day sunbeams Vampire's Vampire starburst tape taping taped blood drips drip heart pink white black red L.A. Colors Energy Source Circuits Sally Hansen Pink Blink Wet n Wild I Red A Good Book NYC New York Color Lincoln Center Venique Runway Sparkle glitter shimmer

I loved the entire design of this mani, every step taken to create them, so I took many pictures! A base of black, some tape, and some white polish created this star-burst design.

nails nailart nail art polish mani manicure Spellbound Lacquer ABC Challenge holiday Valentine's Day Anti-Valentine's Day V-Day sunbeams Vampire's Vampire starburst tape taping taped blood drips drip heart pink white black red L.A. Colors Energy Source Circuits Sally Hansen Pink Blink Wet n Wild I Red A Good Book NYC New York Color Lincoln Center Venique Runway Sparkle glitter shimmer

I used white polish to create a heart on my index nail. The white creates a barrier over the black; this means you don't need to use a ton of pink to cover the black. It also creates a very pretty border around your pink heart if you make it slightly smaller than your white heart. This alone would make for a gorgeous Valentine's Day mani!! You could even create hearts on all your nails instead of just as an accent or use red for the heart to make it really stand out.

nails nailart nail art polish mani manicure Spellbound Lacquer ABC Challenge holiday Valentine's Day Anti-Valentine's Day V-Day sunbeams Vampire's Vampire starburst tape taping taped blood drips drip heart pink white black red L.A. Colors Energy Source Circuits Sally Hansen Pink Blink Wet n Wild I Red A Good Book NYC New York Color Lincoln Center Venique Runway Sparkle glitter shimmer

Since I was going to create bleeding fang marks on my heart I knew I couldn't use red. :) The bleeding marks add depth and give these nails a nearly 3-D look�all a pretty illusion of course. With the dark fang marks, the bright red blood, and the white outline, doesn't it look like the heart is really bleeding?

nails nailart nail art polish mani manicure Spellbound Lacquer ABC Challenge holiday Valentine's Day Anti-Valentine's Day V-Day sunbeams Vampire's Vampire starburst tape taping taped blood drips drip heart pink white black red L.A. Colors Energy Source Circuits Sally Hansen Pink Blink Wet n Wild I Red A Good Book NYC New York Color Lincoln Center Venique Runway Sparkle glitter shimmer

Finally, I created white outlined blood on the tips of my nails. I added a small amount of Venique Runway Sparkle over all of the blood. Sadly, I couldn't seem to get a good picture with the actual sparkle.

So, which are you this Valentine's Day: hearts and roses or vampire bites? Will you be rolling out the Anti-Valentine's Day red carpet?

Friday, 1 February 2013

Welcome to the first post of the Blogs to Love Friday linkup. I was so excited when I first heard of this linkup and I'm even more excited now that it's time to share my favorite posts I read this week. But first ... if you want to join this linkup being hosted by My Beautiful, Crazy Life and Mrs. Monologues read this post and add this button to your posts.


Now onto some of my favorite posts of this week. They may not have been posted this week, but I did find them and read them this week.
  • These Mattified Splatter Nails by modnails may not have been posted this week, but I did find it this week. Be sure to check out her other nails because they are all amazingly awesome!!
  • I use this Coconut Banana Bliss Smoothie recipe almost daily so that has to count, right? It doesn't really come from a blog. I found it on Pinterest though, which is kind of like a blog, lol. I made two very simple changes to the recipe: substituting the coconut oil with coconut water and the Sustain packet for 1 tbsp of yogurt.
  • I look forward to every new post by Sensible Stylista and her newest outfit post has me wanting to rush out and buy some printed skinny jeans. Seriously? Her every post has me wanting to rush out and buy something! I know some of these things won't look good on me, but she makes them look so great that I want them anyway!
  • There are many things to love about The Freckled Fox: her wonderful fashion sense, her adorable crafts, her yummy looking food, or even her amazing photos plus much, much more. However, I adore The Freckled Fox for her hair tutorials! The one I think most deserves sharing is the Posh Faux Hawk. OMG, I am so in love with this look. What odd and slightly weird girl has never dreamed of having a Mohawk at one time in their lives? I certainly have. Almost went for it too, but the reality of having to wear it day in and day out hit hard. This is one hawk you can love and leave and love again!! Still, if faux hawks aren't your thing, I'm sure she'll have a tutorial that is more your style. 
  • This Double Saran Wrap Tutorial video by DullLikeGlitter is another very old post, but one I was super lucky to find on Preen.me this week! She also has a picture tutorial post on her blog. I tried this with light pink, white, and baby blue but can't wait for summer to try her bright red, yellow, and blue look!
nails nailart nail art polish mani manicure Spellbound Lacquer Valentine's Day V-Day Valentine Valentines saran wrap double tutorial Blogs to Love Friday linkup link up pink blue white Sally Hansen Pink Blink Color Fever petites Creme Blue

I keep trying to expand my V-Day mani ideas to incorporate colors other than white, pink, and red. I decided to substitute the often used red for blue in this one, and I think it still has all the makings of a good V-Day mani.

Thursday, 31 January 2013

Hello again everyone! I missed my post yesterday, but I have a really great excuse! It was mentioned in an answer to one of the 1st Blogiversary Giveaway entries that one of you wanted to see a Saran Wrap tutorial. There were more than a few of you who wanted to see video tutorials. So, I was spending all day yesterday editing my first real nail art video. I have a whole new level of respect for video bloggers!

nails nailart nail art polish mani manicure Spellbound Lacquer holiday Valentine's Day Valentine Valentines tutorial Sally Hansen Pink Blink white saran wrap tutorial video

Here are the nails I'll be showing you how to create in the video. This is a very easy mani to do, and with pink and white polish it is perfect for Valentine's Day!


I don't really have the set up or the best software/know-how for this, but I gave it my best shot. Enjoy!

Friday, 25 January 2013

I've been reading through the new giveaway entries for the 'what do you want to see on my blog this year' question and there were a few who wanted Valentine's Day nail art and a few who wanted holiday nail art so I decided to tie a V-Day mani into one of my swatches.

Update: This polish and the rest of the collection are now up for sale in my Etsy shop.


nails nailart nail art polish mani manicure Spellbound Lacquer Candy Coated Collection Candyland Candy Land Peppermint Pinwheels red white hex square glitter indie Sally Hansen Pink Blink Emerald City pink green Valentine's Day holiday Christmas

Peppermint Pinwheels was inspired by the Peppermint Forests of Candyland and their mesmerizing swirls of red and white.

nails nailart nail art polish mani manicure Spellbound Lacquer Candy Coated Collection Candyland Candy Land Peppermint Pinwheels red white hex square glitter indie Sally Hansen Pink Blink Emerald City pink green Valentine's Day holiday Christmas

With its red squares and white hexes, Peppermint Pinwheels is perfect for everyday wear. But, layer it over the right color and it works great for holidays like Christmas and Valentine's Day. :)

nails nailart nail art polish mani manicure Spellbound Lacquer Candy Coated Collection Candyland Candy Land Peppermint Pinwheels red white hex square glitter indie Sally Hansen Pink Blink Emerald City pink green Valentine's Day holiday Christmas

I layered two very thin coats of Peppermint Pinwheels over Sally Hansen Emerald City for a festive Christmas look (I did actually do this around Christmas). Sadly, I added a layer of top coat over Emerald City too soon and caused some pretty bad streaking.


nails nailart nail art polish mani manicure Spellbound Lacquer Candy Coated Collection Candyland Candy Land Peppermint Pinwheels red white hex square glitter indie Sally Hansen Pink Blink Emerald City pink green Valentine's Day holiday Christmas

For a simple Valentine's Day mani, I used a base of Sally Hansen Pink Blink and a thin coat of Peppermint Pinwheels. You may remember Pink Blink from my recent haul. I couldn't ask for a better color. I think this is the most perfect V-Day pink ... actually, I think this is the most perfect pink EVER!! This is definitely the color of pink I think of when I think of my favorite color. :)


nails nailart nail art polish mani manicure Spellbound Lacquer Candy Coated Collection Candyland Candy Land Peppermint Pinwheels red white hex square glitter indie Sally Hansen Pink Blink Emerald City pink green Valentine's Day holiday Christmas

Here is a second, thicker coat of Peppermint Pinwheels.

More Valentine's Day manis will be coming soon. There are definitely a few I have sketched up that I want to try. :)

So, what do you gals think of the Candy Coated Collection so far? Have a favorite?

Wednesday, 23 January 2013

I was really inspired this weekend; I've really missed doing nail art! This is actually a design I sketched up and then realized that it worked perfectly for S in the ABC Challenge.

S is for ... Spring Scene.

nails nailart nail art polish mani manicure Spellbound ABC Challenge S is for Spring Scene flowers roses texture green leaf leafy white picket fence pink yellow LA Colors Wet n Wild Candy-licious Sinful Colors Exotic Green Revlon Garden eyeshadow applicator sponge sponged sponging

You should be expecting this by now, but I used my eyeshadow applicators and Revlon Garden and Sinful Colors Exotic Green to create a leafy texture as a base. The white picket fence came next, hand drawn with a nail art brush, and the flowers were started with a dotting tool and finished with a nail art brush.

nails nailart nail art polish mani manicure Spellbound ABC Challenge S is for Spring Scene flowers roses texture green leaf leafy white picket fence pink yellow LA Colors Wet n Wild Candy-licious Sinful Colors Exotic Green Revlon Garden eyeshadow applicator sponge sponged sponging

With recent temperatures reaching into the single digits, I'm really longing for some flowers!

Be on the lookout tonight for another ABC Challenge mani as I finally get caught up. :)

Wednesday, 21 November 2012

Another day, another ABC Challenge post. With K words like ketchup and kazoo to choose from what was I going to do?? It actually took me a few days and much dictionary browsing to find something worthy of a mani. I bring you:

K is for ... Koi.


nails nailart nail art polish mani manicure Spellbound ABC Challenge K is for Koi fish saran wrap method face glitter shimmer Wet n Wild Club Havana orange Pure Ice Poker Face L.A. Colors White animal

I confess that when I started these nails I still had no idea how I was going to accomplish them. I knew I wanted to do koi and use Wet n Wild Club Havana and white to make a splotchy pattern but that was about it. After using two coats of Club Havana I decided to use saran wrap to dab on the white. This gave the koi a very unique swirling watery pattern. I also used the saran wrap to dab on some Pure Ice Poker Face, a sheer shimmery golden orange polish, in an attempt to create the glittery metallic looking scales of a koi.


nails nailart nail art polish mani manicure Spellbound ABC Challenge K is for Koi fish saran wrap method face glitter shimmer Wet n Wild Club Havana orange Pure Ice Poker Face L.A. Colors White animal

I'm sure you know by now how much I love my accent nails. So, no matter how unique these nails looked alone, I just had to add an open-mouthed, barbel-whiskered koi like fish face.

I will not be posting tomorrow as I will be spending the day with family. To those who celebrate, Happy Thanksgiving. To those who don't, have a great day anyway. Spend time with family and be thankful for all you have. :)

Wednesday, 14 November 2012

I'm pretty excited to share today's post with you. This is for the letter J in the ABC Challenge. J is for ... Jester.

nails nailart nail art polish mani manicure Spellbound ABC Challenge J is for Jester harlequin Harley Quinn Batman DC Comics black white red L.A. Colors Wet n Wild I Red a Good Book inspired Character

I was inspired by Harley Quinn from Batman. Harley has always been one of my favorite Batman characters even though I don't read the comics or watch the animated series. Harley Quinn, as suggested by the play with her name, is clad in a traditional harlequin jester outfit. I used L.A. Colors Black and White with Wet n Wild I Red a Good Book to create this look. No tape was used in the making of this mani. You're stunned, I know. ;)

You can look to the Wikipedia article on Harley Quinn if you'd like to see my inspiration.

Monday, 15 October 2012

Hello everyone. I'm in the midst of a cold and debated even doing a post today, but thanks to some help from the lovely women on my Facebook Page I was able to beat the sore throat and tone down the other symptoms of my cold. You can totally thank them for this post!

nails nailart nail art mani manicure Spellbound border borders roses stamping black white L.A. Colors tutorial elegant stamp stamped stamper

I've been waiting to post these nails for a while but there were always other posts that needed posted first. Well, I'm making today the right day. Lustrous Lacquer wanted to see border nails and this is what I came up with.

nails nailart nail art mani manicure Spellbound border borders roses stamping black white L.A. Colors tutorial elegant stamp stamped stamper

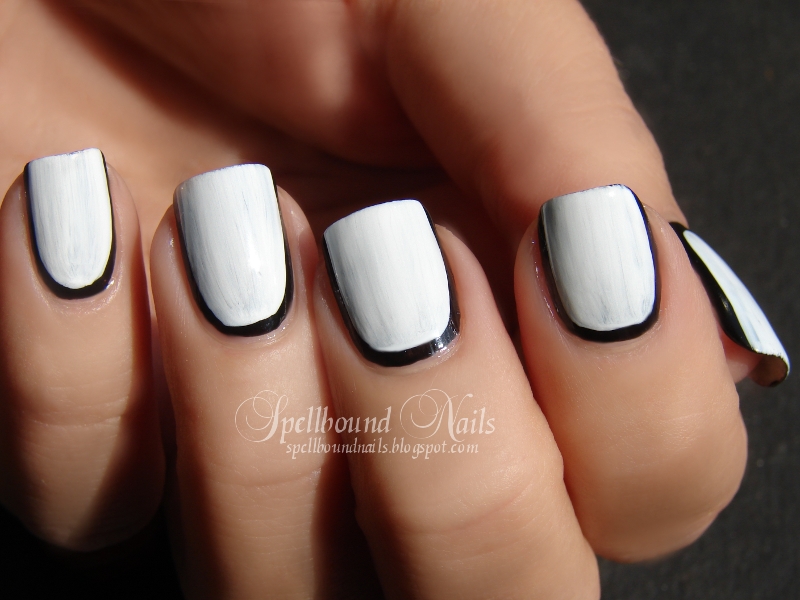
Start out with a base color. This will be the color of your borders. I used two coats of L.A. Colors Black. The next step is to paint your nails again, but leave a border around the edges. I found it easier to simply use the nail polish brush and be a little more careful around the edges, but you could use a nail art brush or a dotting tool to lay down an outline first if you don't feel comfortable jumping right in. You'll go back later and create a tip so don't worry if the tips look messy or the black shows on the edges. This picture shows one coat of L.A. Colors White. I used three coats to completely cover the black.

nails nailart nail art mani manicure Spellbound border borders roses stamping black white L.A. Colors tutorial elegant stamp stamped stamper

Here's where you complete the border by repainting the tips with your border color. Remember to round the edges of this tip to give a nice oval shape to the borders. I let this part of the mani dry completely and then put on a layer of top coat to give myself a nice stamping surface.

nails nailart nail art mani manicure Spellbound border borders roses stamping black white L.A. Colors tutorial elegant stamp stamped stamper

I used the rose image on m65 of my Born Pretty stamping plates. This is the one and only time I got such perfect images on all my nails. I'm sure it has something to do with the L.A. Colors polish I used. It's a very slow to dry polish, and I worked extra fast. Be sure to let your nails dry completely before stamping and be sure it's completely dry before using any top coat. With the black and white even the smallest amount of smudging or running will be immediately visible!

Tuesday, 2 October 2012

Hello everyone!! Since Halloween is my favorite holiday I decided to make October the best month yet. Or at least, I hope you guys will like my posts. What do you have to look forward to?

My usual Wednesday posts have been taken over by the ABC Challenge nail art so you should be seeing some pretty creative designs coming from that. I try to think outside the box with every letter.

I've also decided to take part in the Nail-Aween Nail Art Challenge. There are some really great designs, some I haven't tried before, that are part of this challenge. It's going to be awesome!

nails nailart nail art Spellbound mani manicure Halloween water marble October Nail-Aween Challenge black white LA Colors

What does all this mean for you? More posts!!! What does this mean for me? A really busy month. :)

The first design asked for in the Nail-Aween Challenge is water marble. I really dislike water marble. Don't get me wrong. The look of a finished water marble is really pretty (if you don't look too closely) but the time it takes is really not worth it, in my opinion. With this in mind, I debated doing a pin drag mani instead and calling it a 'without water-water marble', but I just couldn't do it. It would have felt like cheating.

nails nailart nail art Spellbound mani manicure Halloween water marble October Nail-Aween Challenge black white LA Colors

Water Marble is actually pretty simple, but it is also very time consuming. You start out by painting your nails with a base color. I used white. Next, you need a bowl of water. This water has to be filtered or bottled and it must be room temperature. I filled an old butter dish with bottled water and left it sit out overnight. By the time I was ready to start, it was the perfect temperature. What wasn't perfect was thinking I could use a butter dish. The inside was too glossy and the polish wouldn't attach to the sides. You think this would be a good thing but you need to stabilize the outer edge of your polish rings before you can start swirling designs. I finally managed to rig up this. I lined the butter dish with saran wrap and poured the water back in. The saran wrap held the polish perfectly and I had no problems creating swirls.

nails nailart nail art Spellbound mani manicure Halloween water marble October Nail-Aween Challenge black white LA Colors

After you set up your water, make sure you have all your supplies on hand. You want to be able to move from one step to the next without having to leave your work space. Work one finger at a time. Tape around your nail but don't get too close. Taping too close to the nail may stop the polish in the water from settling correctly. It's easier to clean up than to start all over. Once your nail is taped, start dropping your polish into your dish one drop at a time. Be careful not to overload the brush with polish. You only need one drop and an overload brush may drop two or three before you can control it. Keep dropping polish into the water until you get a tight bulls-eye pattern. If your polish isn't spreading you can give the dish a few quick taps against the side. Don't do this too harshly or you'll make a mess by splashing water and polish or create bubbles in your bulls-eye. How do I know? I did both.

Once you decide you have enough rings you'll need to attach them to your dish if they aren't already attached. Don't touch the outer ring! This ring will already be dry and touching it can ruin everything! Work from at least two rings in just to be safe. To create your swirls you can use almost anything sharp: a pin, a toothpick, the sharp end of a pencil (just know that the graphite may cause discoloration in the polish). I used an old nail art brush and found this worked even better than my attempts with a pin or a toothpick. You'll need to keep a napkin or paper towel on hand to keep your sharp object clean as you create swirls. Creating the swirls is up to you. Jump right in or spend a few moments trying to plan them out.

nails nailart nail art Spellbound mani manicure Halloween water marble October Nail-Aween Challenge black white LA Colors

Find a swirl you like and carefully sink your finger (nail down) through the polish and into the water. Keep your finger in the water! You need to clean the water of polish first or you'll ruin your design. I used my nail art brush and rolled it through my fingers while I moved it around the water. This rolling motion will gather the polish better than simply swishing it through the water. Rolling will literally roll the polish around the tip of your brush (or pin/toothpick/pencil). This is what you'll need your napkin for. Carefully remove your finger from the water. Don't blow on your nail or flail your hand through the air. Remove the tape around your nail. Carefully! You don't want to bump your nail and you also need to be aware that you'll be flinging water everywhere because there is certainly water caught in and around the tape. After that, pull your brush through the napkin/paper towel and move onto your other nails, repeating the process again and again. :)

nails nailart nail art Spellbound mani manicure Halloween water marble October Nail-Aween Challenge black white LA Colors

You'll come out with something like this and you'll quickly realize a few other reasons I dislike water marbling besides it being time consuming and a waste of polish. The first thing you'll notice are the bubbles you'll surly have. I'm sure more seasoned water marblers have learned tricks on how to prevent this, but I've found nothing I tried so far worked. Some things I tried made it bubble less and other just caused more bubbles. The other big reason? Polish has settled everywhere that wasn't taped. This means there is polish all over my cuticle and worse still, settled around my nail and under it too! No amount of cleaning will fix all of this. Some will be cleaned and the rest will flake off in a day or so, usually with a little help from some tweezers.

nails nailart nail art Spellbound mani manicure Halloween water marble October Nail-Aween Challenge black white LA Colors

You can see here that I cleaned them as best I could. I also added a layer of top coat. This top coat swiped the bubbles right off and left behind blank spots in the black and dents in the white. While I feel really accomplished for doing this for the Nail-Aween Challenge, and I love the swirls on my pinky and my thumb nails I think this is nail art best viewed from further away ... or just not done at all.

What do you think of water marbling? Have you mastered this art? Or, like me, do you find it a waste of time and polish?