Friday, 16 March 2012

Wow! Could this week have gone any faster?


Capitol Colours are here!! I wanted to have these swatches posted for you guys mid-week but it was just one thing after another! Sadly, I still have only three of the six polishes I want from this collection. I've checked most of the local shops, and they're all sold out. I think if I want them I'm going to have to splurge and order them online. I just hate paying shipping costs and then having to wait for them to arrive. I'm not good with waiting! However, if the other colors are anything like these three the collection is certainly worth the effort and extra money.


The first polish I have to show off is the one I was most interested in, oddly enough. This is Fast Track, a gorgeous beige/tan color chock full of gold shimmer. I'm the kind of girl made for bright colos so I'm not a fan of nudes, but I adore this polish. The shade is just different enough from other nudes to catch attention and the gold shimmer really makes it stand out in a crowd. Fast Track is one of a kind in my opinion.


3 Coats in Sunlight


Next up is Harvest Moon. I'm a bit unsure as to how to discribe this color except stunning. I've heard it described as a copper color, but I would go with more of a tawny bronze. Truthfully, it's only a slight shade different, but I think it better manages to capture the near orange tint that mixes with the copper. Harvest Moon is a hidden gem in this collection that puts me in mind of Autumn, pumpkins, and the golden orange of turning leaves. You know me with shimmering metallics; there's no question that I adore this, both formula and color.


2 Coats in Full Sun


Last, but not least, is Stone Cold. This color certainly brings to mind stone: caves and caverns with thick stone walls. It's dark grey bordering on black in some lights with a thick silver shimmer. This is a matte polish so the shimmer doesn't shine or really sparkle but mixes perfectly with the deeper, darker background. I manage to get my nails covered in one coat, but my coats tend to be a bit thicker than most people use. This polish starts to dry very quickly as the matte sets so work quickly if you don't want it pulling up with your brush.


1 Coat in Full Sun

Stone Cold Close-Up


Can I just say I am stunned and so very thankful to all you followers, new and old? You guys are amazing!!
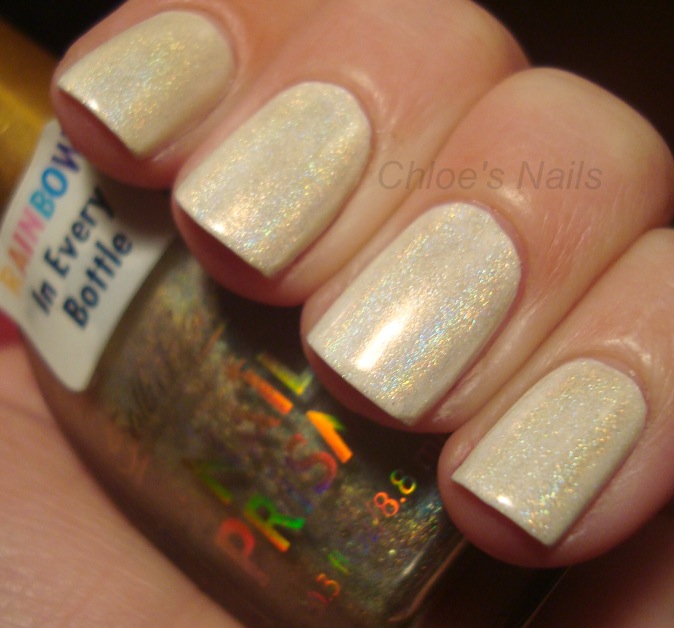
Morning!! I've been on the lookout for a bright while holo for a while now. I do have the Glitter Gals white holo, Light as a Feather, and although it was holo, I wanted it to be more in your face holo :P So I experimented a tad, and tried a little layering. It turned out alright, but def not as I hoped. The Sally Hansen Nail Prisms Diamond kind of turned the white a tad yellow.

I started with 2 coats of China Glaze White on White, and then added a coat of Sally Hansen Nail Prisms Diamond. I wish there was sun when I did this, so I could even see if that helped more. Maybe I shall try again one day.


Side note - I can't freaking wait!!! One week from now I will be enjoying my day off, and proabbaly still talking about just seeing the Hunger Games with Jack!!! Are any of you going to the midnight showing? I always said I would never go to one of those, mainly because of the crowds, but I just couldn't wait!

Thursday, 15 March 2012

Okay so I made a mistake, lol. Hey I'm human dang it. My previous post was NOT Kleancolor Black Chunky holo, it is actually Black Chunky Bluebell. So you guys were right, eeek. I'm so sorry. I just wanted to clear that up, there aren't two versions. I couldn't fix it earlier or correct myself because I can no longer access my blog at work :( Is it too late to call an early April Fools???? Ummm, got you good! Lol.
So a while ago, I purchased a set of Kleancolor polishes off of eBay, mainly just for this one, but as a set, I couldn't really beat the price :) I have yet to play with the others yet and really need to! Also, if you do not already know, let me warn you, Kleancolor polishes have a smell like no other, but it is bearable :)


Wednesday, 14 March 2012

I am a nosey person, love seeing people's collection/storage posts. I asked on twitter if anyone would be interested in seeing a post dedicated to just one brand, showing you the products I've tried. And you said yes! Collection 2000 was a brand that was requested the most. After sorting through my stash i organized my products and photographed them for you.

Collection 2000, recently re-brand to just 'Collection', is an affordable highstreet brand. I think lately the company has improved the quality and range of their products. The Lasting Perfection concealer went down well with so many bloggers and is a personal favourite of mine. A year ago they launched the 'Cream Puffs' which are uh-may-zing! Their Hot Looks nail varnishes are only �1.79 each and perfect if you fancy an on trend shade.


Products I would Recommend;
Lasting Perfection Concealer (need to repurchase this, my fav highstreet concealer)
Cream Puffs (great if your not really a big fan of lip products)
Hot Looks Nail Varnish (just check the brushes before buying as they can be dodgy sometimes) 

I know the answer to this question is going to be bad for my bank but...
What Collection 2000 products do you like? 

Also let me know what other products you would like to see my collection of - maybe nail/skincare/haircare/makeup? 
xx
Okay, so I had a post planned for yesterday, but I just ran out of time, and never got it ready :( OMG, can I just say this past weekend was so nice, that I spent as much time as I could outside with the fam and neighbors. It was so needed, and instantly boosted my spirits. So that is why I didn't post this weekend, and my week nights were filled with helping my daughter with math, or more so just word problems. I'm still not sleeping good, but I think my body is becoming used to it, because I don't feel as tired anymore. I'm not sure yet, if that's good or bad, lol. Oh well, on to the mani!

**UPDATE**
I did forget to mention, that I did apply 2 thick coats of SV after I used I'm a Material Girl to smooth it all out. It is a little bit of a top coat eater

Sharon, if you're reading this, I apologize, I know I told you I had a Kleancolor post, but that will be tomorrow, since I had THE perfect mani for Pink Wednesday!

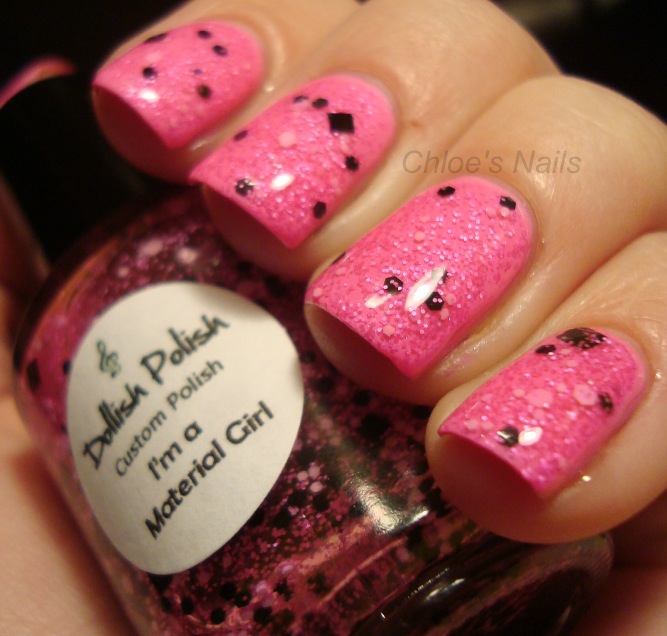
For this I started out with 2 coats of Sally Hansen Bubblegum Pink


I then did 2 coats of a polish I purchased from Dollish Polish on etsy, called I'm a Material Girl. This glitter really is so complex, and I love it! It is one of those glitters though, that needs that extra help with placement. More for the black pieces, but I'm 100% okay with that. It's worth it :)


Monday, 12 March 2012

Natural Light (Sunset)
Today's post is about my foray into using the new Kiss Nail Dress in Peplum. I was very excited to find them at one of my local Walmarts (even if I found Peplum instead of the one I covet, Gown). It was one I didn't visit often but since I was in the area that day I dropped in. Imagine my surprise to find these when neither of the other two Walmarts I visit had them! And for such a great price compared to Claire's Bling Nail Stickers or even to Sally Hansen Salon Effects polish strips!


Flash
Pros

  • Great designs in a variety of styles
  • Great price
  • 28 nail strips to fit both fingers and toes
  • Fairy easy to size since nail strips are on clear sheets
  • Very easy to apply and pretty quickly too
  • Strips can be cut down for other nail designs or even pieced together with other Kiss Nail Dress for an awesome effect
  • They look pretty great on and are certainly eye catching. Follow the 'do not's in the Cons, and they'll look even better.
  • If you find a gem situated on the edge of your nail, carefully file with the blue side of the provided file first. I found if I filed carefully enough I could 'cut' the gem with the file and leave half on my nail.

Natural Light (Sunlight)
My attempt at a top coat and you can see the Nail Dress on the pinky pulling up.
Cons

  • Peplum nail strips are hard to press smoothly onto nails since they are covered in gems.
  • Do NOT stretch the strips to make them fit your nail. They stretch back and leave bits of your nails bare.
  • Do NOT attempt to seal with a top coat. Believe me, the nail strips don't like this.
  • Nail Dress is pretty harsh on the nails of those easily bored (like me). Don't think you can put these on for a few hours or just a day and then take them off. Even peeling the stickers off slowly as recommended by the packaging made my nails start peeling in places.
  • Since you file off the tips of the strips the tips of your nails are bare. With Peplum, the 'polish' is black and the tips of your nails are easily seen.
  • The tips of your fingernails get a lot of use. More than you tend to realize. It's the reason you polish the tips. Nail strips get filed off and don't cover the tips. This leaves them very likely to start peeling up around the tips.

Natural Light (Sunlight)
Be careful not to stretch it over your nails; the Nail Dress stretches back to its original shape leaving the tips and sides of your nail bare.


Do the pros outweigh the cons? I don't know. I think it's something each person has to decide for themselves. I think if I ever stumble across Nail Dress in Gown I'll certainly pick it up like a giddy fangirl, but I also don't think I'll ever choose any other Nail Dress design.

Sunday, 11 March 2012

I went shopping yesterday with a $3 off coupon to my local drug store and came home with a mini haul. I also stopped in at Sally Beauty for their sale price on the China Glaze Hunger Games collection. They were nearly completely out of stock but I managed to snag Stone Cold, Harvest Moon, and Fast Track. Fast Track was the one I was dying for oddly enough. It's not usually a color I would go for but the swatches were gorgeous. I can say it's even more stunning in person! I'll have a swatch post sometime this week for these colors and hopefully more of my haul. Wanna see the awesomeness of my haul?? See that lacy box in the back? That's the prize I won in the Nails, Actually 50 follower giveaway! Must remember to send her a thank you when I get back from family Sunday tonight.


Flash


Natural Light
Enough about that. You'll see more this week. This post is about Diva Couture self adhesive lace tips. Can I just say how much I love these nail stickers? I picked them up by chance early last year at my local Dollar Store and hated them the first time I used them. I had no idea what I was doing since I had never used nail stickers before. I put them on all wrong and they only lasted a day, but they looked gorgeous while they were on. With that in mind I decided to give them another try, and my ability with these stickers improved greatly. The lace tips also come with 5 glittery stipping tapes which I've never used, so I can't give an opinion of them. I buy these simply for the lace.


Natural Light
They aren't all sunshine and light. Is any product ever without its flaws? You get 12 lace tips; this gives you a very limited amount of sizes. I always end up with small lines of my nails showing on either side. However, the stickers are clear so it's really not noticeable. If you find you can't stand it, I'm sure you can butcher the two unused and piece them together for full coverage. The last down side is that these stickers crinkle a bit when you put a top coat over them. You can't not put a top coat over them or they catch on various things and simply peel off. I've found I don't have as many problems if I spend a small amount of time making sure all stickers are firmly pressed down and attached to my nails before adding a top coat. Work from the bottom towards the end of your nail. I start with using the opposite (flat) end of my tweezers and rubbing in circles, pressing outwards. Then I follow with my fingers, pressing the extra sticker over the tips of my nails before taking my file and gently filing off the ends of the stickers. Work with your fingers again once the end is filed off and finish pressing the sticker firmly to the tips of your nails. Put the stickers on all of your nails and then go back through them and give them another smoothing with your fingers before adding your top coat.


Natural Light
I like to use these while giving my nails a break from heavy polish, so I do them very simply. One clear coat as a base coat, the stickers, and then a top coat. However, you could spice these up by using any color of nail polish; light colors would probably work best, but I'm happy to say Diva Couture also makes lace tips in white for over dark colors. I've also used these tips with rhinestones for a very pretty effect.


If you're looking for an elegant nail without all the fuss of actual lace this is definitely the thing to try!


Next post: Kiss Nail Dress in Peplum.

Friday, 9 March 2012


In honor of my finishing The Hunger Games trilogy and in anticipation of the first movie, I decided to do Hunger Games nail art. I think this is one of the only books I've ever read where I didn't prefer any one character over any other; I just plain liked them all: in various different ways, yes, but still ... I tip my imaginary hat to Suzanne Collins.


The first nail, the thumb, is the mockingjay of course. I mean, what else could possibly say Hunger Games better than the mockingjay? Not my best work, I admit. I'm guessing it looks more like a blob than a bird with an arrow if you don't know what you're looking for.


The index finger is to honor Katniss Everdeen, The Girl on Fire, one light shining gloriously in the dark of District 12 (and all of Panem). The flame, the dark surrounding it, and a little bit of coal using black crackle to show where she comes from.


Next is the one nail I desperately wanted to do but debated endlessly on just how to accomplish it. Even with my love and sorrow over Rue, I was left agonizing over what to do for her. I already had the mockingjay, but that was for the overall series. I could do an orchard tree but that didn't feel right either. Finally, I decided to follow Katniss and honor Rue with flowers. So, I tried covering the entire nail in nothing but flowers. I reworked this multiple times. I can't tell you how many times I had to use nail polish remover. Finally, I used a combination of stamping and a brush to fill the flowers in with different colors. The flowers cover the peephole into another world; one where Rue leaps through the trees like a bird with the whistles of her mockingjays singing that she's safe. Yeah, I'm a big ol' sap!


After that is the forest, stream, and the cave from the Arena. Again, it's not my best work, but I lost a good deal of canvas space. I haven't done a nail art design this intricate since I cut off a lot of my nail length. Still, I'm very pleased. Blue Year's Eve makes an absolutely stunning stream! All that bright blue glitter gleaming from the darker polish just speaks of hidden depths, and whether what lurks in those depths is good or bad will only be found out when you dip in a toe. I tried to add a muddy-ish, sandy bank and some odd rocks before it leads into the greanery of the forest. I'm pretty sure it was the other way around in the books: the forest leads into the barren stream riddled with a mess of rocks and the cave, but I couldn't see filling a whole nail with rocks.


Last but not least, I wanted to do something to encompass the violence of the Hunger Games. I knew I wanted blood, but wasn't sure in what way until I happened upon the trailer while searching out ideas. I saw the reaping of District 12, and when I saw the drab gray blues of their clothes (Katniss's horrific dress especially) I knew what I had to do. The blood spatter is done by straw as per a tutorial I found on Youtube. However, the original idea goes to thepolishaholic.com.


Not sure if anyone wants know this but I thought I would include it just in case. You can totally skip over this. :)


Polish Used
Thumb

  • Wet n Wild - Goldmine
  • Funky Fingers - Platinum Record
  • Petites - Bronze Baby
Index
  • L.A. Colors - Black Velvet
  • Pure Ice - Siren
  • Sally Hansen - Sun Kissed
  • Sally Hansen - Mellow Yellow
  • Funky Fingers - Black Scales
Middle
  • Sally Hansen - White On
  • Revlon - Tangerine
  • Sally Hansen- Sun Kissed
  • Sally Hansen - Mellow Yellow
  • Pure Ice - Siren
  • Borghese - Buon Viaggio Mauve
  • Sinful Colors - Beautiful Girl
  • Sinful Colors - Feeling Great
  • Bon Bons - Blue
Ring
  • Sally Hansen - Green with Envy
  • Sally Hansen - Emerald City
  • Pure Ice - Free Spirit
  • Funky Fingers - Platinum Record
  • Wet n Wild - Metallica
  • Sally Hansen - Wet Cement
  • L.A. Colors - Black Velvet
  • China Glaze - Blue Year's Eve
Pinky
  • Revlon - Cloud
  • Pure Ice - Siren

Thursday, 8 March 2012

Okay, so sorry everyone, I am still here. I've just been struggling with sleep the past 3 nights. I've never dealt with insomnia, or any kind of sleep issue, but I am now and it's wearing me down. I'm not sure why either. I would understand if I was stressed or changed anything in my life, but I haven't. I've even been trying to take Tylenol PM, which will usually knock my butt out, but that's not even working. So in the past 3 nights, I've added up a total of 6 hours sleep :( Yesterday, wow, I was a fun girl, lol. I was very lightheaded all day along with a headache on top of being exhausted. Poor Jack, even the delivery guy being late made me cry, lol. Thank goodness he can handle it so well, and not hold my sweet words and moods against me.

I have been doing manis though, and have pictures, but they haven't been cropped or watermarked, so I will try to get them up soon, but as of right now, I'm a zombie.

I hope you all are doing great!
XOXO
Erika