Showing posts with label Wet n Wild. Show all posts

Wednesday, 20 February 2013

Today is supposed to be my X nail art for the ABC Challenge, but I'm stumped on what to do for this letter. I'll think of something by next challenge ... hopefully. For now, check out the rainbow gradient I wore last weekend.

nails nailart nail art polish mani manicure Spellbound Lacquer fun cute sweet rainbow gradient eyeshadow applicator sponge sponged sponging red orange yellow green blue purple colorful Rimmel English Rose Sinful Colors Hazard Sally Hansen Lightening Green with Envy Wet n Wild I Need a Refresh-Mint On a Trip

I hate the claw, but it's pretty much the only position in nails that need to include the thumb. Some of you may remember the sideways rainbow gradient from my NOH8 nails. I wanted to try something different this time so I did them as a normal gradient. I found the lightest rainbow colors from my collection to use for this.

nails nailart nail art polish mani manicure Spellbound Lacquer fun cute sweet rainbow gradient eyeshadow applicator sponge sponged sponging red orange yellow green blue purple colorful

Here are my nails before clean-up. So messy!!! I usually tape around my nails before doing something this messy, but I forget. Isn't that the way things usually go? You only forget something that would speed things up when you're in a hurry!

nails nailart nail art polish mani manicure Spellbound Lacquer fun cute sweet rainbow gradient eyeshadow applicator sponge sponged sponging red orange yellow green blue purple colorful Rimmel English Rose Sinful Colors Hazard Sally Hansen Lightening Green with Envy Wet n Wild I Need a Refresh-Mint On a Trip Rimmel English Rose Sinful Colors Hazard Sally Hansen Lightening Green with Envy Wet n Wild I Need a Refresh-Mint On a Trip

I took this picture in the car. It was snowing so hard and then a little bit of sunlight peeked through, and I couldn't resist snapping a few pics. It's not up to my usual standard, but there's something I really like about this picture.

 Rimmel English Rose Sinful Colors Hazard Sally Hansen Lightening Green with Envy Wet n Wild I Need a Refresh-Mint On a Trip

I couldn't resist getting a picture of my cotton ball after I removed the gradient. I'm reminded of a clown's wig, lol.

Colors Used: Rimmel English Rose, Sinful Colors Hazard, Sally Hansen Lightening, Sally Hansen Green with Envy, Wet n Wild I Need A Refresh-Mint, Wet n Wild On a Trip

Tuesday, 29 January 2013

Hey everyone! Sorry about the non-nail art related posts yesterday. There was a bit of an emergency Sunday that left me with no time to edit and type up posts. So, I went with what I did have. I do really hope to see a few of you joining me in the Blogs to Love Friday linkup. That said, today's post really is nail art!!


nails nailart nail art polish mani manicure Spellbound holiday Valentine's Day Sugar Spun Gradient Sally Hansen Pink Blink Fuchsia Power Wet n Wild I Red A Good Book Sinful Colors Beautiful Girl L.A. Colors white red Energy Source

I have a few ideas for Valentine's Day nails and this was one of the first I thought of � spun sugar Valentine's Day nails done as a gradient.


nails nailart nail art polish mani manicure Spellbound holiday Valentine's Day Sugar Spun Gradient Sally Hansen Pink Blink Fuchsia Power Wet n Wild I Red A Good Book Sinful Colors Beautiful Girl L.A. Colors white red Energy Source

Spun sugar nails are really easy. They are a bit messy but the wispy strings make it easy to clean up. I started with a base of two coats L.A. Colors white. This is Energy Source now that L.A. Colors started naming their polishes. The next step is probably the hardest and it's not hard at all! It just takes a bit of patience. I started at the tips of my nails and worked up using Sally Hansen Pink Blink first. Put a drop or two of your first color on a piece of paper, using a pin or a dotting tool mix the polish until it's thick. You can speed this along by blowing on it as you stir. You can start as soon as it's thick enough to start forming strings when you lift the pin out of the polish. I didn't wait long enough with my red polish and got some drips instead of strings, so make sure it's thick enough not to drip.

Once strings start to form you'll need to get your nail very close to the thick polish. Lay your finger on it's side angled towards the polish if you're having trouble getting the strings on your nail. Use your pin or dotting tool to quickly but smoothly pull strings across your nails, doing one nail at a time.


nails nailart nail art polish mani manicure Spellbound holiday Valentine's Day Sugar Spun Gradient Sally Hansen Pink Blink Fuchsia Power Wet n Wild I Red A Good Book Sinful Colors Beautiful Girl L.A. Colors white red Energy Source

Continue doing the tips of each nail with Pink Blink. You may need to thicken more polish if you didn't start with enough or if it thickened too quickly. I used Sinful Colors Beautiful Girl next. I placed some of my strings over some of the Pink Blink strings to create a seamless fade of color. After Beautiful Girl, I used Sally Hansen Fuchsia Power and then finished with Wet n Wild I Red A Good Book.

Let the polish dry. It shouldn't take long! Then do a quick cleanup. I pinched off some of the wispy strings that were flying around my nails and then used some nail polish remover and a Nail Tee (a fancy pointed Q-tip) to clean up the rest.


nails nailart nail art polish mani manicure Spellbound holiday Valentine's Day Sugar Spun Gradient Sally Hansen Pink Blink Fuchsia Power Wet n Wild I Red A Good Book Sinful Colors Beautiful Girl L.A. Colors white red Energy Source

Add top coat if you like and admire your new mani. Take into consideration when deciding whether to use top coat or not that, while it will make your mani last longer, it will smooth all those strings you just worked so hard on. It will likely take more than one coat as this is a very thick mani. It may also cause some bubbling if you're not careful applying your top coat.

That said, I did use top coat, two coats ... and I did get one large bubble that popped while the top coat dried and left behind a spot bare of top coat. It's really not noticeable though, even in my close-up pictures. I did kind of miss the stringed look though.

Saturday, 26 January 2013

The only polish from this collection inspired by a character and not a location. Lollipop Princess was inspired by Princess Lolly, resident of the Lollipop Woods and princess of Candyland.

Update: This polish and the rest of the collection are now up for sale in my Etsy shop.
  
nails nailart nail art polish mani manicure Spellbound Nails Nail Lacquer Candy Coated Collection Color Swatch Candy Land Candyland inspired Lollipop Princess Lolly Woods glitter hot light pink purple yellow holo holographic Wet n Wild I Need A Refresh-Mint Revlon new Enchanting pastel LA Colors Black NYC New York Color Matte Me Crazy

Lollipop Princess has pink, purple, and yellow hex glitters. And, since every princess needs some bling, small purple holo glitters.


nails nailart nail art polish mani manicure Spellbound Nails Nail Lacquer Candy Coated Collection Color Swatch Candy Land Candyland inspired Lollipop Princess Lolly Woods glitter hot light pink purple yellow holo holographic Wet n Wild I Need A Refresh-Mint Revlon new Enchanting pastel LA Colors Black NYC New York Color Matte Me Crazy bling

I'm going to have to try to get some better pictures. The colors are slightly off in this close-up and in the bottle picture.

nails nailart nail art polish mani manicure Spellbound Nails Nail Lacquer Candy Coated Collection Color Swatch Candy Land Candyland inspired Lollipop Princess Lolly Woods glitter hot light pink purple yellow holo holographic Wet n Wild I Need A Refresh-Mint Revlon new Enchanting pastel LA Colors Black NYC New York Color Matte Me Crazy bling

Lollipop Princess over Wet n Wild I Need A Refresh-Mint.


nails nailart nail art polish mani manicure Spellbound Nails Nail Lacquer Candy Coated Collection Color Swatch Candy Land Candyland inspired Lollipop Princess Lolly Woods glitter hot light pink purple yellow holo holographic Wet n Wild I Need A Refresh-Mint Revlon new Enchanting pastel LA Colors Black NYC New York Color Matte Me Crazy bling

In an effort to really showcase the holographic glitter I layered one coat of Lollipop Princess over Revlon Enchanting with a black accent nail. I think I caught the holo at just the right angle and light to make it flare. Mostly I caught the bright blue flares but it also turns a white/purple and a bright pink. You can see one small flash of pink on my pinky nail.


nails nailart nail art polish mani manicure Spellbound Nails Nail Lacquer Candy Coated Collection Color Swatch Candy Land Candyland inspired Lollipop Princess Lolly Woods glitter hot light pink purple yellow holo holographic Wet n Wild I Need A Refresh-Mint Revlon new Enchanting pastel LA Colors Black NYC New York Color Matte Me Crazy bling

I have been dying to see this glitter matte since I first mixed it up so I decided to add a layer of NYC Matte Me Crazy. Wow! I don't ever want to take this off!!!

Wednesday, 23 January 2013

I was really inspired this weekend; I've really missed doing nail art! This is actually a design I sketched up and then realized that it worked perfectly for S in the ABC Challenge.

S is for ... Spring Scene.

nails nailart nail art polish mani manicure Spellbound ABC Challenge S is for Spring Scene flowers roses texture green leaf leafy white picket fence pink yellow LA Colors Wet n Wild Candy-licious Sinful Colors Exotic Green Revlon Garden eyeshadow applicator sponge sponged sponging

You should be expecting this by now, but I used my eyeshadow applicators and Revlon Garden and Sinful Colors Exotic Green to create a leafy texture as a base. The white picket fence came next, hand drawn with a nail art brush, and the flowers were started with a dotting tool and finished with a nail art brush.

nails nailart nail art polish mani manicure Spellbound ABC Challenge S is for Spring Scene flowers roses texture green leaf leafy white picket fence pink yellow LA Colors Wet n Wild Candy-licious Sinful Colors Exotic Green Revlon Garden eyeshadow applicator sponge sponged sponging

With recent temperatures reaching into the single digits, I'm really longing for some flowers!

Be on the lookout tonight for another ABC Challenge mani as I finally get caught up. :)

Monday, 7 January 2013

Hey everyone! I hope you had a great first 2013 weekend. As for me, I've been doing some swatching. I eyed, hemming and hawing, over the Sephora by OPI Tinsel Town Collection for weeks and weeks before I finally broke down and bought it. This collection was actually part of a Christmas gift for myself, and I'm happy to finally be able to start swatching.


nails nailart nail art polish mani manicure Spellbound Sephora OPI Tinsel Town Collection Read My Palm mint light jade green swatch swatched swatching Sally Hansen Mint Sorbet chocolate chip ice cream creme Wet n Wild I Need A Refresh-Mint ombre comparison mints bubblegum wintergreen haul

I started with the one that caught my eye first, a gorgeous mint named Read My Palm. I love mint polish!!


nails nailart nail art polish mani manicure Spellbound Sephora OPI Tinsel Town Collection Read My Palm mint light jade green swatch swatched swatching Sally Hansen Mint Sorbet chocolate chip ice cream creme Wet n Wild I Need A Refresh-Mint ombre comparison mints bubblegum wintergreen haul

As far as mint polishes go this is one of the better ones I've found. It went on fairly smoothly, though I did find the formula a smidgen too watery. You can see one coat of Read My Palm here. It's slightly streaky and patchy, but covers well for only one coat.


nails nailart nail art polish mani manicure Spellbound Sephora OPI Tinsel Town Collection Read My Palm mint light jade green swatch swatched swatching Sally Hansen Mint Sorbet chocolate chip ice cream creme Wet n Wild I Need A Refresh-Mint ombre comparison mints bubblegum wintergreen haul

Two coats fills everything in and leaves behind a nice finish.


nails nailart nail art polish mani manicure Spellbound Sephora OPI Tinsel Town Collection Read My Palm mint light jade green swatch swatched swatching Sally Hansen Mint Sorbet chocolate chip ice cream creme Wet n Wild I Need A Refresh-Mint ombre comparison mints bubblegum wintergreen haul

Look how smooth and shiny this polish is with two coats and no top coat!


nails nailart nail art polish mani manicure Spellbound Sephora OPI Tinsel Town Collection Read My Palm mint light jade green swatch swatched swatching Sally Hansen Mint Sorbet chocolate chip ice cream creme Wet n Wild I Need A Refresh-Mint ombre comparison mints bubblegum wintergreen haul

Want to know how Read My Palm holds up to my two favorite mints? Read My Palm is on my index and pinky nail while my middle nail has Sally Hansen Mint Sorbet and my ring nail is painted with Wet n Wild I Need A Refresh-Mint.


nails nailart nail art polish mani manicure Spellbound Sephora OPI Tinsel Town Collection Read My Palm mint light jade green swatch swatched swatching Sally Hansen Mint Sorbet chocolate chip ice cream creme Wet n Wild I Need A Refresh-Mint ombre comparison mints bubblegum wintergreen haul

Sally Hansen Mint Sorbet is what I think of when I think mint. It reminds me of mint chocolate chip ice cream and is the perfect mint green in my opinion. Wet n Wild I Need A Refresh-Mint is the complete opposite. It's the perfect cool and refreshing minty blue of wintergreen gum. It's also the color I turn to when I need a sky blue color. As you can see, Read My Palm is leaning heavily on green and is a much darker shade than Mint Sorbet. It's been labeled a light jade green, and I can definitely see that. I think I might just have the perfect ombre shades here.


Color: Mint green with a definite lean towards green. A light jade green.
Finish: Creme
Application: I found the formula slightly watery. One coat went on streaky and patchy but built up nicely with no streaking. The dry time was amazing!
Coats to Opaque: 2
My Rating: 4.5 � if it lost the slightly watery quality it might just have tipped into a 5. I love mint shades and this is the perfect addition to my collection.

Wednesday, 2 January 2013

Hello everyone. Welcome to 2013!! :) Today's post was supposed to be for the letter Q in the ABC Challenge but, after the Christmas rush, I felt like doing nothing, so I'm a little behind in my posts. I don't feel right moving onto Q before posting P so ...

P is for ... Phoenix.

nails nailart nail art polish mani manicure Spellbound ABC Challenge P is for Phoenix Harry Potter Fawkes flames red yellow orange black Wet n Wild I red a good book Sally Hansen Sun Kissed Lightening white L.A. Colors fire

I cringe a little looking at this design. I was cleaning my usual nail art brush and the bristles came out. I was stunned because I was cleaning it like I always clean my brushes. I wasn't any more or less rough/gentle or pulling on the bristles excessively. I'm really not pleased because I pay an outrageous price for these brushes�4 brushes for about $15! I think I'll be ordering my brushes online from now on; for my usual price I can probably get a full set.

So, all brush rants aside, this design is a little messier than my usual since I had to use a thicker brush for the line work. Still, I felt very Harry Potter creating this phoenix ... though it's not as stunning as Fawkes. :)

Friday, 21 December 2012

The rush to Christmas is insane! I spent the day baking cookies and there's a full day of shopping to look forward to tomorrow ... and probably Monday too. Yes, I am a world class procrastinator. I've put this all off until the last minute ... again, because this is exactly what I did last year. I don't even have any decorations up yet. So, this is the reason for the cut back in posts if you were wondering, lol.

nails nailart nail art polish mani manicure Spellbound Christmas border borders dots dotted dotting red green holiday Sinful Colors Exotic Green Wet n Wild I Red a Good Book simple easy

I had all these wonderful ideas I was going to do, and then I just never seemed to have the time to do them. So, I came up with a few very simple nail designs to share. This is one of them. Dotted border nails. It's something new to me. I've done true border nails before but never dotted borders.

nails nailart nail art polish mani manicure Spellbound Christmas border borders dots dotted dotting red green holiday Sinful Colors Exotic Green Wet n Wild I Red a Good Book simple easy

I decided to keep it very Christmas-y with alternating red and green. This is carried over onto my other hand, starting with green on my thumb so it's all very different and interesting. This could totally be worn alone if you don't have much time for dots. Two coats of Sinful Colors Exotic Green and two of Wet n Wild I Red A Good Book, a layer of quick drying top coat and you're out the door looking perfectly festive.

nails nailart nail art polish mani manicure Spellbound Christmas border borders dots dotted dotting red green holiday Sinful Colors Exotic Green Wet n Wild I Red a Good Book simple easy

For the dotted border I used my smallest dotting tool. I created the dots and then went over them again to make them brighter when I realized they weren't showing up well. I wish I had started with white dots first before using red and green. This would have made them much more noticeable, but you live and learn.

Overall though, a very simple and Christmas-y mani. Enjoy. :)

Wednesday, 5 December 2012

We're up to M in the ABC Challenge. Getting ever closer to Z. :( I will be very sad to see the end of this challenge and may just start over on my own. There are so many amazing designs to do for each letter, and I don't think I'll be happy until I try them all. As for today's letter ...

M is for ... Mistletoe. I call this 'Kiss Me Under the Mistletoe'.

nails nailart nail art polish mani manicure Spellbound Sinful Colors Snow Me White Wet n Wild I Red a Good Book China Glaze Holly-Day L.A. Colors Black White green ABC Challenge M is for Mistletoe Kiss Me Under lips romance love Christmas Holiday glitter Pearl Harbor

This isn't my all time favorite design. I like the idea, but I wish I had thought the design out before jumping in. This is what happens when I don't sketch up my designs first.

nails nailart nail art polish mani manicure Spellbound Sinful Colors Snow Me White Wet n Wild I Red a Good Book China Glaze Holly-Day L.A. Colors Black White green ABC Challenge M is for Mistletoe Kiss Me Under lips romance love Christmas Holiday snow glitter Pearl Harbor

I do like the base polish. I went for a snowy effect using Sinful Colors Snow Me White and Pearl Harbor. Two coats of white with the iridescent glitter of Pearl Harbor creates a light dusting of snow over your nails. Perfect for winter. :)

Friday, 30 November 2012

Today I have another glitter swatch. And I thought, why not start the holiday posts early? This is Faceted from the Sinful Colors Holiday Shimmers Collection.

nails nailart nail art polish mani manicure Spellbound Sinful Colors Color Swatch Faceted glitter bar shimmer Holiday Shimmers collection purple iridescent Wet n Wild On a Trip

I used two very thin coats of Faceted over Wet n Wild On a Trip. I'm not usually a big fan of bar glitter but I love this. It's just the right amount of bar to shimmer.

nails nailart nail art polish mani manicure Spellbound Sinful Colors Color Swatch Faceted glitter bar shimmer Holiday Shimmers collection purple iridescent Wet n Wild On a Trip

Add some character to this mani by doing the first coat of glitter normally and the second with a few side to side swipes. This will turn the bar glitter so it's not all going in the same direction.

nails nailart nail art polish mani manicure Spellbound Sinful Colors Color Swatch Faceted glitter bar shimmer Holiday Shimmers collection purple iridescent Wet n Wild On a Trip bottle

I didn't manage to get any really great pictures of this polish on my nails so here's a picture of the bottle. This glitter is definitely in my Top 5 ... maybe even in my Top 3.

Wednesday, 14 November 2012

I'm pretty excited to share today's post with you. This is for the letter J in the ABC Challenge. J is for ... Jester.

nails nailart nail art polish mani manicure Spellbound ABC Challenge J is for Jester harlequin Harley Quinn Batman DC Comics black white red L.A. Colors Wet n Wild I Red a Good Book inspired Character

I was inspired by Harley Quinn from Batman. Harley has always been one of my favorite Batman characters even though I don't read the comics or watch the animated series. Harley Quinn, as suggested by the play with her name, is clad in a traditional harlequin jester outfit. I used L.A. Colors Black and White with Wet n Wild I Red a Good Book to create this look. No tape was used in the making of this mani. You're stunned, I know. ;)

You can look to the Wikipedia article on Harley Quinn if you'd like to see my inspiration.

Friday, 9 November 2012

I've been calling this mani 'I Wanna Be A Mermaid' in my head from the moment I thought of doing this and after it was finished I found it a perfect fit.

nails nailart nail art polish mani manicure Spellbound I Wanna Be A Mermaid sequin glitter Wet n Wild Club Havana orange teal blue green hex

The sequin glitter I used was one from my birthday haul; thinking the glitter was bigger I was going to line it up and overlap it like scales. With how small the glitter turned out to be once removed from the bottle, I decided to simply sprinkle some of it over a wet nail to create a mermaid inspired accent nail. Wet n Wild Club Havana is my base color. Using orange seems like an odd choice since most mermaids of legend are green or teal, but using orange felt right to me. I made up for my odd choice of base color by using teal iridescent glitter for the 'scales'.

I will note that this glitter wanted to stick to everything! And I kept knocking over the tiny bottle holding said glitter, spilling more and more. I really didn't really sprinkle the glitter over the nail since it refused to unstick from my finger. I had to gently dab my glittered finger over the nail to get it to stick. By the end, I had glitter all over me and all over my desk. I was very lucky not to have glitter stuck to any of the other nails besides the accent nail. The true horror came with putting the glitter back in the bottle when I was done. I tried using my Pickerr Uperr, a nail art brush, etc to sweep the glitter up. I finally, after much trial and error (and knocking over the bottle of glitter again and again), used a tissue and a folded piece of paper to sweep the glitter back into the bottle.

Friday, 12 October 2012

sweetjellybean.com

I don't know if you know this but October is Breast Cancer Awareness Month. I think this is something we should all recognize. Breast Cancer Awareness isn't just for survivors or the family of those diagnosed. It's not even just for all women everywhere. While breast cancer among men is rare, it does happen!

In 2012, it is estimated that among U.S. women there will be 226,870 new cases of invasive breast cancer (including new cases of primary breast cancer among survivors). An estimated 2,190 new cases of breast cancer will occur in men. It is also estimated that 39,510 women and 410 men will die of breast cancer this year alone in the United States. In 2010, it was estimated that 1.6 million new cases of breast cancer occurred in women worldwide. This is very real and very life threatening, and it's something that should be important to all of us.


nails nailart nail art mani manicure Spellbound breast cancer awareness Susan G Komen for the cure support pink ribbon french tips glitter campaign October

In support of Breast Cancer Awareness Month I wanted to do a very simple nail art. I wanted this nail art to be something anyone, of any skill level, could do to show their support. I used a very thin coat of Wet n Wild Sugar Coat as my base. Sinful Colors Beautiful Girl was used on the tips of all but my ring finger and topped with a coat of Wet n Wild Sparkled. My ring finger became a standard french tip with the help of LA Colors white and I used Beautiful Girl to create a pink ribbon. This is a very simple design that you won't need any special tools for. If you don't feel comfortable creating your own french tips there are specially created guides (found in the polish/nail tools section of most stores) you can buy or you can use binder re-inforcers (usually found in office supplies). The pink ribbon can be done with a nail art brush, a dotting tool, or even a toothpick.

Go to sweetjellybean.com and pick up your own sidebar badge and post banner so you can blog pink too!

Breast cancer facts from Susan G. Komen for the Cure

Wednesday, 26 September 2012

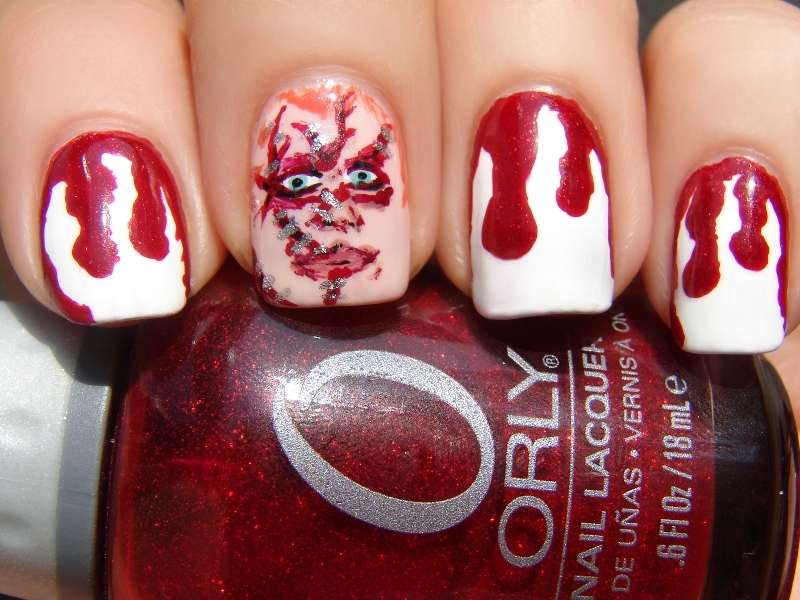
Here is my mani for C in the ABC Challenge. I had so many ideas for C. The classic caged bird flying away design, cats, checkered, color blocking. However, I finally decided C is for ...

Chucky complete with blood drips. The Bride of Chucky movie is definitely one of my favorite 'horror' movies, right up there with Seed of Chucky. The only horror movies I like more are the Resident Evil movies.


nails nail art nailart polish mani manicure Spellbound character nails movie Chucky Child's Play Blood drips red white China Glaze Wet n' Wild Sally Hansen LA Colors shimmer ABC Challenge horror Halloween

I love the blood drips over white in this mani. These come from a tutorial over at Nails by Kayla Shevonne. I was left slightly disappointed at my Chucky. He came together so well but the overall effect just doesn't scream Chucky at me. I don't think I managed to capture that essential craziness he does so well.

However, this mani is chilling no matter if it looks completely like Chucky. So, if I must, C can also be for chilling.

Monday, 24 September 2012

I stumbled across the ABC Challenge last week and decided I wanted to take part. This is my first challenge like this since I usually come in way, way too late.


nails nailart nail art polish mani manicure Spellbound Llama challenge

The ABC's of Nail Polish is pretty much exactly what it sounds like � an ABC nail art challenge hosted by the Llama Nails group on Facebook. The challenge started September 12th and will run through to March 6th. 26 weeks for 26 letters. Posting is every Wednesday. You only need to do one manicure a week and it's okay if you miss a week. However, the big rule is that, each week, something in your manicure must begin with the letter for that week. It can be the name of the polish brand you'll be using, the name of the polish itself, the technique, the stamp, the color, the item depicted on your nails ... really the sky is the limit!

I would love it if any other nail artists or enthusiasts joined me for this challenge!!

I missed the letter A since I came in late for this challenge. I wanted to make up for that by doing two B manicures. So ...

B is for Beard


nails nail art nailart mani manicure Spellbound ABC challenge Santa B beard French Tips cotton ball Christmas

This beard mani is something I've been wanting to do for a really long time. However, it's not something I could wear anywhere ... even just around the house. It's very impractical! This challenge gave me the perfect chance to do this idea though. I made the beard, mustache, and bushy eyebrows from a cotton ball and attached them with clear nail polish. Oddly enough, the face was added after all the hair.

B is for Bricks


nails nailart nail art mani manicure Spellbound ABC Challenge B Bricks Christmas red white lines sponging sponged sponge

Somehow this all turned into a really Christmas-y mani set. I think after doing the beard mani and seeing how much like Santa it looked like all I could think of after that was the old fashioned brick fireplaces. I can just see an accent finger with a roaring fire cut into the bricks. Still, these brick nails were really fun to do. You can't see it in this picture but I sponged on a darker red in hopes of getting a speckled brick pattern but once I added the white it kind of got lost. Oh well.

That's it for this post. I hope to see you in the Llama Nails group doing the challenge beside me. :) Be on the lookout for my C mani in my next post.

Friday, 14 September 2012

Hello girlies! I'm sorry for the long wait between posts. There's been some super huge 'end of spring' cleaning happening in my house and I managed to cut my finger. I wanted to let it heal a bit before risking nail polish remover. That said, I should have enough room for another nail polish drawer before I know it!! ?

However, I could't let the theater debut of the new Resident Evil movie (Resident Evil: Retribution) pass without some nail art!! I apologize for the extreme brightness of this picture. I had to take it with flash since the sunlight made the red disappear completely into the black.


nails nailart nail art nailpolish polish Spellbound mani manicure movie character Resident Evil Retribution blood splatter fingerprint Umbrella Corporation zombie Alice

I knew immediately what I wanted to do for this design. It was getting it onto my nails that was nearly impossible. I decided to create my own nail stickers in hopes of making the completion of this design easier. The Umbrella symbol was made so much easier with this method. It gave me a flat surface to work on, one that I could twist and turn to get the best angle. A dot in the middle, triangles in alternating red and white around this dot, and curved tops. I did blood splatter as I always do, but I loved the way nail stickers gave me the option of choosing the splatter pattern I wanted instead of having to go with what came out of the straw.

The hardest part by far was the bloody fingerprint. It had me almost giving up a few times before I came up with a design I liked. While this idea came from a tutorial I found on deviantART, I had to adapt it so that it would work for me and this design. I painted the pad of my index finger with black and stamped a fingerprint onto my homemade sticker. I left my finger on the sticker until it was almost permanently stuck so that it would leave an imprint on the sticker just in case the black polish didn't get left behind right. With a small brush I traced an approximation of my fingerprint over the black. It wasn't exact but it came through well enough to get the idea across.

So, what's your favorite horror movie? While I used to be a huge horror movie buff The Resident Evil series and the Bride of Chucky are just about the only horror movies I'll watch anymore unless I'm feeling nostalgic.

Wednesday, 5 September 2012

I've been calling this my raining glitter mani so I decided to use that for the title. I wanted to do something a bit different than the usual glitter tips that naturally happen when I break out the glitter.

nails nailart nail art polish mani manicure Spellbound glitter Color Club Wet n Wild holographic raining purple neon

So, I decided to flip the glitter from tip to cuticle and drag it down my nails in lines ... or 'rain'. My sister has taken a liking to these nails so I'll probably be doing them again soon on a different set of nails. :)


nails nailart nail art polish mani manicure Spellbound glitter Color Club Wet n Wild holographic raining purple neon

This mani uses two coats of White on White from China Glaze as a base for the neon. The neon is Color Club's Mrs. Robinson. I used two coats but seeing the pictures, and the white showing through near the tips, I realize I should have used three or maybe even four coats. The glitter is Wet n Wild Kaleidoscope.


nails nailart nail art polish mani manicure Spellbound glitter Color Club Wet n Wild holographic raining purple neon

This picture isn't the best quality but it was taken in full sunlight and shows Mrs. Robinson more true to color than shown in the first two pictures.

Monday, 3 September 2012

Hello again! I know, I know, I'm posting this a bit later than usual; it's been a busy day. I won't bore you with the details, but I will say that my nails are the same length they started the day and my basement is much cleaner. :)


nails nailart nail art mani manicure Spellbound Turquoise Gemstones gems Wet n Wild I Need a Refresh-Mint Sally Hansen Antiqued Gold Crackle nailpolish polish inspired plastic wrap cling sponging

Today's post was inspired by turquoise gemstones and uses a method I've never tried before.


nails nailart nail art mani manicure Spellbound Turquoise Gemstones gems Wet n Wild I Need a Refresh-Mint Sally Hansen Antiqued Gold Crackle nailpolish polish inspired plastic wrap cling sponging

When I saw plastic wrap sponging mentioned on a blog I thought the outcome was pretty but it didn't intrigue me too terribly much. For those who haven't heard of this method, you take a piece of plastic wrap and crinkle it to create a pattern. After that simply dip a bit of the crinkled plastic wrap into some nail polish and dab it onto your nails like using a sponge. You can dab first onto a piece of paper to make sure you like the pattern created. I thought it was a very innovative use for plastic wrap but wasn't really interested in trying this method. However, when I caught a glimpse of a nail design on Pinterest using this method I knew it was something I had to try.


nails nailart nail art mani manicure Spellbound Turquoise Gemstones gems Wet n Wild I Need a Refresh-Mint Sally Hansen Antiqued Gold Crackle nailpolish polish inspired plastic wrap cling sponging

For those of you who know your gemstones you'll notice the big mistake with my turquoise. I started with a two coat base of Wet n Wild's I Need a Refresh-Mint. I thought this made a great gemstone base, and I like to think I was right.


nails nailart nail art mani manicure Spellbound Turquoise Gemstones gems Wet n Wild I Need a Refresh-Mint Sally Hansen Antiqued Gold Crackle nailpolish polish inspired plastic wrap cling sponging

However, the problem came about when I decided to use Sally Hansen Antiqued Gold for the gemstone's veining. Antiqued Gold is one of Sally Hansen's crackle top coats and is a (slightly less bright) match to the gold veining found in a lot of turquoise gems. I thought using a crackle would help add to the pattern using plastic wrap creates. It was perfect ... except that in small amounts Antiqued Gold isn't gold; it's SILVER! So, while the outcome was still very pretty, it wasn't exactly what I had in mind from the start.

Still, I got to try something new and that's always great fun!!

Monday, 2 July 2012

Wait! What do you mean it's not the 4th of July yet?? Yep, that's right. I'm early (for once)!! My holiday nails are usually done quickly and posted the day of the holiday. So I'm really happy to be posting these nails early. I may be a bit biased, but I adore the US flag. There are a few other flags I like but never as much.


4th of July Memorial Day USA flag United States of America red white blue stars stripes nail art nailart mani manicure Spellbound Nails handpainted hand painted freehand

This is three coats of white which I then taped over the bottom half of before painting the blue. I added red stripes to the bottom half and white stars to the top half. I free handed the stars this time. I think it was easier than trying to trace around star shaped gems. Now I just have to focus on drawing them smaller for other designs.

4th of July Memorial Day USA flag United States of America red white blue stars stripes nail art nailart mani manicure Spellbound Nails handpainted hand painted freehand

I wanted to try something different with my picture this time. I love how some bloggers have large pieces of jewelry or hold coffee cups or any number of things besides a nail polish bottle or going claw. So, I decided to try a flower this time until I can browse my local shops for something else. :)

Thursday, 28 June 2012

Hey everyone. I went swimsuit shopping yesterday! I got my first swimsuit in years for vacation last year after losing about 15-20 pounds. Well, I lost another 10 or so this year. That brings my total to just over 30 pounds lost. Yay for me! However, I'm still not at my goal weight so swimsuit shopping is a fairly trying experience, but I guess that's true for almost anyone, isn't it? Are any of us truly happy with every feature of our bodies? Isn't there something, small or large, each of us wants to change? With the horrors of swimsuit shopping in mind I did a quick swimsuit manicure for luck.


swimming swimsuits bathingsuits suits bathing tankini bikini one-piece polka dots red pink blue nails nailart purple nail art beach shopping Spellbound

I've seen bikini nail art before but I don't think I'll ever look or feel good in a bikini so I decided to do a combination of swimsuits. The first is a sexy pink one shoulder. Next is a sporty blue and white striped swimsuit. Then a red and white polka dotted one-piece that I fell in love with while shopping online (it was $160 though), and then a shiny purple bikini.

swimming swimsuits bathingsuits suits bathing tankini bikini one-piece polka dots red pink blue nails nailart purple nail art beach shopping Spellbound mani manicure/></a></div> <div class=


And on my thumb is a bright orange and yellow polka dotted tankini. I must have done something right with these nails because I came home the proud new owner of a sexy (and slimming) black one-piece suit at a great price!


swimsuit swim suit bathing black JCPenney nail art nails manicure mani nailart /></a></div> <div class=

Here's a picture of my new swimsuit, front and back, taken from the JCPenney website. I will look nothing like this in my swimsuit of course, but I'm thinking of sewing some of those pushup bra swim cup things into mine in an attempt to give myself something on top since it has such a deep neckline but don't want to ruin a $40 suit. Has anyone, or do you know anyone, who has done this? How did it work for you or them?