Showing posts with label Stripes. Show all posts

Thursday, 19 December 2013

Hello lovelies! Can you believe it's already less than a week until Christmas?? I feel like it was just last week that it was months and months from Christmas. Still, the Christmas spirit seems to have hit me hard ... well, hit me with nail art ideas because my house still isn't decorated and I have done less than no Christmas shopping.

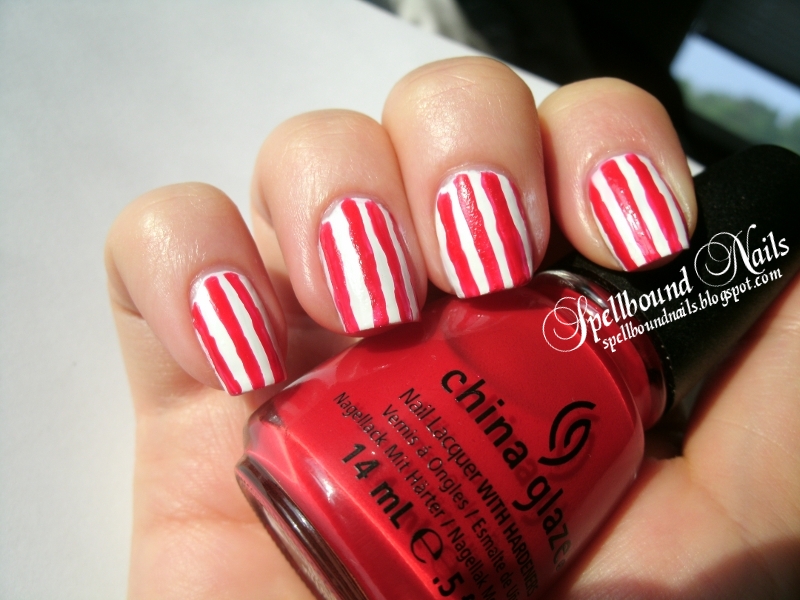
And speaking of nail art ideas ... I think I'm a little obsessed with candy cane stripes. I seriously just want to keep these on until after Christmas; I love them so much!


These are actually really simple to do but there's a lot of waiting involved because the stripes are done with tape and the white polish has to be completely dry before you can start. If you don't wait for it to dry it will dent if you're lucky or ruin all your work at worst.


I think I'm also developing an obsession with OPI The Spy Who Loved Me. It is such a lovely shade of shimmery red and has such wonderful coverage. It also makes perfect candy cane stripes ... and holly berries!

Well, I think that's just about it. I hope you enjoyed yet another of my Christmas manis. :)

Until next time,
- Ashley

*A huge congratulations to Ariel of Lacquer: The Best Medicine for winning my Season of Giving Giveaway!! Her prize is already in the mail. :)

Looking for more holiday manis? Take a look at these!!

Wednesday, 3 July 2013

Hello everyone!! It's been forever since I posted anything. I knew running a nail polish business was going to take time, but I guess I never realized just how much of my blogging time it would eat into. I'm working really hard to keep up with orders, restocks, and developing new releases. Any free time I manage to grasp is spent storing up nail art and swatches so I can start posting again - hopefully within the next few months.

nail art Spellbound Nails Patriotic 4th of July red white blue stripes stars glitter America Independence Day

My patriotic nail art has been getting a ton of stardom lately. My nails can even be found in the July issue of People StyleWatch magazine! If you don't have a subscription to this magazine I recommend getting one. It's one of the best magazines I've read in a long time! I didn't have to search and skim, skipping large portions of the magazine, because every page had something interesting to me.

Spellbound Nails People Style Watch StyleWatch patriotic 4th of July Independence Day red white blue

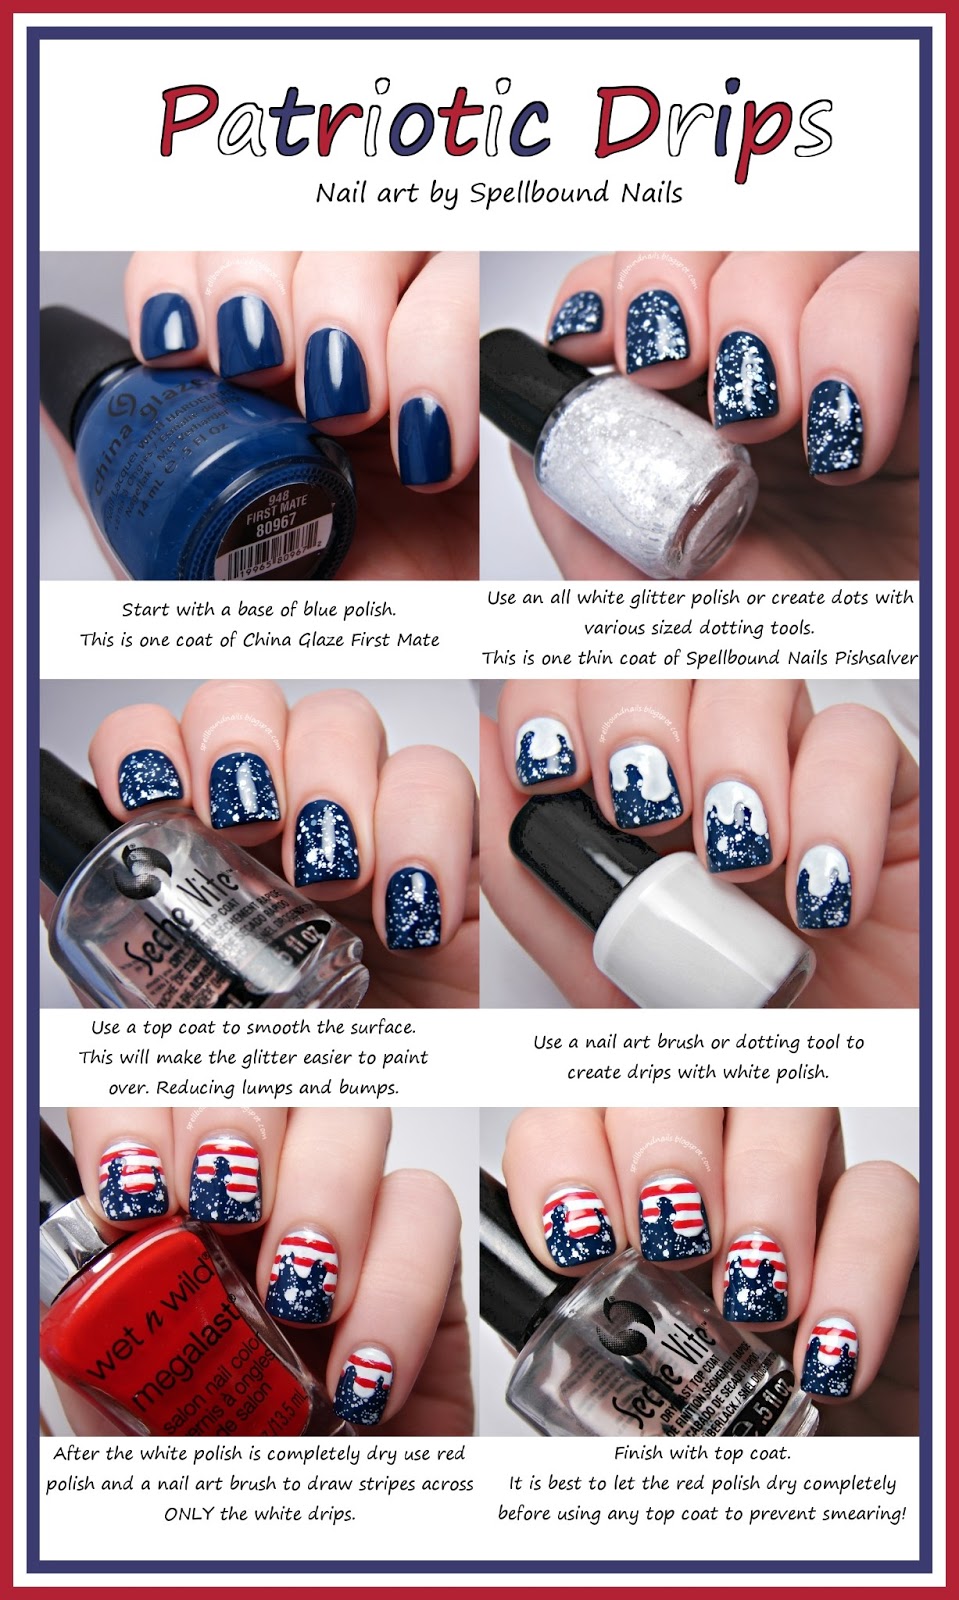
Now, onto the nails!!! With all that interest for my patriotic nails I decided to try something different. I won't claim that I created this - someone, somewhere has probably done this before - but I will say it is something I have never seen before! I would love to see your nails if you decide to try the tutorial, so don't be scared to send them to me. I don't bite. Promise!! :)

Right click and open in a new tab if you're having trouble reading the tutorial.

Patriotic Drips nail art Tutorial Spellbound Nails red white blue stripes glitter America Independence Day 4th of July

That's it for now. For those who don't follow me on Facebook but enjoy my polish I will be having a big restock, complete with a ton of NEW polishes and the return of those sold out polishes some of you may be waiting for! Head over to my Etsy shop tomorrow to see what I've come up with. Hope to see ya there. :)

Tuesday, 19 March 2013

*The products in this post were purchased with my own money.

Today's mani came to me in a dream. No, seriously, I woke up with the idea so I must have dreamed it. And it looks really awesome in my opinion.

Spellbound Nails Nail Lacquer Stripes Dots Born Pretty Store metal studs rhinestones black tape taped taping hot pink bright OPI Strawberry Margarita Beach Party Best of the Best mini collection Doctor Who Dalek freehand Petites Night color swatch Seche Vite top coat

What do you think? I'm reminded slightly of Doctor Who Dalek. The stripes on the side don't fit a Dalek, but the resemblance is there.

Spellbound Nails Nail Lacquer Stripes Dots Born Pretty Store metal studs rhinestones black tape taped taping hot pink bright OPI Strawberry Margarita Beach Party Best of the Best mini collection Doctor Who Dalek freehand Petites Night color swatch Seche Vite top coat

I started with two coats of OPI Strawberry Margarita from the OPI Best of the Best mini collection. Strawberry Margarita is originally from the Beach Party Collection, and I can see why. It's such a yummy bright pink � perfect for the beach.

Spellbound Nails Nail Lacquer Stripes Dots Born Pretty Store metal studs rhinestones black tape taped taping hot pink bright OPI Strawberry Margarita Beach Party Best of the Best mini collection Doctor Who Dalek freehand Petites Night color swatch Seche Vite top coat

I used tape to create the thin lines up and down on either side and filled them in with Petites Black. Then I used a nail art brush to create the thicker stripes across. You could also do this with tape, but I found it faster, if less neat and precise, to freehand them.

Spellbound Nails Nail Lacquer Stripes Dots Born Pretty Store metal studs rhinestones black tape taped taping hot pink bright OPI Strawberry Margarita Beach Party Best of the Best mini collection Doctor Who Dalek freehand Petites Night color swatch Seche Vite top coat

I added a coat of Seche Vite and thought it looked bare. It needed something, so I dug out my Born Pretty Store studs. I vowed to use these more often and this was the perfect opportunity. I decided on the black studs. I've never found the perfect mani for these so I've never used them before! Exciting!!

The best way I've found to use these types of studs is to lay them on your nail over dry polish first so you can get the perfect spacing and positioning. Then pick them up one by one with tweezers and lightly dip the bottom in clear polish and set them back down. It gives you more leeway as you can decide you don't like the design and move them around. You can't do this if you just pick them up and slap them on wet polish. There's no changing your mind after that! I really hope this tip helps someone. :)

*The products in this post were purchased with my own money.

Tuesday, 30 October 2012

Today's post is being turned into a double post. While we are not in the direct path of Hurricane Sandy, we are feeling the effects. We've had rain, snow, and power outages just to name a few. We've spent all night and most of today with no power and no heat. I am beyond thankful that the power is back up and the house is finally getting warm again. All the other people and families experiencing Sandy are in my thoughts. Take care!!


nails nailart nail art polish mani manicure Spellbound Nail-Aween Challenge witch wicked East West The Wizard of Oz stripes black white green pointed hat poppies flowers Sally Hansen Wet n Wild L.A. Colors

I was so excited to see witch inspired nail art in the Nail-Aween Challenge. What better inspiration for witch than The Wizard of Oz?? It's one of my all time favorite movies. With this in mind, I created black and white stripes for the socks worn by the Wicked Witch of the East, shown under Dorthy's house. I did an accent nail using Sally Hansen's Green with Envy to match the Wicked Witch of the West's green skin and added a pointed black hat. I decided to add some red poppies to the striped nails to complete the mani and tie it all into The Wizard of Oz.


nails nailart nail art polish mani manicure Spellbound Nail-Aween Challenge pumpkins orange green leaves Sally Hansen L.A. Colors

For the pumpkin nail art, I thought briefly of doing Jack-O'-Lantern nails but finally decided against that. Jack-O'-Lanterns seemed overdone, and you know how I love thinking differently! I decided to do actual pumpkins. I used Sally Hansen Sun Kissed as the orange base. The shading was done by mixing black and white with Sun Kissed to create the dark and light colors. Green with Envy was used the same way for the leaves. I took this picture slightly from the side in an attempt to trick the eye into seeing width and roundness.


Also, if my Halloween nail art just isn't enough for you, check out this nail art video from Swagbucks to learn how to create some really awesome skeleton nails for Halloween!!

Wednesday, 29 August 2012

Wow, is it time for another post already? I was going to use yesterday to get my pictures all nicely resized and watermarked and, if I had some extra time, get a few posts typed up for auto-posting ... yeah, that didn't happen. Lol! I spent the past two days doing extreme cleaning. I don't know about you but cleaning makes me hungry and there's nothing better than a nice refreshing watermelon!


nails nailart nail art Spellbound mani manicure watermelon fruit green China Glaze Holly-Day Sally Hansen Green with Envy Funky Fingers Kingston realistic

This design was originally done by The Polish Well. I fell in complete and total love with this idea after seeing her nails posted on Beautylish. I debated doing them on my own nails since she had already done such an amazing job on them ... but you should know by now that I have no impulse control. I couldn't resist.


nails nailart nail art Spellbound mani manicure watermelon fruit green China Glaze Holly-Day Sally Hansen Green with Envy Funky Fingers Kingston realistic

I knew immediately that I wanted to use Funky Fingers' neon Kingston for the flesh of the watermelon. For the skin, I decided to go slightly more realistic by using China Glaze Holly-Day as a base and dabbing on a light speckling of Sally Hansen Green with Envy. I also used this color to draw the squiggles onto the watermelon.

I wish I had had a watermelon on hand (no pun intended) so I could have pictures of this mani next to a real watermelon. My family were amazed at how real they looked when we went shopping while I was wearing this mani.

Monday, 2 July 2012

Wait! What do you mean it's not the 4th of July yet?? Yep, that's right. I'm early (for once)!! My holiday nails are usually done quickly and posted the day of the holiday. So I'm really happy to be posting these nails early. I may be a bit biased, but I adore the US flag. There are a few other flags I like but never as much.


4th of July Memorial Day USA flag United States of America red white blue stars stripes nail art nailart mani manicure Spellbound Nails handpainted hand painted freehand

This is three coats of white which I then taped over the bottom half of before painting the blue. I added red stripes to the bottom half and white stars to the top half. I free handed the stars this time. I think it was easier than trying to trace around star shaped gems. Now I just have to focus on drawing them smaller for other designs.

4th of July Memorial Day USA flag United States of America red white blue stars stripes nail art nailart mani manicure Spellbound Nails handpainted hand painted freehand

I wanted to try something different with my picture this time. I love how some bloggers have large pieces of jewelry or hold coffee cups or any number of things besides a nail polish bottle or going claw. So, I decided to try a flower this time until I can browse my local shops for something else. :)

Thursday, 28 June 2012

Hey everyone. I went swimsuit shopping yesterday! I got my first swimsuit in years for vacation last year after losing about 15-20 pounds. Well, I lost another 10 or so this year. That brings my total to just over 30 pounds lost. Yay for me! However, I'm still not at my goal weight so swimsuit shopping is a fairly trying experience, but I guess that's true for almost anyone, isn't it? Are any of us truly happy with every feature of our bodies? Isn't there something, small or large, each of us wants to change? With the horrors of swimsuit shopping in mind I did a quick swimsuit manicure for luck.


swimming swimsuits bathingsuits suits bathing tankini bikini one-piece polka dots red pink blue nails nailart purple nail art beach shopping Spellbound

I've seen bikini nail art before but I don't think I'll ever look or feel good in a bikini so I decided to do a combination of swimsuits. The first is a sexy pink one shoulder. Next is a sporty blue and white striped swimsuit. Then a red and white polka dotted one-piece that I fell in love with while shopping online (it was $160 though), and then a shiny purple bikini.

swimming swimsuits bathingsuits suits bathing tankini bikini one-piece polka dots red pink blue nails nailart purple nail art beach shopping Spellbound mani manicure/></a></div> <div class=


And on my thumb is a bright orange and yellow polka dotted tankini. I must have done something right with these nails because I came home the proud new owner of a sexy (and slimming) black one-piece suit at a great price!


swimsuit swim suit bathing black JCPenney nail art nails manicure mani nailart /></a></div> <div class=

Here's a picture of my new swimsuit, front and back, taken from the JCPenney website. I will look nothing like this in my swimsuit of course, but I'm thinking of sewing some of those pushup bra swim cup things into mine in an attempt to give myself something on top since it has such a deep neckline but don't want to ruin a $40 suit. Has anyone, or do you know anyone, who has done this? How did it work for you or them?

Monday, 25 June 2012

Today's post is my very first Harry Potter mani. I have dozens of Harry Potter designs sketched in my nail art book, but I've never felt confident enough to complete any. So, when I was completely stumped on what to do with my nails last week I figured it was past time to do something Harry Potter.


nail art nails mani manicure Harry Potter Gryffindor Slytherin Ravenclaw Hufflepuff Hogwarts Houses striped Golden Snitch wings red gold green silver yellow black blue bronze


I went through all my sketches and realized I didn't want to do any of them. I thought briefly about doing something for each book but there are seven books ... too many for one hand and too few for both. I could have also done something for my favorite parts of the books but ... well, I have too many. :)


nail art nails mani manicure Harry Potter Gryffindor Slytherin Ravenclaw Hufflepuff Hogwarts Houses striped Golden Snitch wings red gold green silver yellow black blue bronze


I finally settled on Quidditch as my inspiration. When I think of a Quidditch uniform all I can think of is stripes. I'm not sure why, but I think it has something to do with the Hogwarts striped ties. I tend to imagine the house colors as stripes now. And as all the muddy Quidditch training in the books tells us Quidditch is a dirty job! With this in mind I sponged on some deep brown over the uniforms to create a muddy, dirtied look.


nail art nails mani manicure Harry Potter Gryffindor Slytherin Ravenclaw Hufflepuff Hogwarts Houses striped Golden Snitch wings red gold green silver yellow black blue bronze


Last but not least ... what Quidditch game is complete without the Golden Snitch??


Polish Used
Hufflepuff: Pure Ice Excuse Me & Beauty Concepts unnamed shimmery black
Slytherin: Sally Hansen Emerald City & Sally Hansen Celeb City
Gryffindor: Maybelline Bold Gold & Wet n Wild I Red a Good Book
Ravenclaw: Bon Bon Blue & Petites Bronze Baby
Snitch: Revlon Blue Lagoon, LA Colors White, Maybelline Bold Gold, Wet n Wild Goldmine, Funky Fingers Platinum Record, and a mix of black and white to create the gray used for outlining the wings.


Before beginning this mani I used 2 coats of white polish on all my nails so I could get the brightest colors possible.

Sunday, 17 June 2012

Hey everyone! Happy Father's Day ... or rather ugly tie day.

fathers day ties nails nail art manicure happy

We don't do much for Father's Day in our family since we're a bit ... different. I have my mom and my bonus dad. That's our family's word for step.


So, my bonus dad gets a card and a gift. We also go to my bonus grandparents house for lunch. Today we're having hotdogs on the grill with homemade Chili sauce and sides.


With such a simple day I decided to keep my nails simple too.


I started out with three coats of white polish and drew the 'shirt collar' on with black. For the ties I used a dotter and my thin nail art brush. It is such a simple design that my family really enjoys.


That's it for this post. I hope you all have a great day if or however you celebrate.

Thursday, 14 June 2012

'ello girlies. Check out the Under Construction post if you're wondering if you found the right blog. I'm just making a few changes. However, that's not what today's post is about. Today's mani is fashion inspired.


I caught a glimpse of a dress on television last month or maybe the month before. I can't find a picture of it sadly, but I'll do my best to describe it. It was a black and white striped dress that had a sort of veed slit up the back. The vee was filled with this beautiful red fabric. I was immediately hit with inspiration and sketched out both the dress and a nail design.


Don't mind the claw. I didn't want to take the chance of smudging my nails by holding anything.

I finally remembered to get a work in progress picture. I always forget these pictures since I zone out while doing nails. It's almost a form of meditation for me. For these nails, I used three coats of white polish before using a 'V' cut piece of tape. Once they were taped, I used black polish to draw the stripes. After that it was simple to use three coats of an awesome shimmery red polish to fill in the vees after removing the tape. Before adding the red you can touch up your stripes if they're jagged. I was feeling shaky while doing these so I used a small flat brush to dab on the stripes. This left the edges slightly jagged in places but going back through and touching up what I could, filling in what I couldn't with more white, fixed that right up!


That's all I have for you today. I saved my favorite picture for last. Not sure why I like this one so much, but I do. It might be because I took it at a different angle than usual. Variety is always good. :)


Polish Used

  • China Glaze - White on White
  • LA Colors - Black
  • Orly - Star Spangled

Sunday, 27 May 2012

Hello girlies. Tomorrow is Memorial Day in America, a day to honor the men and women who died while serving in the Armed Forces. In national cemeteries, many volunteers place American flags on each grave as a way to honor them. These nails are my way of honoring the fallen.


Memorial Day nail art nails stars stripes red white and blue


I was hit with inspiration Friday night while looking through some tape manis. What if I used the elements of an American flag and put them on a nail? A red and white striped nail showing through outlines of stars. It could be just like a tape mani if I used stickers.  It was brilliant. I just needed some star stickers in various sizes.


Memorial Day nail art nails stars stripes red white and blue

It was amazingly hard to find the sizes of stars I wanted ... or to find any star stickers at all! I thought of nothing beyond the sizes I needed. Silly of me! Anyone else seeing the problem? Yes, they are stars in various sizes. Yes, they are stickers. Why yes, that does says adhesive gems!! Instead of putting star stickers on my nails and painting over them like tape I had to put these hard gems on my nails and carefully trace around each one since they didn't conform to my nails like a true sticker would. Then I had to fill in the entire nail around the star outlines. It went from being such a simple mani idea to an all night and all morning job. I got one hand done before I was too tired to see straight and had to do the other hand first thing in the morning.

Memorial Day nail art nails stars stripes red white and blue

Some of the stars turned out amazing, nearly perfect, while others were a bit deformed.


Still, my original idea came through pretty well I think.


Memorial Day nail art nails stars stripes red white and blue


Here is a look at what is under all that blue which is China Glaze First Mate if you were wondering. I started with a base of OPI Alpine Snow and drew in a few messy stripes with China Glaze Poinsettia. I just wanted to show you that, for a design like this, the stripes don't have to be perfect because you'll be seeing only a very small portion of each one. Looking at the finished nails you would never think something this messy was under each one! :)

Thursday, 22 March 2012

Can I just say thank you for all the wonderfully sweet comments on my Spring mani? I know I don't answer the comments as often as I should, but I just want you guys to know that you really know how to turn a bad day around and make a girl happy!! I treasure each and every comment.


I decided to stick to the theme and do something with flowers again. I know this has been done a thousand times before by others but this is a mani I haven't tried before.  So, I figured, why not give it a try? Vintage inspired, here I come!


Natural Evening Light
I tried to keep everything soft without bright sunlight. It just felt right with these nails.

Yep, that's a broken nail. Both index nails broke yesterday and contributed to my very bad day. Sadly, this hand, my left, is by far the worst. And it just grew out from the last break too!! :(


I did a Google search for vintage and came up with this vintage floral wallpaper. That and the tons of other vintage floral nails are where this idea comes from. With this design, I really don't think I can claim anything as mine since it's all been done before. So I give credit to all the nailers out there who have done this design before me!!

I think I'm finally getting the hang of swirled roses. It only took two days of near non-stop practice.

Is there anything you guys would like to see me do on this blog? I'm open to suggestions. :)

Polish Used
  • Borghese - Brillante
  • Sinful Colors - Beautiful Girl
  • Wet n Wild - French White Creme
  • Sally Hansen - Mint Sorbet
  • Sally Hansen - Green With Envy
  • OPI - Uh-Oh Roll Down The Window
  • Hard Candy - Matte-ly In Love