Showing posts with label OPI. Show all posts

Sunday, 22 December 2013

Hello lovelies! Welcome to another very simple mani idea for Christmas.

I've said it before but OPI The Spy Who Loved Me is perfect for Christmas manis. However, if you don't have this you can use a really any shimmery red or even just a plain creme red. I believe my go-to polish last year was Orly Star Spangled. It's a little bit of a darker red from what I remember, but is just as, if not more, shimmery!


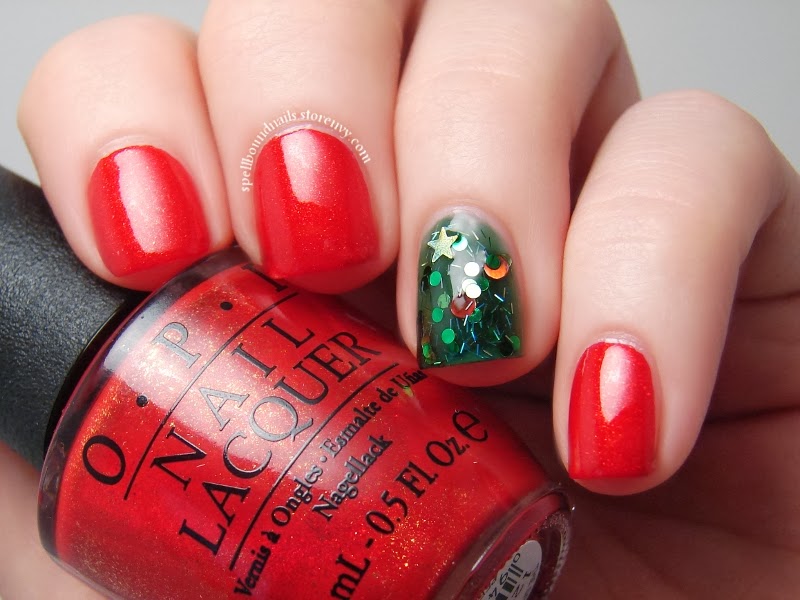
So, super simple! Two coats of OPI The Spy Who Loved Me and three coats of my own polish, Spellbound Nails Happy Christmas To All as an accent nail.


This mani looks so much better in person because you can really see the sparkle and shift of the glitter and this does seem to trick the eye into thinking Happy Christmas To All really does look like a Christmas tree especially with that star at the top of my nail. I admit I started this mani with a different design in mind; a bit of a tape mani to create a tree shape on the accent nail with a carefully placed star glitter, but once the star came out of the bottle (without my permissions lol) and refused to budge it all came together so much better in my opinion!

I plan to have at least another one or two designs before Christmas so keep an eye out for those.

Until next time,
- Ashley

Thursday, 19 December 2013

Hello lovelies! Can you believe it's already less than a week until Christmas?? I feel like it was just last week that it was months and months from Christmas. Still, the Christmas spirit seems to have hit me hard ... well, hit me with nail art ideas because my house still isn't decorated and I have done less than no Christmas shopping.

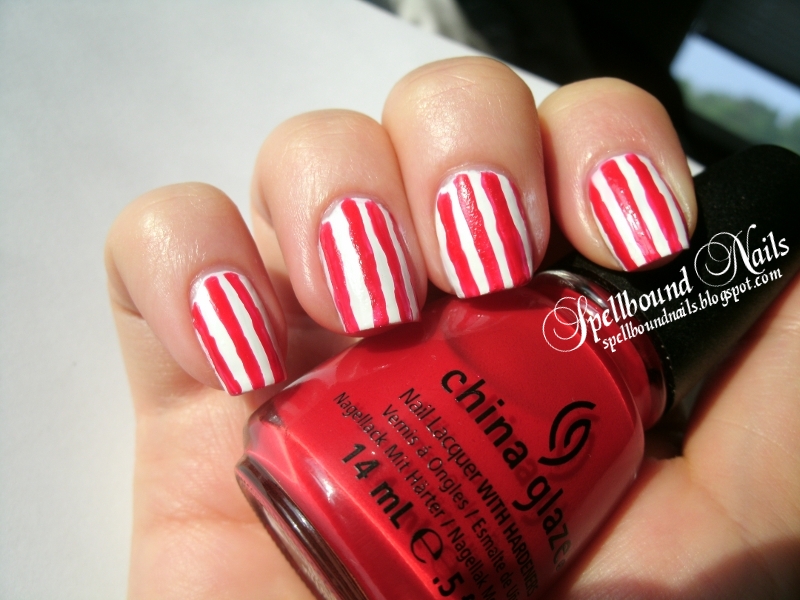
And speaking of nail art ideas ... I think I'm a little obsessed with candy cane stripes. I seriously just want to keep these on until after Christmas; I love them so much!


These are actually really simple to do but there's a lot of waiting involved because the stripes are done with tape and the white polish has to be completely dry before you can start. If you don't wait for it to dry it will dent if you're lucky or ruin all your work at worst.


I think I'm also developing an obsession with OPI The Spy Who Loved Me. It is such a lovely shade of shimmery red and has such wonderful coverage. It also makes perfect candy cane stripes ... and holly berries!

Well, I think that's just about it. I hope you enjoyed yet another of my Christmas manis. :)

Until next time,
- Ashley

*A huge congratulations to Ariel of Lacquer: The Best Medicine for winning my Season of Giving Giveaway!! Her prize is already in the mail. :)

Looking for more holiday manis? Take a look at these!!

Thursday, 12 December 2013

Hello again!! First off, have you entered the giveaways I'm either hosting or a part of yet? If not you can enter here, here, and here. That's a lot of polish you could win; don't miss out! Go on. I'll wait. Done? Okay, onto the nail art!


I really wanted something simple but eye-catching so I started with a base of OPI The Spy Who Loved Me. This polish was a Christmas gift last year but red is always in season around Christmas. What makes this polish even better is the gold shimmer.


In some lights the shimmer will just look red but as you can see here and in the next pic the gold will occasionally show itself. It can be a little shy. :)


This one is a little blurry but it really shows off the gold shimmer.


via BornPrettyStore
To complete this mani, and add just a little more of a Christmas-y touch, I used my new-found stamping skills and added some candy cane stripes in white. This was done using the Born Pretty Store stamping plate M65. If you'll remember I used this stamping plate before to create my Elegant Border Nails. You can buy this stamping plate right now for $2.99. As always feel free to use MLE10W21 for 10% off your BPS orders.

If you don't have and don't want to buy this stamping plate you can always draw the stripes on freehand, use a base coat of white and put down some striping tape before painting on your red, peeling up the striping tape after ... or just use the striping tape itself to create the stripes! All it takes is a little imagination!

Until next time
? Ashley

Tuesday, 19 March 2013

*The products in this post were purchased with my own money.

Today's mani came to me in a dream. No, seriously, I woke up with the idea so I must have dreamed it. And it looks really awesome in my opinion.

Spellbound Nails Nail Lacquer Stripes Dots Born Pretty Store metal studs rhinestones black tape taped taping hot pink bright OPI Strawberry Margarita Beach Party Best of the Best mini collection Doctor Who Dalek freehand Petites Night color swatch Seche Vite top coat

What do you think? I'm reminded slightly of Doctor Who Dalek. The stripes on the side don't fit a Dalek, but the resemblance is there.

Spellbound Nails Nail Lacquer Stripes Dots Born Pretty Store metal studs rhinestones black tape taped taping hot pink bright OPI Strawberry Margarita Beach Party Best of the Best mini collection Doctor Who Dalek freehand Petites Night color swatch Seche Vite top coat

I started with two coats of OPI Strawberry Margarita from the OPI Best of the Best mini collection. Strawberry Margarita is originally from the Beach Party Collection, and I can see why. It's such a yummy bright pink � perfect for the beach.

Spellbound Nails Nail Lacquer Stripes Dots Born Pretty Store metal studs rhinestones black tape taped taping hot pink bright OPI Strawberry Margarita Beach Party Best of the Best mini collection Doctor Who Dalek freehand Petites Night color swatch Seche Vite top coat

I used tape to create the thin lines up and down on either side and filled them in with Petites Black. Then I used a nail art brush to create the thicker stripes across. You could also do this with tape, but I found it faster, if less neat and precise, to freehand them.

Spellbound Nails Nail Lacquer Stripes Dots Born Pretty Store metal studs rhinestones black tape taped taping hot pink bright OPI Strawberry Margarita Beach Party Best of the Best mini collection Doctor Who Dalek freehand Petites Night color swatch Seche Vite top coat

I added a coat of Seche Vite and thought it looked bare. It needed something, so I dug out my Born Pretty Store studs. I vowed to use these more often and this was the perfect opportunity. I decided on the black studs. I've never found the perfect mani for these so I've never used them before! Exciting!!

The best way I've found to use these types of studs is to lay them on your nail over dry polish first so you can get the perfect spacing and positioning. Then pick them up one by one with tweezers and lightly dip the bottom in clear polish and set them back down. It gives you more leeway as you can decide you don't like the design and move them around. You can't do this if you just pick them up and slap them on wet polish. There's no changing your mind after that! I really hope this tip helps someone. :)

*The products in this post were purchased with my own money.

Tuesday, 22 January 2013

Welcome to my gradient fail. This isn't a full fail, but under any light except very direct sunlight and my lightbox these colors are just too dark to show the gorgeous fade between them.

nails nailart nail art polish mani manicure Spellbound OPI Best of the Best mini collection Russian Navy indigo blue shimmer magenta Lincoln Park After Dark purple eggplant deep dark LA Colors black gradient fail sponge sponged Seche Vite Dry Fast Top Coat

Even with my lightbox I had a very hard time capturing this gradient. I used two polishes from the OPI Best of the Best mini collection. I got this collection as a gift Christmas 2011, and I love it to pieces.

nails nailart nail art polish mani manicure Spellbound OPI Best of the Best mini collection Russian Navy indigo blue shimmer magenta Lincoln Park After Dark purple eggplant deep dark LA Colors black gradient fail sponge sponged Seche Vite Dry Fast Top Coat

The first polish I used, and the base of my gradient, is Russian Navy. Wow! I can see why this was one of the Best of the Best. Originally from the OPI Russian Collection, Russian Navy is now an OPI Classic shade. From the outside, Russian Navy looks purple. However, once you untwist that cap you're in for a shock! This polish is a deep indigo blue and all that purple you saw from the outside fades into a subtle shimmer.

nails nailart nail art polish mani manicure Spellbound OPI Best of the Best mini collection Russian Navy indigo blue shimmer magenta Lincoln Park After Dark purple eggplant deep dark LA Colors black gradient fail sponge sponged Seche Vite Dry Fast Top Coat

Next, I used Lincoln Park After Dark, originally from the Chicago Collection. Alone this polish is a very deep, dark purple, but turned black when layered over Russian Navy. I was hoping once I got it sponged on and added a top coat that the beauty of this purple would shine through but I couldn't get a hint of purple on my nails no matter the light I put it under ... though some of the purple color did show in the bottle.

nails nailart nail art polish mani manicure Spellbound OPI Best of the Best mini collection Russian Navy indigo blue shimmer magenta Lincoln Park After Dark purple eggplant deep dark LA Colors black gradient fail sponge sponged Seche Vite Dry Fast Top Coat

Lastly, I added a small amount of black to the very tips, reminiscent of a French tip.

nails nailart nail art polish mani manicure Spellbound OPI Best of the Best mini collection Russian Navy indigo blue shimmer magenta Lincoln Park After Dark purple eggplant deep dark LA Colors black gradient fail sponge sponged Seche Vite Dry Fast Top Coat

One coat of Seche Vite Dry Fast Top Coat sealed the colors together and gave my nails an amazing amount of shine. This is my very first bottle of Seche Vite, bought and paid for with a free gift card I earned with my Swagbucks account. Sign up for an account of your own and use the code JANTASTIC (before 11:59 PT tonight) and you'll start with 100 Swag Bucks. Hint: A $5 Amazon gift card is 450 Swag Bucks.

So, overall, if I was going to walk around with my hands in a lightbox this would be a perfect gradient. I don't think that idea would work very well though and, sadly, neither does this mani anywhere except these pictures. :(

Wednesday, 9 January 2013

I've been asked many times how I keep my hands/nails/cuticles looking so nice. Well, after taking off my latest polish I realized it's that time of the month � the time when my nails are starting to look a little long and ragged and I have to do a complete work over on them. I do this once, maybe twice a month, and do multiple smaller touch-ups between. So, I decided to snap a few pictures and attempt a short video in an attempt to explain how I keep my nails in shape. You guys asked for it!! :)


nails nailart nail art polish mani manicure Spellbound My Nail Care Routine tutorial non-acetone non acetone nail polish remover born pretty store clippers cutters Aveeno Daily Moisturizing hand lotion Revlon Shape n Buff file OPI matte Nail Envy nail strengthener biotin video

Here are the main things you'll need. I use non-acetone nail polish remover and a cotton ball to remove all my nail polish. I use so much of this stuff that I go for the cheaper Equate option. It works just as well as name brand and costs less! I bought the nail trimmer from the Born Pretty Store over a year ago, and I still love this thing! I recommend getting a six (or seven) sided file; I prefer my Revlon Shape 'N' Buff six sided file. And, the only lotion I will ever use is Aveeno, usually Daily Moisturizing. If you use something else make sure it is not water based. Check the list of ingredients and make sure water is near the end of the list. Water dries out your skin and nails, so I have never understood why you would want to use a water based lotion in an attempt to cure said dry skin. Aveeno Daily Mouisturizing has a dimenthicone skin protectant (a breathable barrier that locks in moisture) and is natural colloidal oatmeal based (which will help soothe and soften dry skin). You'll also need to have a sink and some soap nearby.

nails nailart nail art polish mani manicure Spellbound My Nail Care Routine tutorial non-acetone non acetone nail polish remover born pretty store clippers cutters Aveeno Daily Moisturizing hand lotion Revlon Shape n Buff file OPI matte Nail Envy nail strengthener biotin video

This is my elusive right hand immediately after removing polish and washing my hands. It needs a lot of TLC, right? Sadly, by the time I made the decision to do this tutorial I had already done my (prettier) left hand. What this means is that this hand will be a lot more ragged. Since I am right handed this hand takes all the damage. This also means the results of my overhaul will be a little less perfect since I'm cutting and filing with my non-dominant hand. Here is what I start with: dry skin, long nails that are growing out of their squared shape, peeling tips, and hideous cuticles. The end results will be a drastic change!


nails nailart nail art polish mani manicure Spellbound My Nail Care Routine tutorial non-acetone non acetone nail polish remover born pretty store clippers cutters Aveeno Daily Moisturizing hand lotion Revlon Shape n Buff file OPI matte Nail Envy nail strengthener biotin video

There will be no editing in these pictures (except light quality if needed) so you can see the true, unaltered nail makeover. The first thing to do, after washing and drying your hands, is to trim your nails.


nails nailart nail art polish mani manicure Spellbound My Nail Care Routine tutorial non-acetone non acetone nail polish remover born pretty store clippers cutters Aveeno Daily Moisturizing hand lotion Revlon Shape n Buff file OPI matte Nail Envy nail strengthener biotin video

Be careful after cutting your nails as they will be extra sharp. :)


nails nailart nail art polish mani manicure Spellbound My Nail Care Routine tutorial non-acetone non acetone nail polish remover born pretty store clippers cutters Aveeno Daily Moisturizing hand lotion Revlon Shape n Buff file OPI matte Nail Envy nail strengthener biotin video

Here is where the file comes in.


nails nailart nail art polish mani manicure Spellbound My Nail Care Routine tutorial non-acetone non acetone nail polish remover born pretty store clippers cutters Aveeno Daily Moisturizing hand lotion Revlon Shape n Buff file OPI matte Nail Envy nail strengthener biotin video

I use the previous pictures white side to file some extra length off my nails, creating the squared shape I like, and then round out the edges a bit. After that, I use the blue side to even out my nails. The pink end is used to smooth both the tips of my nails and the ridges on my nails.


nails nailart nail art polish mani manicure Spellbound My Nail Care Routine tutorial non-acetone non acetone nail polish remover born pretty store clippers cutters Aveeno Daily Moisturizing hand lotion Revlon Shape n Buff file OPI matte Nail Envy nail strengthener biotin video

You're nails will start to look worse before they look better. Be very careful if you have ridges that need filing. You never want to file too much off the tops of your nails!!


nails nailart nail art polish mani manicure Spellbound My Nail Care Routine tutorial non-acetone non acetone nail polish remover born pretty store clippers cutters Aveeno Daily Moisturizing hand lotion Revlon Shape n Buff file OPI matte Nail Envy nail strengthener biotin video

Next I use the purple and dark blue sides to lightly buff and shine my nails.


nails nailart nail art polish mani manicure Spellbound My Nail Care Routine tutorial non-acetone non acetone nail polish remover born pretty store clippers cutters Aveeno Daily Moisturizing hand lotion Revlon Shape n Buff file OPI matte Nail Envy nail strengthener biotin video

They look pretty bad, right? They'll look a little better after you wash off some of the dust and dandruff left behind by filing. Use some soap and water and be extra gentle.


nails nailart nail art polish mani manicure Spellbound My Nail Care Routine tutorial non-acetone non acetone nail polish remover born pretty store clippers cutters Aveeno Daily Moisturizing hand lotion Revlon Shape n Buff file OPI matte Nail Envy nail strengthener biotin video

Next up: lotion, lotion, and more lotion. It's far better to have too much than have not enough. Put a large dollop in your palm and cover your hands in lotion; then focus on massaging the lotion into your nails and around your cuticles. See the video below.


Forgive me, I really hope this works. This is my first video, and I really don't have the setup for this. I had to balance my camera on my knee and hope I didn't knock it over while filming. It's a bit out of focus in some parts, but it gets the point across. Don't forget to get some lotion under your nails too.

Let the lotion sink in for a few minutes before even thinking of touching your cuticles. The lotion will soften them and make pushing them back easier. After a few minutes go ahead and push your cuticles back. GENTLY!! If they don't move easily use more lotion and wait a bit longer. Better to wait a few extra minutes than to tear your cuticles attempting to push them back. Not only would that be painful, but there's always the risk of infection with damaged cuticles.


nails nailart nail art polish mani manicure Spellbound My Nail Care Routine tutorial non-acetone non acetone nail polish remover born pretty store clippers cutters Aveeno Daily Moisturizing hand lotion Revlon Shape n Buff file OPI matte Nail Envy nail strengthener biotin video

Finally, after the lotion has all sunk in and your hands are silky smooth but dry, apply a base coat. I just got this OPI Matte Nail Envy in the mail (bought with an Amazon gift card I received from Swagbucks.com) so I decided to give it a try. This is two coats. I really love how it's not truly matte but more the matte of your natural nails. It leaves a bit of shine behind that looks really nice. It also left my nails so strong and with a nearly perfectly arched shape after about an hour on my nails! This will certainly contribute to their overall strength. It does leave me wondering if I'm supposed to use my usual base coat over this or if this subs as a base coat. The big question is: will it protect against staining on its own?

My daily routine between these overhauls usually consists of lots of lotion and some less frequent filing between old and new polish. I use nothing but non-acetone remover, and I never trim or in any way remove my cuticles. Really, nothing too intensive.

What do you guys think? Definitely easy enough that anyone can do, right? There's no reason not to have beautiful hands and nails. Give it a try and let me know if this works for you. :)

Monday, 7 January 2013

Hey everyone! I hope you had a great first 2013 weekend. As for me, I've been doing some swatching. I eyed, hemming and hawing, over the Sephora by OPI Tinsel Town Collection for weeks and weeks before I finally broke down and bought it. This collection was actually part of a Christmas gift for myself, and I'm happy to finally be able to start swatching.


nails nailart nail art polish mani manicure Spellbound Sephora OPI Tinsel Town Collection Read My Palm mint light jade green swatch swatched swatching Sally Hansen Mint Sorbet chocolate chip ice cream creme Wet n Wild I Need A Refresh-Mint ombre comparison mints bubblegum wintergreen haul

I started with the one that caught my eye first, a gorgeous mint named Read My Palm. I love mint polish!!


nails nailart nail art polish mani manicure Spellbound Sephora OPI Tinsel Town Collection Read My Palm mint light jade green swatch swatched swatching Sally Hansen Mint Sorbet chocolate chip ice cream creme Wet n Wild I Need A Refresh-Mint ombre comparison mints bubblegum wintergreen haul

As far as mint polishes go this is one of the better ones I've found. It went on fairly smoothly, though I did find the formula a smidgen too watery. You can see one coat of Read My Palm here. It's slightly streaky and patchy, but covers well for only one coat.


nails nailart nail art polish mani manicure Spellbound Sephora OPI Tinsel Town Collection Read My Palm mint light jade green swatch swatched swatching Sally Hansen Mint Sorbet chocolate chip ice cream creme Wet n Wild I Need A Refresh-Mint ombre comparison mints bubblegum wintergreen haul

Two coats fills everything in and leaves behind a nice finish.


nails nailart nail art polish mani manicure Spellbound Sephora OPI Tinsel Town Collection Read My Palm mint light jade green swatch swatched swatching Sally Hansen Mint Sorbet chocolate chip ice cream creme Wet n Wild I Need A Refresh-Mint ombre comparison mints bubblegum wintergreen haul

Look how smooth and shiny this polish is with two coats and no top coat!


nails nailart nail art polish mani manicure Spellbound Sephora OPI Tinsel Town Collection Read My Palm mint light jade green swatch swatched swatching Sally Hansen Mint Sorbet chocolate chip ice cream creme Wet n Wild I Need A Refresh-Mint ombre comparison mints bubblegum wintergreen haul

Want to know how Read My Palm holds up to my two favorite mints? Read My Palm is on my index and pinky nail while my middle nail has Sally Hansen Mint Sorbet and my ring nail is painted with Wet n Wild I Need A Refresh-Mint.


nails nailart nail art polish mani manicure Spellbound Sephora OPI Tinsel Town Collection Read My Palm mint light jade green swatch swatched swatching Sally Hansen Mint Sorbet chocolate chip ice cream creme Wet n Wild I Need A Refresh-Mint ombre comparison mints bubblegum wintergreen haul

Sally Hansen Mint Sorbet is what I think of when I think mint. It reminds me of mint chocolate chip ice cream and is the perfect mint green in my opinion. Wet n Wild I Need A Refresh-Mint is the complete opposite. It's the perfect cool and refreshing minty blue of wintergreen gum. It's also the color I turn to when I need a sky blue color. As you can see, Read My Palm is leaning heavily on green and is a much darker shade than Mint Sorbet. It's been labeled a light jade green, and I can definitely see that. I think I might just have the perfect ombre shades here.


Color: Mint green with a definite lean towards green. A light jade green.
Finish: Creme
Application: I found the formula slightly watery. One coat went on streaky and patchy but built up nicely with no streaking. The dry time was amazing!
Coats to Opaque: 2
My Rating: 4.5 � if it lost the slightly watery quality it might just have tipped into a 5. I love mint shades and this is the perfect addition to my collection.

Monday, 31 December 2012

Happy New Year everyone!! Wow, it feels like forever since I've posted anything. I only have three real resolutions for this year and that one is definitely on there. I want to get back into my regular posting schedule and keep coming up with more and better ideas. I want to get and succeed at my dream job. And last but not least I want to keep eating healthy, continue my workout schedule, and keep losing weight. I lost over 30 pounds in about 1.5 years � most of that this year. Yay me!! I still have another 10-20 pounds to lose (continuing in a healthy, non-obsessive way) to reach my goal weight. Wish me luck. :)

nails nailart nail art polish mani manicure Spellbound Happy New Year tape taped red gold glitter shimmer James Bond The Spy Who Loved Me Goldeneye OPI Skyfall Collection metallic flaky flakies holiday 007

Now, onto the post. One of my Christmas gifts this year was 'Get Bonded' a three piece nail polish gift set. It contained The Spy Who Loved Me, Goldeneye, and Skyfall � all three from the OPI Skyfall Collection, their James Bond holiday collection. I decided to use Goldeneye and The Spy Who Loved Me in a tape mani for New Year's. Wow, this mani was stunning!!! I left it on for four days. For a girl who changes her polish daily, sometimes multiple times a day, this shows just how much I loved this mani.

nails nailart nail art polish mani manicure Spellbound Happy New Year tape taped red gold glitter shimmer James Bond The Spy Who Loved Me Goldeneye OPI Skyfall Collection metallic flaky flakies holiday 007

Honestly, I had every intention of passing on this collection. Looking at the swatches I didn't see anything truly stunning and worth searching for. Boy was I wrong!! I am so glad I got this as a gift. I couldn't manage to capture the true magnificence of Goldeneye. This picture gives an idea of the range of gold shades this glitter captures. The glitter was odd, kind of chunky and flaky, almost a metallic and went opaque for me in just two coats. It's not like any other glitter in my collection which is awesome!!

nails nailart nail art polish mani manicure Spellbound Happy New Year tape taped red gold glitter shimmer James Bond The Spy Who Loved Me Goldeneye OPI Skyfall Collection metallic flaky flakies holiday 007

Here is another shot of Goldeneye before I started taping. This picture washes out the color but gives you a better look at the chunky quality of the glitter. I can't get over how close I came to missing this glitter, of choosing not to get it. How silly of me!!

nails nailart nail art polish mani manicure Spellbound Happy New Year tape taped red gold glitter shimmer James Bond The Spy Who Loved Me Goldeneye OPI Skyfall Collection metallic flaky flakies holiday 007

I am equally as happy to own The Spy Who Loved Me. These polishes went on beautifully, look amazing together, and lasted the four days with not a hint of a chip. I did need to take a chisel to my nails to get Goldeneye off. It's misleading, looking so flaky and metallic. It makes you forget it's a glitter at heart. I think maybe it's harder to remove than regular glitters. I scrubbed and soaked and still had patches that just wouldn't come off. They're actually still there, like little golden bruises on my nails.

You've heard my resolutions; what things do you hope, wish and/or promise to do in 2013?

Wednesday, 19 December 2012

This one took a lot of thought and still feels a bit like a cop out. With Christmas on the brain and O being the letter of the week in the ABC Challenge I knew more than a few of my fellow challengers were likely to do ornaments. I strive to be different in this challenge�to think outside the box. However, what else was there for O that still fit into my holiday themed posts?

O is for Oh Christmas Tree.

nails nailart nail art polish mani manicure Spellbound OPI France Collection Tickle My France-y Essie Luxe Effects Shine of the Times flakie flakey flakies glitter nude tan holiday China Glaze Winter Holly green Wet n Wild Fergie Hollywood Walk of Fame star red gold ABC Challenge O
Shade

I used OPI Tickle My France-y as the base. This was my first time using this color and I'm left wondering why I never used it before. It is so beautiful!! On top of this color I used my brand new bottle (bought on Amazon with a gift card from Swagbucks.com) of Essie Shine of the Times. Can I say wow? These two colors are amazing together! They create a very elegant and glamorous look. I will say Shine of the Times looks best (in my opinion) in the shade. It's the reason for such a dimly lit picture.

From there I used two pieces of tape to create a triangle on my ring nail, filled that in with China Glaze Winter Holly and topped it with a red star dug out of Wet n Wild Fergie Hollywood Walk of Fame.

Saturday, 2 June 2012

I've given myself something of a challenge. I want to see how many ways I can spice up a simple French manicure. I will keep the standard French white as a base for these manis as an added challenge.


French tips manicure stamped hearts nail art nails


You've seen the standard French manicure in Mother's Day post, 'The Mommy Mess', and you've seen the Mother's Day design I created over those nails. Now, I bring you French Hearts. :)


French tips manicure stamped hearts nail art nails


I used my new Born Pretty image plate m56 for this design. I adore this image plate. It's a plate full of tip stamps. It's the same plate that contained the bow from my 'All Wrapped Up' nails


French tips manicure stamped hearts nail art nails


I only had one problem with stamping this design. I didn't push enough near the tip of my index nail and lost the hearts from the very tips. You can see that I went back and tried adding them. Well, I didn't line them up well enough and overlapped them slightly. I like to think I'm getting better though. The other nails are almost perfect!! Yay!


French tips manicure stamped hearts nail art nails


I used OPI Alpine Snow and Bubble Bath as the base again. The hearts are done with Wet n Wild's 'I Red a Good Book'.

Sunday, 27 May 2012

Hello girlies. Tomorrow is Memorial Day in America, a day to honor the men and women who died while serving in the Armed Forces. In national cemeteries, many volunteers place American flags on each grave as a way to honor them. These nails are my way of honoring the fallen.


Memorial Day nail art nails stars stripes red white and blue


I was hit with inspiration Friday night while looking through some tape manis. What if I used the elements of an American flag and put them on a nail? A red and white striped nail showing through outlines of stars. It could be just like a tape mani if I used stickers.  It was brilliant. I just needed some star stickers in various sizes.


Memorial Day nail art nails stars stripes red white and blue

It was amazingly hard to find the sizes of stars I wanted ... or to find any star stickers at all! I thought of nothing beyond the sizes I needed. Silly of me! Anyone else seeing the problem? Yes, they are stars in various sizes. Yes, they are stickers. Why yes, that does says adhesive gems!! Instead of putting star stickers on my nails and painting over them like tape I had to put these hard gems on my nails and carefully trace around each one since they didn't conform to my nails like a true sticker would. Then I had to fill in the entire nail around the star outlines. It went from being such a simple mani idea to an all night and all morning job. I got one hand done before I was too tired to see straight and had to do the other hand first thing in the morning.

Memorial Day nail art nails stars stripes red white and blue

Some of the stars turned out amazing, nearly perfect, while others were a bit deformed.


Still, my original idea came through pretty well I think.


Memorial Day nail art nails stars stripes red white and blue


Here is a look at what is under all that blue which is China Glaze First Mate if you were wondering. I started with a base of OPI Alpine Snow and drew in a few messy stripes with China Glaze Poinsettia. I just wanted to show you that, for a design like this, the stripes don't have to be perfect because you'll be seeing only a very small portion of each one. Looking at the finished nails you would never think something this messy was under each one! :)

Sunday, 13 May 2012

Happy Mother's Day  to the mothers out there. Today's post is for my own mommy.


I thought long and hard about this design. I didn't want a generic Mother's Day design. What I really wanted was something personal to my mother. Well, my mom's favorite flower is the lilac. Best of all? Her favorite color is also purple! Talk about perfect.


Sadly, I found the lilac flower almost impossible to recreate into something people would look at and think, "Oh, that's a lilac!" In my opinion, it's a bit of a mess.


However, my mom was kind enough to point out that her knowing what it was was all that should matter. This mani was created for her after all, and she loves it.


I started with these nails. I'm not usually one for a French mani. I always end up with streaks when using a 'natural' polish, which was no different with this mani. But I became pretty fond of these. I used two coats of OPI Bubble Bath with one coat of OPI Alpine Snow on the tips. I was feeling very steady handed that day so I went ahead and free handed the tips.


These last two pictures are of my left hand. This is the hand I usually use for my pictures, but I found myself liking the nails of my right hand better. But, I guess the lack of precision worked better for this mani. Go figure.


Polish Used
Borghese - Brilliante
OPI - Bubble Bath
OPI - Alpine Snow
OPI - Uh-Oh Roll Down the Window
Sally Hansen - Green with Envy
Sally Hansen - Lacey Lilac
Pure Ice - New Lilac
LA Colors - Purple
Sally Hansen - Insta-Dri