Showing posts with label Shimmer. Show all posts

Wednesday, 25 December 2013

Hello lovelies!! I'm a little late posting today, but right after finishing these this morning I had to immediately leave. How immediate? Immediate like I was terrified I was going to smudge them while getting dressed - thank goodness for my trusty Seche Vite top coat! The chance of smudging made me snap a few quick pics and then I was out the door. I just now settled down to watch some Christmas Doctor Who (goodbye, Doctor #11 ??) and realized I never got around to taking the pics off my camera. So, here's my Christmas mani ... late but at least it's still Christmas. :)


I wanted a mani that I could wear after Christmas. Once Christmas is over I want Christmas over so I went simple - more winter than truly Christmas. I started with 3 coats of CQ Pearls and then topped it with 2 coats of Firefly from Hell.


If you'll remember Firefly from Hell was the glow-in-the-dark glitter topper from my Halloween collection. There are still a few of these glow polishes left if anyone wants one; you can get them on sale for $6 in my Storenvy shop. :) I adore how the stamped snowflakes still show up in the dark!!


I think I'm getting better at this whole stamping thing!! These snowflakes were done in mere moments (with China Glaze Blue Bells Ring) as I was in such a hurry and they're almost all there - only a few smudges and missing lines. And, as you can see, I also added a pearl to the center of the large snowflake on my ring fingernails. I think it added a slightly elegant, dressy touch.

So, how was your holiday? Do anything special? Wear anything special on your nails? How about gifts?? Did you get everything you asked Santa for? :)

Until next time,
-Ashley

Friday, 8 February 2013

My Blogs to Love Friday post is coming later today, but I realized I never did a full post on my Candy Coated Collection. A one-stop place to see the polishes and swatches so you don't have to search out the previous swatch posts. Those swatch posts will likely hold a bit more info but if you're simply looking for the swatches and not the info behind the polish this is the place. :)

The entire Candy Coated Collection is now available in my Etsy shop

There are five polishes in this collection: Lollipop PrincessPlum out of ChocolatePeppermint PinwheelsGlitter Me Gumdrops, and Frosting Coated Sprinkles.


Lollipop Princess over Revlon Enchanting and LA Colors Black

Lollipop Princess over Revlon Enchanting and LA Colors Black with a coat of NYC Matte Me Crazy

Plum out of Chocolate over OPI Tickle My France-y

Peppermint Pinwheels over Sally Hansen Pink Blink

Glitter Me Gumdrops over Wet n Wild Candy-licious

Frosting Coated Sprinkles over naked nails
Frosting Coated Sprinkles over LA Colors White

Do you have a favorite?

I would be really grateful if you shared this post or favorited my shop or your favorite polish on Etsy. ?

Tuesday, 22 January 2013

Welcome to my gradient fail. This isn't a full fail, but under any light except very direct sunlight and my lightbox these colors are just too dark to show the gorgeous fade between them.

nails nailart nail art polish mani manicure Spellbound OPI Best of the Best mini collection Russian Navy indigo blue shimmer magenta Lincoln Park After Dark purple eggplant deep dark LA Colors black gradient fail sponge sponged Seche Vite Dry Fast Top Coat

Even with my lightbox I had a very hard time capturing this gradient. I used two polishes from the OPI Best of the Best mini collection. I got this collection as a gift Christmas 2011, and I love it to pieces.

nails nailart nail art polish mani manicure Spellbound OPI Best of the Best mini collection Russian Navy indigo blue shimmer magenta Lincoln Park After Dark purple eggplant deep dark LA Colors black gradient fail sponge sponged Seche Vite Dry Fast Top Coat

The first polish I used, and the base of my gradient, is Russian Navy. Wow! I can see why this was one of the Best of the Best. Originally from the OPI Russian Collection, Russian Navy is now an OPI Classic shade. From the outside, Russian Navy looks purple. However, once you untwist that cap you're in for a shock! This polish is a deep indigo blue and all that purple you saw from the outside fades into a subtle shimmer.

nails nailart nail art polish mani manicure Spellbound OPI Best of the Best mini collection Russian Navy indigo blue shimmer magenta Lincoln Park After Dark purple eggplant deep dark LA Colors black gradient fail sponge sponged Seche Vite Dry Fast Top Coat

Next, I used Lincoln Park After Dark, originally from the Chicago Collection. Alone this polish is a very deep, dark purple, but turned black when layered over Russian Navy. I was hoping once I got it sponged on and added a top coat that the beauty of this purple would shine through but I couldn't get a hint of purple on my nails no matter the light I put it under ... though some of the purple color did show in the bottle.

nails nailart nail art polish mani manicure Spellbound OPI Best of the Best mini collection Russian Navy indigo blue shimmer magenta Lincoln Park After Dark purple eggplant deep dark LA Colors black gradient fail sponge sponged Seche Vite Dry Fast Top Coat

Lastly, I added a small amount of black to the very tips, reminiscent of a French tip.

nails nailart nail art polish mani manicure Spellbound OPI Best of the Best mini collection Russian Navy indigo blue shimmer magenta Lincoln Park After Dark purple eggplant deep dark LA Colors black gradient fail sponge sponged Seche Vite Dry Fast Top Coat

One coat of Seche Vite Dry Fast Top Coat sealed the colors together and gave my nails an amazing amount of shine. This is my very first bottle of Seche Vite, bought and paid for with a free gift card I earned with my Swagbucks account. Sign up for an account of your own and use the code JANTASTIC (before 11:59 PT tonight) and you'll start with 100 Swag Bucks. Hint: A $5 Amazon gift card is 450 Swag Bucks.

So, overall, if I was going to walk around with my hands in a lightbox this would be a perfect gradient. I don't think that idea would work very well though and, sadly, neither does this mani anywhere except these pictures. :(

Monday, 31 December 2012

Happy New Year everyone!! Wow, it feels like forever since I've posted anything. I only have three real resolutions for this year and that one is definitely on there. I want to get back into my regular posting schedule and keep coming up with more and better ideas. I want to get and succeed at my dream job. And last but not least I want to keep eating healthy, continue my workout schedule, and keep losing weight. I lost over 30 pounds in about 1.5 years � most of that this year. Yay me!! I still have another 10-20 pounds to lose (continuing in a healthy, non-obsessive way) to reach my goal weight. Wish me luck. :)

nails nailart nail art polish mani manicure Spellbound Happy New Year tape taped red gold glitter shimmer James Bond The Spy Who Loved Me Goldeneye OPI Skyfall Collection metallic flaky flakies holiday 007

Now, onto the post. One of my Christmas gifts this year was 'Get Bonded' a three piece nail polish gift set. It contained The Spy Who Loved Me, Goldeneye, and Skyfall � all three from the OPI Skyfall Collection, their James Bond holiday collection. I decided to use Goldeneye and The Spy Who Loved Me in a tape mani for New Year's. Wow, this mani was stunning!!! I left it on for four days. For a girl who changes her polish daily, sometimes multiple times a day, this shows just how much I loved this mani.

nails nailart nail art polish mani manicure Spellbound Happy New Year tape taped red gold glitter shimmer James Bond The Spy Who Loved Me Goldeneye OPI Skyfall Collection metallic flaky flakies holiday 007

Honestly, I had every intention of passing on this collection. Looking at the swatches I didn't see anything truly stunning and worth searching for. Boy was I wrong!! I am so glad I got this as a gift. I couldn't manage to capture the true magnificence of Goldeneye. This picture gives an idea of the range of gold shades this glitter captures. The glitter was odd, kind of chunky and flaky, almost a metallic and went opaque for me in just two coats. It's not like any other glitter in my collection which is awesome!!

nails nailart nail art polish mani manicure Spellbound Happy New Year tape taped red gold glitter shimmer James Bond The Spy Who Loved Me Goldeneye OPI Skyfall Collection metallic flaky flakies holiday 007

Here is another shot of Goldeneye before I started taping. This picture washes out the color but gives you a better look at the chunky quality of the glitter. I can't get over how close I came to missing this glitter, of choosing not to get it. How silly of me!!

nails nailart nail art polish mani manicure Spellbound Happy New Year tape taped red gold glitter shimmer James Bond The Spy Who Loved Me Goldeneye OPI Skyfall Collection metallic flaky flakies holiday 007

I am equally as happy to own The Spy Who Loved Me. These polishes went on beautifully, look amazing together, and lasted the four days with not a hint of a chip. I did need to take a chisel to my nails to get Goldeneye off. It's misleading, looking so flaky and metallic. It makes you forget it's a glitter at heart. I think maybe it's harder to remove than regular glitters. I scrubbed and soaked and still had patches that just wouldn't come off. They're actually still there, like little golden bruises on my nails.

You've heard my resolutions; what things do you hope, wish and/or promise to do in 2013?

Tuesday, 4 December 2012

Today's China Glaze Holiday Joy polish is by far my favorite of this collection. It was one I picked up completely on a whim, but I couldn't be happier.

nails nailart nail art polish mani manicure Spellbound China Glaze Holiday Joy Collection Christmas red shimmer glitter ruby Cranberry Splash color swatch review

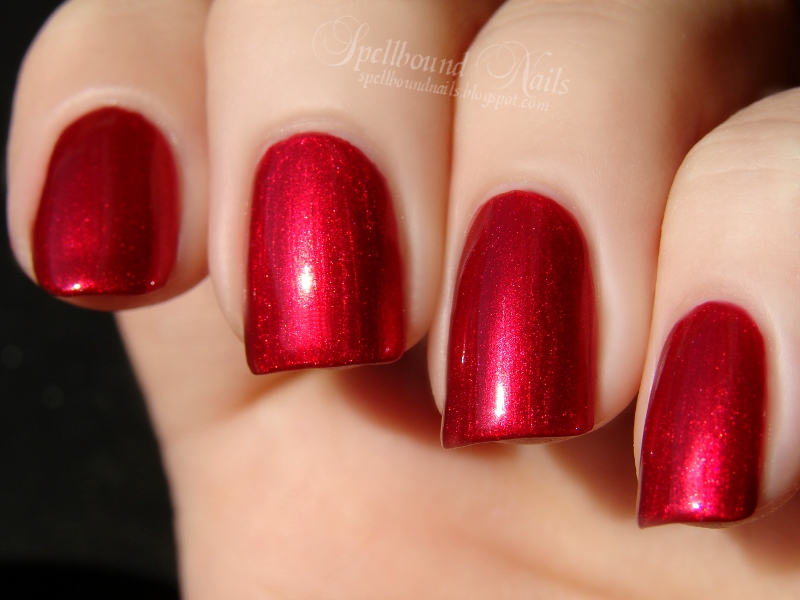
Meet Cranberry Splash, an amazingly beautiful ruby red shimmer. This is two coats of Cranberry Splash, picture taken in the shade. In some lights this polish looks almost liquid on the nails. Its shine is so intense and gorgeous.

nails nailart nail art polish mani manicure Spellbound China Glaze Holiday Joy Collection Christmas red shimmer glitter ruby Cranberry Splash color swatch review

This picture was taken in my lightbox. Polishes like Cranberry Splash, Christmas red with shimmer, are fairly common additions to most holiday collections. However, I find China Glaze has captured the most perfect shade of shimmery red for the holiday season.

nails nailart nail art polish mani manicure Spellbound China Glaze Holiday Joy Collection Christmas red shimmer glitter ruby Cranberry Splash color swatch review

This picture, taken in full sunlight, shows the wonderful shimmery side of Cranberry Splash.

Application was nearly perfect. It went on very smoothly and was easy to control. I find most red polishes have a messy application but Cranberry Splash needed next to no cleanup. There were a few streaks when I wasn't careful enough with the brush, but nothing too noticeable. I simply had to slow down a bit and apply from one side of the nail to the other instead of starting in the middle. This put a stop to any streaking and left behind a perfect finish. A top coat sealed it and gave it a shiny gleam.

All in all, China Glaze Cranberry Splash is a striking polish and will make a lovely addition to your nail polish collection. And just think how beautiful this color will look against some snow or in the presence of a lit and decorated tree during any holiday celebrations.


I'm attempting to start giving better, more thorough reviews instead of my usual 'it's pretty; go buy it'. I'm more than open to ideas on what a good review should include. If there's something you always look for in a review let me know and I'll try to include it in my upcoming reviews. Thank you!

Wednesday, 26 September 2012

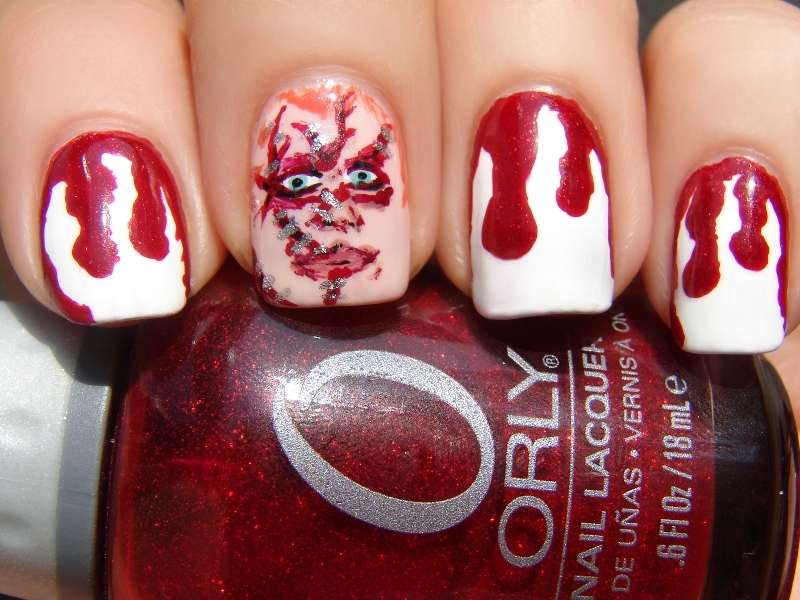
Here is my mani for C in the ABC Challenge. I had so many ideas for C. The classic caged bird flying away design, cats, checkered, color blocking. However, I finally decided C is for ...

Chucky complete with blood drips. The Bride of Chucky movie is definitely one of my favorite 'horror' movies, right up there with Seed of Chucky. The only horror movies I like more are the Resident Evil movies.


nails nail art nailart polish mani manicure Spellbound character nails movie Chucky Child's Play Blood drips red white China Glaze Wet n' Wild Sally Hansen LA Colors shimmer ABC Challenge horror Halloween

I love the blood drips over white in this mani. These come from a tutorial over at Nails by Kayla Shevonne. I was left slightly disappointed at my Chucky. He came together so well but the overall effect just doesn't scream Chucky at me. I don't think I managed to capture that essential craziness he does so well.

However, this mani is chilling no matter if it looks completely like Chucky. So, if I must, C can also be for chilling.

Friday, 10 August 2012

Hello (and goodbye) girlies. I leave early tomorrow morning for a lovely week-long beach vacation, so this is my last blog post until I get back. I'm hoping to stay in contact through my Facebook page though so check there if you need me or just want to see beach pictures. :)


nails nailart nail art Spellbound mani manicure China Glaze On Safari Collection Adventure Red-y Elephant Walk polish nailpolish

First off, painting your nails outside? Not as great as it sounds. Even less so on a hot day. The heat of the day and the cool breeze I enjoyed so much played havoc with this polish. It started drying on the brush after just one swipe onto my nail and bubbled like crazy! I was so disappointed because this is such an amazing color. I wanted to keep it on for at least another day or two, but I just couldn't stand the bubbles.


nails nailart nail art Spellbound mani manicure China Glaze On Safari Collection Adventure Red-y Elephant Walk polish nailpolish

But enough ranting! This is the last polish I own (besides the glitter and I have something special planned for that) from the China Glaze On Safari collection. It's probably my second favorite color, after Exotic Encounters. It looks fairly plain at first being a soft grey creme with a very light silver shimmer. However, upon closer inspection it has a slight leaning towards green in certain lights. As for the shimmer ... well, have a closer look.


nails nailart nail art Spellbound mani manicure China Glaze On Safari Collection Adventure Red-y Elephant Walk polish nailpolish


nails nailart nail art Spellbound mani manicure China Glaze On Safari Collection Adventure Red-y Elephant Walk polish nailpolish

These are an up close look at this silver shimmer in direct sunlight. In shade it's a fairly nondescript silver shimmer, but it comes alive in sunlight.


nails nailart nail art Spellbound mani manicure China Glaze On Safari Collection Adventure Red-y Elephant Walk polish nailpolish

This isn't my best tribal design. I ran out of original ideas after the first two or three polishes of this collection, but I do love how the red of Adventure Red-y looks against the soft shimmery grey of Elephant Walk. It's a striking combination.

Saturday, 21 July 2012

Welcome to Day 5, the last and final post for 'A Week of Glitter'. There are many more ways to use glitter, but I have to end somewhere! So, I'll end with one of my favorite ways of using glitter. This post focuses on gradient glitter.


Both polishes I used are from the China Glaze Capitol Colours Collection. If you'll remember this was dubbed the China Glaze Hunger Games Collection. I used Stone Cold as my base color and created the gradient using the red and gold glitter, Electrify.


You can see in this picture that Stone Cold has it's own bit of sparkle to it with it's silver shimmer. Stone Cold is a matte polish, however I used a top coat with this mani. The color change of Stone Cold from matte to shine is almost startling. It goes from the dark silver/grey of stone to a deep almost black color. Different, but still gorgeous.


No matter how much I love the look of Electrify, I try to use it only occasionally. Why, you ask, if I love it so much? Electrify is one of the most stubborn glitters I've ever encountered. Even using the foil method recommended for stubborn glitters it still takes a few minutes of scrubbing to get this removed from my nails. That's saying nothing about how the bits of removed glitter cling to everything they meet.

Wednesday, 18 July 2012

The 3rd post in 'A Week of Glitter' isn't exactly a glitter. It's a shimmer, but I figure that still qualifies for this week since it adds a sparkle to any outfit.


This is Sinful Colors Cinderella. I looked everywhere for this when it first came out and only just now found it in a 'brand new' display. I hate living in a small town for this reason.


Cinderella lived up to my, admittedly small, expectations. I can't say it really impressed me ... but then I wasn't expecting it to. While I adore this shade of baby blue, it's not one of the colors I can wear well.


I also found the beautiful pink shimmer you could see so clearly in the bottle got a bit lost on the nail unless you looked very closely. However, I used 4 coats to get Cinderella opaque so that might have something to do with the lost shimmer. I know other bloggers raved about the shimmer and their pictures showed it much more than my own.

Thursday, 14 June 2012

'ello girlies. Check out the Under Construction post if you're wondering if you found the right blog. I'm just making a few changes. However, that's not what today's post is about. Today's mani is fashion inspired.


I caught a glimpse of a dress on television last month or maybe the month before. I can't find a picture of it sadly, but I'll do my best to describe it. It was a black and white striped dress that had a sort of veed slit up the back. The vee was filled with this beautiful red fabric. I was immediately hit with inspiration and sketched out both the dress and a nail design.


Don't mind the claw. I didn't want to take the chance of smudging my nails by holding anything.

I finally remembered to get a work in progress picture. I always forget these pictures since I zone out while doing nails. It's almost a form of meditation for me. For these nails, I used three coats of white polish before using a 'V' cut piece of tape. Once they were taped, I used black polish to draw the stripes. After that it was simple to use three coats of an awesome shimmery red polish to fill in the vees after removing the tape. Before adding the red you can touch up your stripes if they're jagged. I was feeling shaky while doing these so I used a small flat brush to dab on the stripes. This left the edges slightly jagged in places but going back through and touching up what I could, filling in what I couldn't with more white, fixed that right up!


That's all I have for you today. I saved my favorite picture for last. Not sure why I like this one so much, but I do. It might be because I took it at a different angle than usual. Variety is always good. :)


Polish Used

  • China Glaze - White on White
  • LA Colors - Black
  • Orly - Star Spangled

Thursday, 7 June 2012

The Dalek Rule This Galaxy


nails nail art polish manicure mani Dalek Doctor Who Galaxy stars glitter shimmer


I mentioned on my Facebook page last week that I was doing my first galaxy nail. I also mentioned that I had to put my own spin on them. I left you all in the dark on just what kind of spin. Well, it's a Doctor Who spin. Most of you probably won't recognize the Doctor Who reference, but I hope you enjoy the nails anway. I thought of using the Tardis but I decided to go the road less traveled and do a Dalek ... or maybe just Dalek inspired since it's not a perfect replica.


nails nail art polish manicure mani Dalek Doctor Who Galaxy stars glitter shimmer


What galaxy is complete without a Dalek or two? None, I tell you, none! The Dalek nails aren't something just anyone would recognize, but it's a nice in-joke among fans. I'm just curious, how many of you recognized the nail right away or got excited when you read the title?


nails nail art polish manicure mani Dalek Doctor Who Galaxy stars glitter shimmer


Some of you may recognize this gold nail from last post's Golden Twilight nails. Not only is the color Bold Gold ... it's the same nail! I took off the Twilight Rays color but kept Bold Gold. It has held up very nicely, hasn't it? I just added the Born Pretty gold nail studs and a few layers of top coat to keep them in place. The nail studs are a great match in color for Bold Gold and make for a near perfect Dalek!


nails nail art polish manicure mani Dalek Doctor Who Galaxy stars glitter shimmer


I was utterly terrified of doing galaxy nails after hearing all the horror stories, but I think these turned out really well being my first try and all.


nails nail art polish manicure mani Dalek Doctor Who Galaxy stars glitter shimmer


I decided to use a creme black for space but stuck to shimmer polishes for the galaxies. The stars dotted on are a white creme. I also used this white for the galaxy base. The galaxies are made up of shimmer yellow, orange, and peach for the lighter shades and a deep shimmer metallic purple and a shimmer blue for the darker shades. I used a purple glitter, a blue holo glitter, a silver holo glitter, and a simple fine glitter for the stars not dotted on. It was all very shiny and glittery!

nails nail art polish manicure mani Dalek Doctor Who Galaxy stars glitter shimmer

I couldn't resist bringing out my blue/white light and seeing what they looked like under that. I think it was one of my better ideas to use only shimmer and glitter polishes.


nails nail art polish manicure mani Dalek Doctor Who Galaxy stars glitter shimmer gradient eyeshadow applicator brush sponge
Image from Alibaba.com


For those looking for simpler solution to using a sponge, whether for galaxy nails or gradients or any other nail where a sponge would come in handy, use an eyeshadow applicator. I found this worked so much better for me than any kind of sponge. Not only did I pick up a pack of 12 (60mm) applicators for cheap at my local dollar store, I had better control while using them. They are made to fit in your hand so they keep a wet mani intact while you do the opposite hand and are small enough to move around your entire nail easily. I can also use and reuse these. For these nails, I only used one side of an applicator! Not even the front and back of one side, just one side.


So, what do you guys think of galaxy nails? I know I will definitely be doing these again! 


Polish Used
LA Colors - Black
Sally Hansen - White On
Pure Ice - Unzip Me
Pure Ice - Twinkle
Revlon - Tangerine
Funky Fingers - Power Chord
China Glaze - Blue Year's Eve
L.A Girl Glitter Addict - Eutopia
Funky Fingers - Flashing Lights
Wet n Wild - Kaleidoscope
LA Colors - Glitter

Tuesday, 5 June 2012

Maybelline New York Color Show Bold Gold Twilight Rays black glitter shimmer nails nail art polish


Today's post puts Maybelline New York's new Color Show nail polish in the spotlight. Color Show is part of Maybelline's collection of runway colors. The Color Show collection comes in, get this, 40 new shades!! 30 hot colors and 10 statement pieces. The hot colors are mostly bright, bold neons and deep shimmer filled polishes while the statement pieces encompass crackle like polishes they call shredded, denims, and metallics. These polishes are priced to sell as well. I picked these two up for about $2.97 a bottle. I read somewhere that the top price is likely to be $3.99, but check your local shops to be sure. With the price and multitude of shades you can always have nails like a supermodel.


Maybelline New York Color Show Bold Gold Twilight Rays black glitter shimmer nails nail art polish


I felt myself very lucky to find these polishes in stores already. My town is usually the last to receive new products. With this in mind I immediately grabbed Twilight Rays and Bold Gold. Twilight Rays is a black polish filled with a gold glittery shimmer. I found the gold glitters nearly disappeared into the black with three coats of polish. Even in sunlight they didn't really pop like I thought they would. Nice to be sure, but not what I was expecting.


Maybelline New York Color Show Bold Gold Twilight Rays black glitter shimmer nails nail art polish


Bold Gold is a shade I have been looking for for what seems like forever. I've tried handfuls of gold polishes looking for this exact shade and texture. I'm ecstatic to finally own this color after so long. Bold Gold is a gorgeous yellow gold metallic. It has a very fine shimmer effect to it that doesn't overpower the delicate color like some other polishes. This is a perfect gold in my opinion! While Twilight Rays left me slightly disappointed, Bold Gold really stepped up.


I will say I had some major trouble getting Bold Gold to stay on my nails while painting them. The brush kept swiping the polish right off. The polish itself looked to be separating, oddly enough. When it was swiped off it left behind a watery oil with no color. I had to start over after my first attempt. I have reason to believe the polish was reacting to my base coat since I used a different base coat on my second attempt and things went smoother. There were still a few problems but no separation. A second coat of Bold Gold took care of that.


That said, Bold Gold stayed on my nails for about a week. I'm sure it would have lasted longer if I hadn't removed it myself. It had absolutely no chips and not even any wear on the tips when I took it off last night. Amazing!


Maybelline New York Color Show Bold Gold Twilight Rays black glitter shimmer nails nail art polish

Here is a close up of Twilight Rays. You can see the shimmer is actually a combination of tiny flecks of micro glitters and larger, yet still very small, hexagonal glitters.

Maybelline New York Color Show Bold Gold Twilight Rays black glitter shimmer nails nail art polish

And here is a close up of Bold Gold. You can see the shimmer really well here.


No matter what you think of the two colors I picked out of this collection you should definitely check it out for yourselves. With so many shades to be found in this collection you're sure to find a color created just for you.