Showing posts with label LA Colors. Show all posts

Wednesday, 3 April 2013

Late night post!! I'm sorry for the lack of actual nail posts lately. I just really haven't been feeling very inspired. It might have something to do with this. I had absolutely no idea what to do for Ancient Mayan in the Time Periods Challenge. I'm not a history buff. I have a few eras I like, but I mostly look to the future. I know nothing about the Mayan culture. If there wasn't the recent hubbub about the end of the world thanks to the Mayan Calender I likely wouldn't know anything about Maya at all. I searched and searched all week and finally found something last night. It feels a bit like a cop out but ...

Spellbound Nails Nail Lacquer Polish Time Periods Challenge Ancient Mayan Maya Jaguar gods demi-gods protectors animal print China Glaze On Safari Kalahari Kiss Desert Sun sponge sponged gradient

Mayans worshiped many jaguar gods, demi-gods, and protectors. As I said, I know nothing about Mayan culture, but I found this really interesting. Why? Because I love big cats!! They should totally be worshiped! I actually looked into colleges with programs that would let me work with these beauties, but found nothing that would let me do exactly what I wanted. I even looked into volunteering at big cat rescues, but there were sadly none near enough.

So, if you haven't figured it out yet, my nails are jaguar print. I really try to stay away from most animal prints. They've been done a hundred thousand times before by nearly every blogger under the sun. There's really nothing new that can be done with these prints. But I really did enjoy doing these nails ... twice since the first attempt was a messy disaster!

Tuesday, 26 March 2013

*All products in this post were purchased by me.

Hello everyone! I picked up a few things this weekend at some really awesome prices so I thought I'd do a haul post. :)


First up: L.A. Colors neons. I adore these!! I stopped in at the local Dollar Store to pick up some rolls for Sunday dinner and couldn't resist taking a browse through the nail polish. I found Mint, Hottie, Pink Bubbles, In A Flash, and Tangerine. I was in a hurry or I would have dug out the neon purple I'm sure I saw at the bottom of the bin too. See Pink Bubbles on my toes in the picture collage below. Having a neon polish on my toes is a must for spring and summer!


Saturday, I picked up these pretties from the Rite Aid sale bin ... well, all but the NYC polish; it, and a few other products, were marked at 75% off!! The sale bin seems to be drying up sadly, but I hold out hope that more polishes will be moved there soon. From left to right: Battery Park Purple, Tahitian Green, Strength of Pink, Figi, and Corduroy.


Also on for 75% off was this gorgeous NYC Lip Plumper in Plum Tart. I got this for $0.99!!! I didn't get it for the plumper ... okay, I didn't get it only for the plumper. The color is just so pretty! It's actually much lighter in person. I think of a nude gloss with a drop of plum color mixed in to give your lips a very natural shimmery flush of color. I didn't notice any real plump to my lips but it did have a slightly minty scent and did cause some tingling to my lips. Almost like getting toothpaste on your lips while brushing your teeth; I found it causes nearly the same amount of tingling for me. I found it almost refreshing to be honest.


Also on Saturday I found some really awesome sale items in Boscov's. This white sweater was an amazing find. It is so very, very comfy and is light enough to last in my wardrobe through Spring. And was a steal at $5.99! I also picked up a lovely gray blazer (no pics yet). I love blazers!! They are an essential part of my wardrobe! To find one for $9.99 was brilliant, but to get up to the checkout and have the sale's women scan it up as $5.99 was stunningly brilliant!

The one thing I didn't get on sale was the shoes. I saw them two weeks ago and fell in love � which is odd because I can't stand flats. I've been told many times that I must have been born with my heels because the only time I'm without them is when I'm not wearing any shoes at all. When I saw them this weekend I couldn't let them go again. Especially after trying them on and seeing how comfortable they are. I honestly expected to try them on and have them fit like all the other flats. They would surely feel weird and hurt the backs of my feet, but these lovelies didn't hurt at all and they fit perfectly! They are so me. An oddly fitting combo of nude and neon color with an awesome spiked toe. They were about $17 � which is a steal in and of itself for a pair of shoes today!

And my new shoes match my new neon pink nail polish! I hate feet, abhor them really, but I wanted to show off my neon toes too much. I kept the picture small and hope it doesn't make anyone cringe too badly. And yes, that is snow between the gaps of my porch. Yes, yes I did stand outside in my bare feet to get this picture. Dedication to my blog at its best ... or worst?

*All products in this post were purchased by me.

Thursday, 7 March 2013

And so ends the ABC Challenge. I am terribly sad to see this challenge over. I almost want to start all over again because there are so many letters that I had multiple nail art ideas for. Take Z for example. There's zebras, zombies, and zigzags and the one I went with: 

Z is for ... Zippers

nails nailart nail art mani manicure polish Spellbound Lacquer ABC Challenge Z is for Zipper Zippers tutorial Shimmer Polish Mary black silver white red China Glaze Adventure Red-y L.A. LA Colors Circuits Energy Source Pure Ice Silver Mercedes glitter unzipped

I did this design completely backwards. I was working on swatching Shimmer Polish (swatches coming next week) when I was hit with the idea of zippers opening up to reveal Mary in all it's glittery glory.

I think it turned out pretty great considering I had to draw everything around that small V of Mary you see. To learn how to do a traditional zipper nail and not my backwards version you should definitely check out this picture tutorial found on Beautylish.

Will any of you be joining me for the Inspired by Time Periods Challenge??

Wednesday, 6 March 2013

I am so sad to see the ABC Challenge end. Especially since I am running behind. Still, I'm looking forward to the start of the new nail art challenge: Inspired by Time Periods. This challenge will be hosted in the same group as the ABC Challenge so don't think you're in the wrong place when you click the link! Still, until then, I have Y and Z left to do. Thankfully, this post takes care of Y.

Y is for ... Cracked Eggs and Dripping Yolk.

nails nailart nail art polish mani manicure Spellboud Lacquer ABC Challenge Y is for Cracked Eggs and Dripping Yolk texture sponge L.A. LA Colors White NYC New York Color Matte Me Crazy Sally Hansen Lightening Sun Kissed Seche Vite

I really wanted to finish this challenge the way I started ... by doing the unusual and being different. So I went with yolk.

nails nailart nail art polish mani manicure Spellbound Lacquer ABC Challenge Y is for Cracked Eggs and Dripping Yolk texture sponge L.A. LA Colors White NYC New York Color Matte Me Crazy Sally Hansen Lightening Sun Kissed Seche Vite

I started with two coats of L.A. Colors Energy Source and put a coat of NYC Matte Me Crazy over it to give it a very awesome smoothly matte look. I think this alone would be a totally wearable look!

nails nailart nail art polish mani manicure Spellbound Lacquer ABC Challenge Y is for Cracked Eggs and Dripping Yolk texture sponge L.A. LA Colors White NYC New York Color Matte Me Crazy Sally Hansen Lightening Sun Kissed Seche Vite

Still, we all know eggs aren't really smooth. They're kind of speckled and dimpled if you look close enough. So I took a piece of makeup sponge and dabbed on a bit more white. I know! So much different from my usual eyeshadow applicator.

nails nailart nail art polish mani manicure Spellbound Lacquer ABC Challenge Y is for Cracked Eggs and Dripping Yolk texture sponge L.A. LA Colors White NYC New York Color Matte Me Crazy Sally Hansen Lightening Sun Kissed Seche Vite

After that, I drew on the egg yolk drips with Sally Hansen Lightening and outlined them with a mix of Lightening and Sally Hansen Sun Kissed. I kinda wish I had added a bit of fake light reflection with this mixture too, but I really like the finished look. To make the yolk really shiny and keep the matte look of the egg I actually used a nail art brush to put Seche Vite on just the drips.

Monday, 4 March 2013

I'm back!! My new computer arrived Saturday, and I spent the weekend getting it set up. The actual setup was easy and took minutes, but the little details of everyday use are a bit harder. You don't realize all the little things (like font, text size, saved passwords, desktop icons) about your computer you take for granted until they look almost right but are just wrong enough to really bug you. I'm still working on getting those little things fixed, but it feels so great to be back!! :)

Being back means I have some nail art to catch up on � like ABC Challenge posts. The challenge is coming to an end this Wednesday, and I still haven't posted my X mani.

X is for ... X-Men.


nails nailart nail art mani manicure polish Spellbound Lacquer design freehand ABC Challenge X-Men character First Class uniform costume black yellow L.A. LA Colors Sally Hansen Lightening comic comics Marvel

I knew immediately I wanted to use X-Men for X. I just wasn't exactly sure what kind of design I wanted to do for X-Men. I went searching and found the X-Men: First Class comics ... and the uniforms.

nails nailart nail art mani manicure polish Spellbound Lacquer design freehand ABC Challenge X-Men character First Class uniform costume black yellow L.A. LA Colors Sally Hansen Lightening comic comics Marvel

The uniforms were weird enough to catch my eye; bright yellow and black create an interesting contrast. I'm oddly reminded of Bumblebee from Transformers. The First Class uniforms have an odd black circle around the bellybutton area that has a yellow X cut straight through that I replaced on the chest area (or at least what I imagine is the chest area) with simple black letters to spell XMEN.


Challenge Inspired by Time Periods Jurassic Era Neanderthal Stone Age Ancient Egypt Mayan Greece Rome Medieval Imperial China Renaissance Victorian Industrial Roaring 20s 1950s 1960s 1970s 1980s 1990s Futuristic

The hosts of the ABC Challenge have decided to start a new challenge once this one is over. It will be Inspired by Time Periods so be sure to check out the group if you'd like to join. It will certainly be challenging! :)

Also, what do you guys think of the new St. Patrick's Day layout? I went to change the header and buttons to something more festive like always and everything went wonky! I had to rearrange and recode almost everything. I think it looks much better though, neater and more organized ... at least for me. How's it look for everyone else? No overflow or anything weird like that?

Thursday, 14 February 2013

Happy Valentine's Day!!! Welcome to the last Valentine's Day manicure of 2013 � Love Letters.


nails nail art nailart mani manicure polish Spellbound Lacquer holiday Valentine's Day Valentine Love Letters Newspaper newsprint envelopes envelope hearts heart stickers red white black LA Colors Energy Source L.A. Petities Night fun cute sweet lovely

I started with a base of LA Colors Energy Source. This is the best white I've found to date. It can be bought in most Dollar Stores at a great price and it takes a really, really long time to turn thick in the bottle. I used a nail art brush and Petites Night to create the envelopes, sealed them with top coat, and topped with a red heart sticker. The accent nail is a simple newspaper nail. I used the wedding announcements section of the newspaper. :)


nails nail art nailart mani manicure polish Spellbound Lacquer holiday Valentine's Day Valentine Love Letters Newspaper newsprint envelopes envelope hearts heart stickers red white black LA Colors Energy Source L.A. Petities Night fun cute sweet lovely

Here is what the mani looks like without the heart stickers. You could certainly keep them like this, use heart rhinestones, or even just draw the hearts on with polish if you don't have stickers or rhinestones.

Have trouble creating newspaper nails? Don't do them on completely dry nails. Wait until your nails are almost dry before dipping your nails or the newspaper into rubbing alcohol and applying to your nails. You want your nails to be at that point where they're dry to the touch but applying any pressure will leave fingerprints. This degree of 'wetness' will soak up the newspaper ink much better than dry nails. Be sure to apply even pressure across your entire nail or you'll end up with patchy newsprint. If you do have a place on your nail that is blank simply line up another piece of newspaper � being as exact in lining it up as possible, lightly dip a finger of the other hand in alcohol, and use it to hold the newspaper onto the blank spot.

Wednesday, 13 February 2013

Hello everyone and welcome to another ABC Challenge post! This week we're up to the letter W. Coming up with words to use for each letter and then creating a nail art design for that word is harder than it sounds! My mind goes blank every week, so I usually scroll through dictionary sites to find my word of the week. I thought there was absolutely nothing to do this week that I could then link to Valentine's Day, but I finally came up with something. And it has no pink!!

W is for ... Wings of Love.


nails nailart nail art polish mani manicure Spellbound Lacquer ABC Challenge letter W is for Wings of Love bird cage birdcage caged bird love cursive flying fly away heart hearts black white LA Colors Energy Source Petites Night elegant sweet holiday Valentine's Day design

I have wanted to do a caged bird mani forever! And I completely and totally adore how this one turned out!! I started with 3 coats of LA Colors Energy Source. More coats than I usually use, but since so much of the white was going to show I didn't want any chance of this being sheer or patchy. The black is Petites Night. I tried to keep everything connected between nails. The open birdcage, the cursive love, and the bird all leading to the heart. 


nails nailart nail art polish mani manicure Spellbound Lacquer ABC Challenge letter W is for Wings of Love bird cage birdcage caged bird love cursive flying fly away heart hearts black white LA Colors Energy Source Petites Night elegant sweet holiday Valentine's Day design

I love this mani so much that I couldn't seem to stop taking pictures. I tried to choose one from every angle so you can get the full effect.


nails nailart nail art polish mani manicure Spellbound Lacquer ABC Challenge letter W is for Wings of Love bird cage birdcage caged bird love cursive flying fly away heart hearts black white LA Colors Energy Source Petites Night elegant sweet holiday Valentine's Day design


nails nailart nail art polish mani manicure Spellbound Lacquer ABC Challenge letter W is for Wings of Love bird cage birdcage caged bird love cursive flying fly away heart hearts black white LA Colors Energy Source Petites Night elegant sweet holiday Valentine's Day design


nails nailart nail art polish mani manicure Spellbound Lacquer ABC Challenge letter W is for Wings of Love bird cage birdcage caged bird love cursive flying fly away heart hearts black white LA Colors Energy Source Petites Night elegant sweet holiday Valentine's Day design

I actually sacrificed an old nail art brush to do this mani. I couldn't get the lines small and delicate enough for the birdcage and the cursive love with the brushes I have, so I cut some bristles off an old brush to make it thinner! A great use for old brushes and cheaper than buying a thinner brush!!

It looks intricate and elegant, but is actually pretty simple when you break it down by nail. I found the hardest part is actually the birdcage, at least for me. Don't try to twist your hand around to do it right-side-up � this will just make your hands shaky and it's harder/messier to do an 'n' shape with nail polish; it's so much easier to leave your hand pointed straight away from you and just create a U on your nail. Create a smaller U inside that making sure the bottom of your u's touch/overlap and put a line down the middle. Add a line across the bottom, a handle at the top, and an open door on the side.

I really hope you enjoy this mani as much as I do. Check back tomorrow for the last Valentine's Day mani.

Saturday, 26 January 2013

The only polish from this collection inspired by a character and not a location. Lollipop Princess was inspired by Princess Lolly, resident of the Lollipop Woods and princess of Candyland.

Update: This polish and the rest of the collection are now up for sale in my Etsy shop.
  
nails nailart nail art polish mani manicure Spellbound Nails Nail Lacquer Candy Coated Collection Color Swatch Candy Land Candyland inspired Lollipop Princess Lolly Woods glitter hot light pink purple yellow holo holographic Wet n Wild I Need A Refresh-Mint Revlon new Enchanting pastel LA Colors Black NYC New York Color Matte Me Crazy

Lollipop Princess has pink, purple, and yellow hex glitters. And, since every princess needs some bling, small purple holo glitters.


nails nailart nail art polish mani manicure Spellbound Nails Nail Lacquer Candy Coated Collection Color Swatch Candy Land Candyland inspired Lollipop Princess Lolly Woods glitter hot light pink purple yellow holo holographic Wet n Wild I Need A Refresh-Mint Revlon new Enchanting pastel LA Colors Black NYC New York Color Matte Me Crazy bling

I'm going to have to try to get some better pictures. The colors are slightly off in this close-up and in the bottle picture.

nails nailart nail art polish mani manicure Spellbound Nails Nail Lacquer Candy Coated Collection Color Swatch Candy Land Candyland inspired Lollipop Princess Lolly Woods glitter hot light pink purple yellow holo holographic Wet n Wild I Need A Refresh-Mint Revlon new Enchanting pastel LA Colors Black NYC New York Color Matte Me Crazy bling

Lollipop Princess over Wet n Wild I Need A Refresh-Mint.


nails nailart nail art polish mani manicure Spellbound Nails Nail Lacquer Candy Coated Collection Color Swatch Candy Land Candyland inspired Lollipop Princess Lolly Woods glitter hot light pink purple yellow holo holographic Wet n Wild I Need A Refresh-Mint Revlon new Enchanting pastel LA Colors Black NYC New York Color Matte Me Crazy bling

In an effort to really showcase the holographic glitter I layered one coat of Lollipop Princess over Revlon Enchanting with a black accent nail. I think I caught the holo at just the right angle and light to make it flare. Mostly I caught the bright blue flares but it also turns a white/purple and a bright pink. You can see one small flash of pink on my pinky nail.


nails nailart nail art polish mani manicure Spellbound Nails Nail Lacquer Candy Coated Collection Color Swatch Candy Land Candyland inspired Lollipop Princess Lolly Woods glitter hot light pink purple yellow holo holographic Wet n Wild I Need A Refresh-Mint Revlon new Enchanting pastel LA Colors Black NYC New York Color Matte Me Crazy bling

I have been dying to see this glitter matte since I first mixed it up so I decided to add a layer of NYC Matte Me Crazy. Wow! I don't ever want to take this off!!!

Wednesday, 23 January 2013

I was really inspired this weekend; I've really missed doing nail art! This is actually a design I sketched up and then realized that it worked perfectly for S in the ABC Challenge.

S is for ... Spring Scene.

nails nailart nail art polish mani manicure Spellbound ABC Challenge S is for Spring Scene flowers roses texture green leaf leafy white picket fence pink yellow LA Colors Wet n Wild Candy-licious Sinful Colors Exotic Green Revlon Garden eyeshadow applicator sponge sponged sponging

You should be expecting this by now, but I used my eyeshadow applicators and Revlon Garden and Sinful Colors Exotic Green to create a leafy texture as a base. The white picket fence came next, hand drawn with a nail art brush, and the flowers were started with a dotting tool and finished with a nail art brush.

nails nailart nail art polish mani manicure Spellbound ABC Challenge S is for Spring Scene flowers roses texture green leaf leafy white picket fence pink yellow LA Colors Wet n Wild Candy-licious Sinful Colors Exotic Green Revlon Garden eyeshadow applicator sponge sponged sponging

With recent temperatures reaching into the single digits, I'm really longing for some flowers!

Be on the lookout tonight for another ABC Challenge mani as I finally get caught up. :)

Tuesday, 22 January 2013

Welcome to my gradient fail. This isn't a full fail, but under any light except very direct sunlight and my lightbox these colors are just too dark to show the gorgeous fade between them.

nails nailart nail art polish mani manicure Spellbound OPI Best of the Best mini collection Russian Navy indigo blue shimmer magenta Lincoln Park After Dark purple eggplant deep dark LA Colors black gradient fail sponge sponged Seche Vite Dry Fast Top Coat

Even with my lightbox I had a very hard time capturing this gradient. I used two polishes from the OPI Best of the Best mini collection. I got this collection as a gift Christmas 2011, and I love it to pieces.

nails nailart nail art polish mani manicure Spellbound OPI Best of the Best mini collection Russian Navy indigo blue shimmer magenta Lincoln Park After Dark purple eggplant deep dark LA Colors black gradient fail sponge sponged Seche Vite Dry Fast Top Coat

The first polish I used, and the base of my gradient, is Russian Navy. Wow! I can see why this was one of the Best of the Best. Originally from the OPI Russian Collection, Russian Navy is now an OPI Classic shade. From the outside, Russian Navy looks purple. However, once you untwist that cap you're in for a shock! This polish is a deep indigo blue and all that purple you saw from the outside fades into a subtle shimmer.

nails nailart nail art polish mani manicure Spellbound OPI Best of the Best mini collection Russian Navy indigo blue shimmer magenta Lincoln Park After Dark purple eggplant deep dark LA Colors black gradient fail sponge sponged Seche Vite Dry Fast Top Coat

Next, I used Lincoln Park After Dark, originally from the Chicago Collection. Alone this polish is a very deep, dark purple, but turned black when layered over Russian Navy. I was hoping once I got it sponged on and added a top coat that the beauty of this purple would shine through but I couldn't get a hint of purple on my nails no matter the light I put it under ... though some of the purple color did show in the bottle.

nails nailart nail art polish mani manicure Spellbound OPI Best of the Best mini collection Russian Navy indigo blue shimmer magenta Lincoln Park After Dark purple eggplant deep dark LA Colors black gradient fail sponge sponged Seche Vite Dry Fast Top Coat

Lastly, I added a small amount of black to the very tips, reminiscent of a French tip.

nails nailart nail art polish mani manicure Spellbound OPI Best of the Best mini collection Russian Navy indigo blue shimmer magenta Lincoln Park After Dark purple eggplant deep dark LA Colors black gradient fail sponge sponged Seche Vite Dry Fast Top Coat

One coat of Seche Vite Dry Fast Top Coat sealed the colors together and gave my nails an amazing amount of shine. This is my very first bottle of Seche Vite, bought and paid for with a free gift card I earned with my Swagbucks account. Sign up for an account of your own and use the code JANTASTIC (before 11:59 PT tonight) and you'll start with 100 Swag Bucks. Hint: A $5 Amazon gift card is 450 Swag Bucks.

So, overall, if I was going to walk around with my hands in a lightbox this would be a perfect gradient. I don't think that idea would work very well though and, sadly, neither does this mani anywhere except these pictures. :(

Wednesday, 2 January 2013

Hello everyone. Welcome to 2013!! :) Today's post was supposed to be for the letter Q in the ABC Challenge but, after the Christmas rush, I felt like doing nothing, so I'm a little behind in my posts. I don't feel right moving onto Q before posting P so ...

P is for ... Phoenix.

nails nailart nail art polish mani manicure Spellbound ABC Challenge P is for Phoenix Harry Potter Fawkes flames red yellow orange black Wet n Wild I red a good book Sally Hansen Sun Kissed Lightening white L.A. Colors fire

I cringe a little looking at this design. I was cleaning my usual nail art brush and the bristles came out. I was stunned because I was cleaning it like I always clean my brushes. I wasn't any more or less rough/gentle or pulling on the bristles excessively. I'm really not pleased because I pay an outrageous price for these brushes�4 brushes for about $15! I think I'll be ordering my brushes online from now on; for my usual price I can probably get a full set.

So, all brush rants aside, this design is a little messier than my usual since I had to use a thicker brush for the line work. Still, I felt very Harry Potter creating this phoenix ... though it's not as stunning as Fawkes. :)

Wednesday, 5 December 2012

We're up to M in the ABC Challenge. Getting ever closer to Z. :( I will be very sad to see the end of this challenge and may just start over on my own. There are so many amazing designs to do for each letter, and I don't think I'll be happy until I try them all. As for today's letter ...

M is for ... Mistletoe. I call this 'Kiss Me Under the Mistletoe'.

nails nailart nail art polish mani manicure Spellbound Sinful Colors Snow Me White Wet n Wild I Red a Good Book China Glaze Holly-Day L.A. Colors Black White green ABC Challenge M is for Mistletoe Kiss Me Under lips romance love Christmas Holiday glitter Pearl Harbor

This isn't my all time favorite design. I like the idea, but I wish I had thought the design out before jumping in. This is what happens when I don't sketch up my designs first.

nails nailart nail art polish mani manicure Spellbound Sinful Colors Snow Me White Wet n Wild I Red a Good Book China Glaze Holly-Day L.A. Colors Black White green ABC Challenge M is for Mistletoe Kiss Me Under lips romance love Christmas Holiday snow glitter Pearl Harbor

I do like the base polish. I went for a snowy effect using Sinful Colors Snow Me White and Pearl Harbor. Two coats of white with the iridescent glitter of Pearl Harbor creates a light dusting of snow over your nails. Perfect for winter. :)

Monday, 19 November 2012

So many nail polish brands are coming out with some really lovely holiday collections. It leaves me wanting to buy and swatch them all for you. Sadly, I don't have the money to buy them all ... but I did buy a few. Today's post is Heels of Dazzle, which is another from the Venique 2012 Holiday Collection.

nails nailart nail art polish mani manicure Spellbound Venique 2012 Holiday Collection Christmas Heels of Dazzle glitter sequin red fiery black L.A. Colors layered swatch color

Heels of Dazzle is a shiny red sequin style hex glitter in a thick and clear base. I was drawn to this glitter because it is just so different from the other holiday glitters this year since a lot of brands went with ultra-fine glitters.

Shown above is one coat of Heels of Dazzle layered over L.A. Colors Black. At first, I was just using the black base to really pull attention to the red, but I came to really love this decision. As you can see, in some light the red really pops and in others it's a hidden mystery. It's like opening that one present on Christmas that you didn't manage to find hidden around the house (yes, I was one of those kid!) and being completely and totally surprised�but in a good way.

nails nailart nail art polish mani manicure Spellbound Venique 2012 Holiday Collection Christmas Heels of Dazzle glitter sequin red fiery black L.A. Colors layered swatch color

Adding a second layer of glitter gave me another surprise. Adding more glitter on top of the first coat caused it to begin reflecting the light off of each other. This caused fiery glints of color. The flares of fire really aren't this prevalent in all lights. It's more something you'll catch out of the corner of your eye or with a motion of your hand. It will capture your attention but will disappear when you look closer. I was really lucky to capture this with my lightbox and such direct lighting.

nails nailart nail art polish mani manicure Spellbound Venique 2012 Holiday Collection Christmas Heels of Dazzle glitter sequin red fiery black L.A. Colors layered swatch color

I added a top coat to seal the polish and give this mani a perfectly smooth finish. I was pretty darn impressed with how flat this glitter sat on my nail. There was only one problem piece and it was simply a defective bit of glitter that had gotten cut in half leaving it with a rough edge. It was easy to remove and the top coat filled in the gap.

A tip to distributing the glitter without large patches: give your brush a side to side swish as you drag it up your nail. It's not a perfect solution and you'll likely still end up digging for glitter to fill a spot or two but not as much. You can also try the dabbing method with your brush. A dab here and there can really distribute the glitter. :)

Wednesday, 14 November 2012

I'm pretty excited to share today's post with you. This is for the letter J in the ABC Challenge. J is for ... Jester.

nails nailart nail art polish mani manicure Spellbound ABC Challenge J is for Jester harlequin Harley Quinn Batman DC Comics black white red L.A. Colors Wet n Wild I Red a Good Book inspired Character

I was inspired by Harley Quinn from Batman. Harley has always been one of my favorite Batman characters even though I don't read the comics or watch the animated series. Harley Quinn, as suggested by the play with her name, is clad in a traditional harlequin jester outfit. I used L.A. Colors Black and White with Wet n Wild I Red a Good Book to create this look. No tape was used in the making of this mani. You're stunned, I know. ;)

You can look to the Wikipedia article on Harley Quinn if you'd like to see my inspiration.

Monday, 15 October 2012

Hello everyone. I'm in the midst of a cold and debated even doing a post today, but thanks to some help from the lovely women on my Facebook Page I was able to beat the sore throat and tone down the other symptoms of my cold. You can totally thank them for this post!

nails nailart nail art mani manicure Spellbound border borders roses stamping black white L.A. Colors tutorial elegant stamp stamped stamper

I've been waiting to post these nails for a while but there were always other posts that needed posted first. Well, I'm making today the right day. Lustrous Lacquer wanted to see border nails and this is what I came up with.

nails nailart nail art mani manicure Spellbound border borders roses stamping black white L.A. Colors tutorial elegant stamp stamped stamper

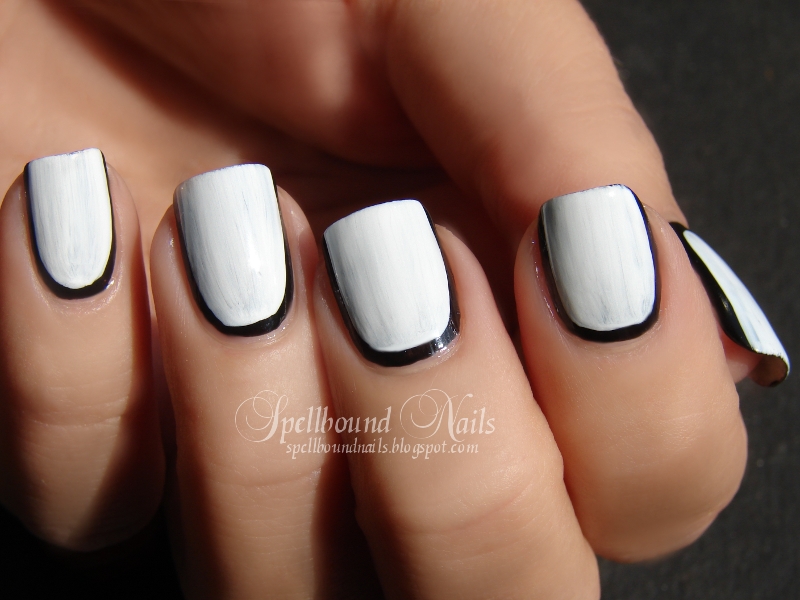
Start out with a base color. This will be the color of your borders. I used two coats of L.A. Colors Black. The next step is to paint your nails again, but leave a border around the edges. I found it easier to simply use the nail polish brush and be a little more careful around the edges, but you could use a nail art brush or a dotting tool to lay down an outline first if you don't feel comfortable jumping right in. You'll go back later and create a tip so don't worry if the tips look messy or the black shows on the edges. This picture shows one coat of L.A. Colors White. I used three coats to completely cover the black.

nails nailart nail art mani manicure Spellbound border borders roses stamping black white L.A. Colors tutorial elegant stamp stamped stamper

Here's where you complete the border by repainting the tips with your border color. Remember to round the edges of this tip to give a nice oval shape to the borders. I let this part of the mani dry completely and then put on a layer of top coat to give myself a nice stamping surface.

nails nailart nail art mani manicure Spellbound border borders roses stamping black white L.A. Colors tutorial elegant stamp stamped stamper

I used the rose image on m65 of my Born Pretty stamping plates. This is the one and only time I got such perfect images on all my nails. I'm sure it has something to do with the L.A. Colors polish I used. It's a very slow to dry polish, and I worked extra fast. Be sure to let your nails dry completely before stamping and be sure it's completely dry before using any top coat. With the black and white even the smallest amount of smudging or running will be immediately visible!

Friday, 12 October 2012

sweetjellybean.com

I don't know if you know this but October is Breast Cancer Awareness Month. I think this is something we should all recognize. Breast Cancer Awareness isn't just for survivors or the family of those diagnosed. It's not even just for all women everywhere. While breast cancer among men is rare, it does happen!

In 2012, it is estimated that among U.S. women there will be 226,870 new cases of invasive breast cancer (including new cases of primary breast cancer among survivors). An estimated 2,190 new cases of breast cancer will occur in men. It is also estimated that 39,510 women and 410 men will die of breast cancer this year alone in the United States. In 2010, it was estimated that 1.6 million new cases of breast cancer occurred in women worldwide. This is very real and very life threatening, and it's something that should be important to all of us.


nails nailart nail art mani manicure Spellbound breast cancer awareness Susan G Komen for the cure support pink ribbon french tips glitter campaign October

In support of Breast Cancer Awareness Month I wanted to do a very simple nail art. I wanted this nail art to be something anyone, of any skill level, could do to show their support. I used a very thin coat of Wet n Wild Sugar Coat as my base. Sinful Colors Beautiful Girl was used on the tips of all but my ring finger and topped with a coat of Wet n Wild Sparkled. My ring finger became a standard french tip with the help of LA Colors white and I used Beautiful Girl to create a pink ribbon. This is a very simple design that you won't need any special tools for. If you don't feel comfortable creating your own french tips there are specially created guides (found in the polish/nail tools section of most stores) you can buy or you can use binder re-inforcers (usually found in office supplies). The pink ribbon can be done with a nail art brush, a dotting tool, or even a toothpick.

Go to sweetjellybean.com and pick up your own sidebar badge and post banner so you can blog pink too!

Breast cancer facts from Susan G. Komen for the Cure

Tuesday, 2 October 2012

Hello everyone!! Since Halloween is my favorite holiday I decided to make October the best month yet. Or at least, I hope you guys will like my posts. What do you have to look forward to?

My usual Wednesday posts have been taken over by the ABC Challenge nail art so you should be seeing some pretty creative designs coming from that. I try to think outside the box with every letter.

I've also decided to take part in the Nail-Aween Nail Art Challenge. There are some really great designs, some I haven't tried before, that are part of this challenge. It's going to be awesome!

nails nailart nail art Spellbound mani manicure Halloween water marble October Nail-Aween Challenge black white LA Colors

What does all this mean for you? More posts!!! What does this mean for me? A really busy month. :)

The first design asked for in the Nail-Aween Challenge is water marble. I really dislike water marble. Don't get me wrong. The look of a finished water marble is really pretty (if you don't look too closely) but the time it takes is really not worth it, in my opinion. With this in mind, I debated doing a pin drag mani instead and calling it a 'without water-water marble', but I just couldn't do it. It would have felt like cheating.

nails nailart nail art Spellbound mani manicure Halloween water marble October Nail-Aween Challenge black white LA Colors

Water Marble is actually pretty simple, but it is also very time consuming. You start out by painting your nails with a base color. I used white. Next, you need a bowl of water. This water has to be filtered or bottled and it must be room temperature. I filled an old butter dish with bottled water and left it sit out overnight. By the time I was ready to start, it was the perfect temperature. What wasn't perfect was thinking I could use a butter dish. The inside was too glossy and the polish wouldn't attach to the sides. You think this would be a good thing but you need to stabilize the outer edge of your polish rings before you can start swirling designs. I finally managed to rig up this. I lined the butter dish with saran wrap and poured the water back in. The saran wrap held the polish perfectly and I had no problems creating swirls.

nails nailart nail art Spellbound mani manicure Halloween water marble October Nail-Aween Challenge black white LA Colors

After you set up your water, make sure you have all your supplies on hand. You want to be able to move from one step to the next without having to leave your work space. Work one finger at a time. Tape around your nail but don't get too close. Taping too close to the nail may stop the polish in the water from settling correctly. It's easier to clean up than to start all over. Once your nail is taped, start dropping your polish into your dish one drop at a time. Be careful not to overload the brush with polish. You only need one drop and an overload brush may drop two or three before you can control it. Keep dropping polish into the water until you get a tight bulls-eye pattern. If your polish isn't spreading you can give the dish a few quick taps against the side. Don't do this too harshly or you'll make a mess by splashing water and polish or create bubbles in your bulls-eye. How do I know? I did both.

Once you decide you have enough rings you'll need to attach them to your dish if they aren't already attached. Don't touch the outer ring! This ring will already be dry and touching it can ruin everything! Work from at least two rings in just to be safe. To create your swirls you can use almost anything sharp: a pin, a toothpick, the sharp end of a pencil (just know that the graphite may cause discoloration in the polish). I used an old nail art brush and found this worked even better than my attempts with a pin or a toothpick. You'll need to keep a napkin or paper towel on hand to keep your sharp object clean as you create swirls. Creating the swirls is up to you. Jump right in or spend a few moments trying to plan them out.

nails nailart nail art Spellbound mani manicure Halloween water marble October Nail-Aween Challenge black white LA Colors

Find a swirl you like and carefully sink your finger (nail down) through the polish and into the water. Keep your finger in the water! You need to clean the water of polish first or you'll ruin your design. I used my nail art brush and rolled it through my fingers while I moved it around the water. This rolling motion will gather the polish better than simply swishing it through the water. Rolling will literally roll the polish around the tip of your brush (or pin/toothpick/pencil). This is what you'll need your napkin for. Carefully remove your finger from the water. Don't blow on your nail or flail your hand through the air. Remove the tape around your nail. Carefully! You don't want to bump your nail and you also need to be aware that you'll be flinging water everywhere because there is certainly water caught in and around the tape. After that, pull your brush through the napkin/paper towel and move onto your other nails, repeating the process again and again. :)

nails nailart nail art Spellbound mani manicure Halloween water marble October Nail-Aween Challenge black white LA Colors

You'll come out with something like this and you'll quickly realize a few other reasons I dislike water marbling besides it being time consuming and a waste of polish. The first thing you'll notice are the bubbles you'll surly have. I'm sure more seasoned water marblers have learned tricks on how to prevent this, but I've found nothing I tried so far worked. Some things I tried made it bubble less and other just caused more bubbles. The other big reason? Polish has settled everywhere that wasn't taped. This means there is polish all over my cuticle and worse still, settled around my nail and under it too! No amount of cleaning will fix all of this. Some will be cleaned and the rest will flake off in a day or so, usually with a little help from some tweezers.

nails nailart nail art Spellbound mani manicure Halloween water marble October Nail-Aween Challenge black white LA Colors

You can see here that I cleaned them as best I could. I also added a layer of top coat. This top coat swiped the bubbles right off and left behind blank spots in the black and dents in the white. While I feel really accomplished for doing this for the Nail-Aween Challenge, and I love the swirls on my pinky and my thumb nails I think this is nail art best viewed from further away ... or just not done at all.

What do you think of water marbling? Have you mastered this art? Or, like me, do you find it a waste of time and polish?