Showing posts with label Matte. Show all posts

Wednesday, 11 September 2013

Another post?? YES! I've had this polish swatched and the pictures sitting on my computer for forever a few months.


I've gotten really horrible about doing my nails lately, so I'm trying to clear out all my old swatches in an effort to keep the blog going.


I picked up this and a few other Fresh Paint polishes at Five Below a few months ago. While Guava is definitely my favorite of those I bought, being such an amazingly gorgeous color, it was a real pain to work with! It's one of those polishes that streaks and drags, making the first coat a real eye-sore. Still, the really lovely almost neon peachy coral color works really well with my skin tone, in my opinion, bringing out the peachy tones instead of the yellow/green some polishes can bring out. I found the hassle worth it in the end.


You can see here the polish really is practically a neon in the sun.


I just had to see what this polish looked like with a coat of matte! Stunning!!


And I finally got around to trying the glitter topper I picked up at Sephora nearly a year ago!!! This is Chaotic from the Sephora X: The Toppers collection. It's a pretty standard black and white graffiti glitter, and was easy to apply. Still, probably not worth the money I paid for it given that every indie brand under the sun seems to have a black and white topper close to this at half the price ... live and learn, right?

Until next time. xoxo

Wednesday, 9 January 2013

I've been asked many times how I keep my hands/nails/cuticles looking so nice. Well, after taking off my latest polish I realized it's that time of the month � the time when my nails are starting to look a little long and ragged and I have to do a complete work over on them. I do this once, maybe twice a month, and do multiple smaller touch-ups between. So, I decided to snap a few pictures and attempt a short video in an attempt to explain how I keep my nails in shape. You guys asked for it!! :)


nails nailart nail art polish mani manicure Spellbound My Nail Care Routine tutorial non-acetone non acetone nail polish remover born pretty store clippers cutters Aveeno Daily Moisturizing hand lotion Revlon Shape n Buff file OPI matte Nail Envy nail strengthener biotin video

Here are the main things you'll need. I use non-acetone nail polish remover and a cotton ball to remove all my nail polish. I use so much of this stuff that I go for the cheaper Equate option. It works just as well as name brand and costs less! I bought the nail trimmer from the Born Pretty Store over a year ago, and I still love this thing! I recommend getting a six (or seven) sided file; I prefer my Revlon Shape 'N' Buff six sided file. And, the only lotion I will ever use is Aveeno, usually Daily Moisturizing. If you use something else make sure it is not water based. Check the list of ingredients and make sure water is near the end of the list. Water dries out your skin and nails, so I have never understood why you would want to use a water based lotion in an attempt to cure said dry skin. Aveeno Daily Mouisturizing has a dimenthicone skin protectant (a breathable barrier that locks in moisture) and is natural colloidal oatmeal based (which will help soothe and soften dry skin). You'll also need to have a sink and some soap nearby.

nails nailart nail art polish mani manicure Spellbound My Nail Care Routine tutorial non-acetone non acetone nail polish remover born pretty store clippers cutters Aveeno Daily Moisturizing hand lotion Revlon Shape n Buff file OPI matte Nail Envy nail strengthener biotin video

This is my elusive right hand immediately after removing polish and washing my hands. It needs a lot of TLC, right? Sadly, by the time I made the decision to do this tutorial I had already done my (prettier) left hand. What this means is that this hand will be a lot more ragged. Since I am right handed this hand takes all the damage. This also means the results of my overhaul will be a little less perfect since I'm cutting and filing with my non-dominant hand. Here is what I start with: dry skin, long nails that are growing out of their squared shape, peeling tips, and hideous cuticles. The end results will be a drastic change!


nails nailart nail art polish mani manicure Spellbound My Nail Care Routine tutorial non-acetone non acetone nail polish remover born pretty store clippers cutters Aveeno Daily Moisturizing hand lotion Revlon Shape n Buff file OPI matte Nail Envy nail strengthener biotin video

There will be no editing in these pictures (except light quality if needed) so you can see the true, unaltered nail makeover. The first thing to do, after washing and drying your hands, is to trim your nails.


nails nailart nail art polish mani manicure Spellbound My Nail Care Routine tutorial non-acetone non acetone nail polish remover born pretty store clippers cutters Aveeno Daily Moisturizing hand lotion Revlon Shape n Buff file OPI matte Nail Envy nail strengthener biotin video

Be careful after cutting your nails as they will be extra sharp. :)


nails nailart nail art polish mani manicure Spellbound My Nail Care Routine tutorial non-acetone non acetone nail polish remover born pretty store clippers cutters Aveeno Daily Moisturizing hand lotion Revlon Shape n Buff file OPI matte Nail Envy nail strengthener biotin video

Here is where the file comes in.


nails nailart nail art polish mani manicure Spellbound My Nail Care Routine tutorial non-acetone non acetone nail polish remover born pretty store clippers cutters Aveeno Daily Moisturizing hand lotion Revlon Shape n Buff file OPI matte Nail Envy nail strengthener biotin video

I use the previous pictures white side to file some extra length off my nails, creating the squared shape I like, and then round out the edges a bit. After that, I use the blue side to even out my nails. The pink end is used to smooth both the tips of my nails and the ridges on my nails.


nails nailart nail art polish mani manicure Spellbound My Nail Care Routine tutorial non-acetone non acetone nail polish remover born pretty store clippers cutters Aveeno Daily Moisturizing hand lotion Revlon Shape n Buff file OPI matte Nail Envy nail strengthener biotin video

You're nails will start to look worse before they look better. Be very careful if you have ridges that need filing. You never want to file too much off the tops of your nails!!


nails nailart nail art polish mani manicure Spellbound My Nail Care Routine tutorial non-acetone non acetone nail polish remover born pretty store clippers cutters Aveeno Daily Moisturizing hand lotion Revlon Shape n Buff file OPI matte Nail Envy nail strengthener biotin video

Next I use the purple and dark blue sides to lightly buff and shine my nails.


nails nailart nail art polish mani manicure Spellbound My Nail Care Routine tutorial non-acetone non acetone nail polish remover born pretty store clippers cutters Aveeno Daily Moisturizing hand lotion Revlon Shape n Buff file OPI matte Nail Envy nail strengthener biotin video

They look pretty bad, right? They'll look a little better after you wash off some of the dust and dandruff left behind by filing. Use some soap and water and be extra gentle.


nails nailart nail art polish mani manicure Spellbound My Nail Care Routine tutorial non-acetone non acetone nail polish remover born pretty store clippers cutters Aveeno Daily Moisturizing hand lotion Revlon Shape n Buff file OPI matte Nail Envy nail strengthener biotin video

Next up: lotion, lotion, and more lotion. It's far better to have too much than have not enough. Put a large dollop in your palm and cover your hands in lotion; then focus on massaging the lotion into your nails and around your cuticles. See the video below.


Forgive me, I really hope this works. This is my first video, and I really don't have the setup for this. I had to balance my camera on my knee and hope I didn't knock it over while filming. It's a bit out of focus in some parts, but it gets the point across. Don't forget to get some lotion under your nails too.

Let the lotion sink in for a few minutes before even thinking of touching your cuticles. The lotion will soften them and make pushing them back easier. After a few minutes go ahead and push your cuticles back. GENTLY!! If they don't move easily use more lotion and wait a bit longer. Better to wait a few extra minutes than to tear your cuticles attempting to push them back. Not only would that be painful, but there's always the risk of infection with damaged cuticles.


nails nailart nail art polish mani manicure Spellbound My Nail Care Routine tutorial non-acetone non acetone nail polish remover born pretty store clippers cutters Aveeno Daily Moisturizing hand lotion Revlon Shape n Buff file OPI matte Nail Envy nail strengthener biotin video

Finally, after the lotion has all sunk in and your hands are silky smooth but dry, apply a base coat. I just got this OPI Matte Nail Envy in the mail (bought with an Amazon gift card I received from Swagbucks.com) so I decided to give it a try. This is two coats. I really love how it's not truly matte but more the matte of your natural nails. It leaves a bit of shine behind that looks really nice. It also left my nails so strong and with a nearly perfectly arched shape after about an hour on my nails! This will certainly contribute to their overall strength. It does leave me wondering if I'm supposed to use my usual base coat over this or if this subs as a base coat. The big question is: will it protect against staining on its own?

My daily routine between these overhauls usually consists of lots of lotion and some less frequent filing between old and new polish. I use nothing but non-acetone remover, and I never trim or in any way remove my cuticles. Really, nothing too intensive.

What do you guys think? Definitely easy enough that anyone can do, right? There's no reason not to have beautiful hands and nails. Give it a try and let me know if this works for you. :)

Tuesday, 9 October 2012

Sorry this is a bit late. It was supposed to be up Friday. There were two manicures in the Nail-Aween Challenge that I was least looking forward to and they were the water marble and the matte dotticure. Personally, I'm just not fond of matte dotticures. I love bright colors and flashy nail art. I managed to get a bright color but it's certainly not flashy nail art.


nails nail art nailart manicure mani Spellbound Nail-Aween Halloween Matte Dots Dotticure New York Color NYC red orange Challenge

This is New York Color's Spring Street and it's one of those really hard colors to photograph, but I think I managed somewhat well. Spring Street is an orange-red that leans orange in person but instantly turns red on camera. Between the bottle and the color on my nails you should have some idea of what this color looks like.


nails nail art nailart manicure mani Spellbound Nail-Aween Halloween Matte Dots Dotticure New York Color NYC red orange Challenge

No matter how much or how little I like this color it is something truly amazing when turned matte. I did three layers of Spring Street. Two would have worked but I wanted a perfectly smooth surface. As anyone who has used matte before can tell you it chips easily and quickly so I always do a coat of my usual top coat before using my matte top coat. I've never had any problems so far so it must work pretty well. Once the matte top coat was completely dry I was stunned by how rubber my nails looked. This picture does them no justice!


nails nail art nailart manicure mani Spellbound Nail-Aween Halloween Matte Dots Dotticure New York Color NYC red orange Challenge

After the matte top coat dried all that was needed was some dots. Really, what can you do with a matte dotticure? There are only so many combination of dots you can do without it looking crowded. I went with a row of medium sized dot right up the middle.

Honestly, I'm happy to be through with this manicure. But I'll let you in on a secret ... the next one in the Nail-Aween Challenge is going to be awesome!!!

I forgot to add this in my last post. Here's a list of the other artists taking part in this challenge. Go check them out, give them some love. 


Tuesday, 12 June 2012

Hello girlies. I was set not to post today as I was supposed to be in Connecticut by way of New York and the Statue of Liberty but those plans have been put off to a later time. So, I bring you what I think of as Vintage Inspired: Take Two.


I bought Sally Hansen's Lacey Lilac for my Mother's Day nails, but I've become pretty taken with it. It's such a great shade of light purple, exactly the shade I reach for when I go for a lilac. Everything loses its shine after a time, so using NYC's matte top coat, Matte Me Crazy, really turns these nails vintage.


The cameo is hand-painted using the 'DIY nail art stickers' method. It's something I found on Youtube a year or more ago but only used a few times. I prefer hand-painting straight onto my nails but with something like this that needs a lot of precision it's a good fallback. I definitely recommend it if you have trouble painting your non-dominant hand or even if you're not too artistic, because you can print out a small design and trace it with this method.


The peals used in this mani come from the Born Pretty store. This is where I buy most of my nail art 'pretties': things like pearls, beads, studs, and rhinestones. My very first order through the store included these pearls. They are great because they come in three sizes: 4mm, 3mm, and 1.5mm. The pearls used in this design are the 1.5mm pearls. You can also buy a wheel of 1.5mm pearls in various colors. I have yet to try them, but they look so pretty! The Born Pretty store doesn't just carry nail art decorations or even just things dealing with nail art either. You can find cosmetics, really awesome contact lenses that I intend to buy at some point, hair decorations, jewelry, and much more. The prices are stunning and all with free shipping!!! If you haven't checked them out yet I definitely recommend taking a browse through. I'm sure you'll find something you just have to have. I know I do! So much that I keep a list of things I want between orders so I don't forget something.


Be sure to check out their specials for sales. Also, look into their Rewards Program. You earn points for each order, posting reviews, and uploading photos. These points translate to money that you can use in your orders. Use up to 1000 points ($10.00) with each order. Depending on your order you might just get it completely free!!

Wednesday, 2 May 2012

Hello, lovelies! How do my nails look? These are the first pictures since I broke the index nail of this hand and did an emergency teabag fix. It's holding up great!!

As for this post, I bring you a new product today. Or rather, New York Color (NYC) brings you a new product. It's a mattifying top coat (yep, they called it mattifying) they've named Matte Me Crazy.


I was stunned to find this on the shelf. The only matte top coat to be found around here is Hard Candy's, Matte-ly in Love, found exclusively in Walmart. Hard Candy will cost you about $4 for a .35 fl oz bottle. It will even get you a cute little cardboard topper that fits over the cap. This makes finding it in a polish drawer very easy!


But, the reason I was so excited to find this new matte top coat is that NYC costs under $2 for a .33 fl oz bottle and can be bought in a multitude of locations. Sadly, it doesn't come with a cardboard topper and is not so easy to find in a polish drawer. :(


Now for the nitty gritty. Hard Candy has a much thicker formula. Hard Candy passed the drip test with flying colors. NYC ... not so much. It gave two very quick drips and a slower third before leveling out on the brush.


While on the subject of brushes. Hard Candy has a short, rounded brush with a slightly short and round cap. It fits in my hand okay but its short length may not be comfortable for everyone. NYC has a longer and wider brush that's attached to a round cone like cap. My preference in brushes have always leaned towards the wider and flatter. I adore the Sally Hansen flat brush and the new Wet n Wild megalast Pro brush so I prefer the NYC brush.


I don't think Riveting was the polish to go for when testing out a new matte top coat. I know it turned matte but I'm not sure just how matte. I can however tell you that NYC mattified slower than Hard Candy. I was actually kind of pleased about this though. I've had trouble with one part of my nails turning more matte than another with Hard Candy because it dried and turned matte too quickly. I don't know about anyone else, but I paint backwards so my pinkie nail was just settling into fully matte by the time I started my thumb with NYC. I had no streaking or blobs of darker matte with NYC.

I will definitely give you a more thorough answer on just how matte is matte when talking about these two in another post with another mani. NYC may just be a good substitute for the more expensive Hard Candy. We'll see ... probably sometime next week.

Friday, 16 March 2012

Wow! Could this week have gone any faster?


Capitol Colours are here!! I wanted to have these swatches posted for you guys mid-week but it was just one thing after another! Sadly, I still have only three of the six polishes I want from this collection. I've checked most of the local shops, and they're all sold out. I think if I want them I'm going to have to splurge and order them online. I just hate paying shipping costs and then having to wait for them to arrive. I'm not good with waiting! However, if the other colors are anything like these three the collection is certainly worth the effort and extra money.


The first polish I have to show off is the one I was most interested in, oddly enough. This is Fast Track, a gorgeous beige/tan color chock full of gold shimmer. I'm the kind of girl made for bright colos so I'm not a fan of nudes, but I adore this polish. The shade is just different enough from other nudes to catch attention and the gold shimmer really makes it stand out in a crowd. Fast Track is one of a kind in my opinion.


3 Coats in Sunlight


Next up is Harvest Moon. I'm a bit unsure as to how to discribe this color except stunning. I've heard it described as a copper color, but I would go with more of a tawny bronze. Truthfully, it's only a slight shade different, but I think it better manages to capture the near orange tint that mixes with the copper. Harvest Moon is a hidden gem in this collection that puts me in mind of Autumn, pumpkins, and the golden orange of turning leaves. You know me with shimmering metallics; there's no question that I adore this, both formula and color.


2 Coats in Full Sun


Last, but not least, is Stone Cold. This color certainly brings to mind stone: caves and caverns with thick stone walls. It's dark grey bordering on black in some lights with a thick silver shimmer. This is a matte polish so the shimmer doesn't shine or really sparkle but mixes perfectly with the deeper, darker background. I manage to get my nails covered in one coat, but my coats tend to be a bit thicker than most people use. This polish starts to dry very quickly as the matte sets so work quickly if you don't want it pulling up with your brush.


1 Coat in Full Sun

Stone Cold Close-Up


Can I just say I am stunned and so very thankful to all you followers, new and old? You guys are amazing!!

Monday, 5 March 2012

Hey everyone, I hope you guys had a great weekend!

This mani I did Friday night, while Jack and I were just relaxing and watching one of our favorite movies, Blow. If you have not seen that movie, you MUST!!!!

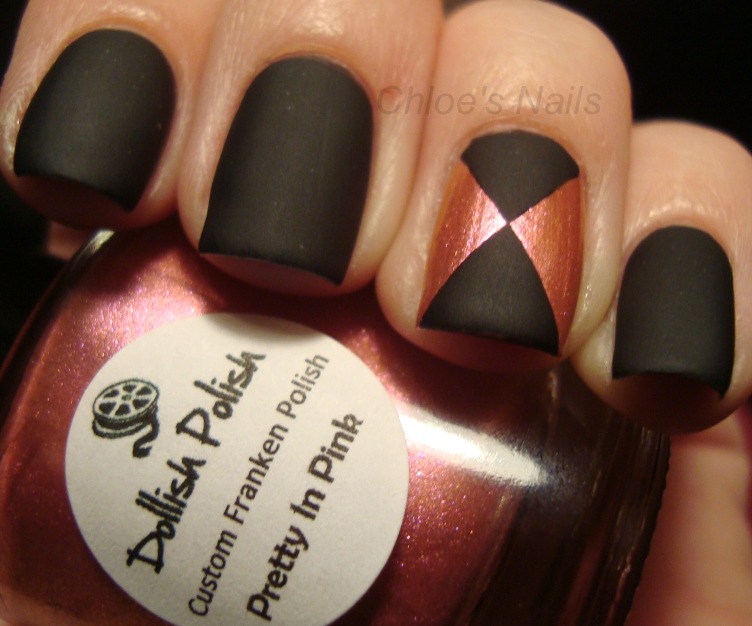
I started with using Sinful Black on Black on all my nails except my ring finger nails. On them I used a polish I purchased from Etsy called Pretty in Pink, it's a pink and orange duochrome. The seller is DollishPolish. I love her stuff and have a few others to share with you guys :)

Excuse my new friend, the paper cut who has taken up residency on my middle finger!!!


Then I taped off my ring fingers like this

I added Sinful Black on Black over top


Then after that dried, I taped them off again like so...

then once again I used the Black on Black and a coat of Seche Vite


How could I stop there though, especially with my Essie Matte About You top coat just staring at me from the end table!
So, once again, taping my nails off the exact way as I did before, only over the black, and applying the matte top coat to the other nails, here was my finished mani :)