Showing posts with label Beige. Show all posts

Saturday, 30 June 2012

I am very excited about this post. It's feather nails! I've been wanting to try these for months. I picked up the feathers a day or two before my last nail break though so doing these nails was put on hold. My nail has since grown back nicely so I figured it was past time to try feather nails for the first time. 

Birds of a Feather nails nail art nailart mani manicure Spellbound feathers neutral beige spots dots


Before attempting these nails I scoured the internet for blogger tutorials and youtube videos. What I learned is that while everyone has their own quirks, it's all basically done the same way. With this in mind, I set out to complete my own nails keeping the feather tutorials in mind.

Birds of a Feather nails nail art nailart mani manicure Spellbound feathers neutral beige spots dots

I started with two coats of Revlon's Bare Bones. I thought of buying brightly colored feathers or using a bright polish but I wanted these nails to be slightly more classic. I wanted them to look more realistic for my first try. So I went for the realistic feathers and a neutral base color.

Birds of a Feather nails nail art nailart mani manicure Spellbound feathers neutral beige spots dots

What I quickly realized is that the nails were very easy to do. Time consuming, yes but hard, not so much! I would recommend buying the bagged loose feathers. The only realistic feathers my craft store had though was a feather pad . I have no idea what this is used for originally but whatever it's meant for ... I don't think the feathers are meant to be just plucked and pulled off like I was doing. Some of them wouldn't come off at all and those that did left pieces behind. Still, I got more than enough of the feather to work with, so I guess the feather pad worked well enough.

Birds of a Feather nails nail art nailart mani manicure Spellbound feathers neutral beige spots dots

Putting the feathers on was also a fairly simple task. I used the glue-like polish that comes in gem packages. I figured if it can hold on my gems for days it should be no problem to hold on a feather.

The first thing to remember when putting feathers on your nails is that you don't want to trim them too much before you have them practically glued to your nails. They will fall apart! Get them laid on your nails over a layer of clear polish, nothing quick drying because you need time to work, and then trim them around your nail. You'll want a small pair of scissors to do the trimming. I found it easier to trim because mine were both small and sharp tipped. After you get them trimmed around your nail you'll likely find you have some small, sharp pieces hanging over your nail. I recommend turning your scissors at an angle to lay over your nail and trimming the tips this way. Get the bottom blade under the pieces of feather hanging over your nail and use the top blade (still at an angle) to skim the very tip of your nail. Be very careful you don't cut your finger or your nail, just the feather! Anything you can't get with a pair of scissors can be lightly filed with a soft file.

I used three or four coats of a thick, quick dry top coat over the feathers. It took about that many before the polish stopped settling around the feather and the nail got smooth.

Birds of a Feather nails nail art nailart mani manicure Spellbound feathers neutral beige spots dots

Here is the last picture I have to share. It's a natural part of the feather I used on this finger. I didn't even realized one of the spots formed into a heart, but I was ecstatic to see this!! It was like a little bit of love from the feathers themselves.

These feathers stayed on my nails for 5 days, and they only came off because I removed them! This is a very lasting manicure. This might have something to do with the feathers adding some protection to the tips of your nails or simply because you use so much top coat to seal them. Whatever it is, this mani lasts and looks amazing! The reactions you get when you say they're real feathers is also pretty darn cool.

Friday, 27 April 2012

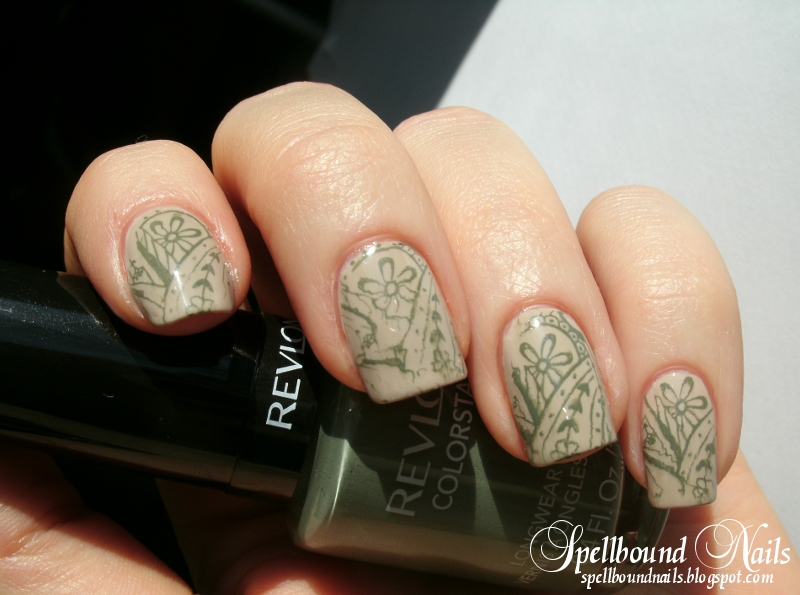
Hello, girlies! I tried my hand at stamping again today. I still haven't got it down yet, but I might be getting better. What do you think?


I think of this mani as deconstructed camo or my attempt at 'pretty camo'. While doing this design, I kept in mind the camo that uses various shades of green and tan to create leaves and a wood texture. I think it turned out very nice with this flowery, girlish stamp.


For some reason the middle nail smudged horribly when I stamped the design. Can you push too hard while stamping?


The two polishes used come from the Revlon Colorstay collection which just arrived in my small town. They are Bare Bones and Spanish Moss. I picked them up with a slightly different mani in mind but they looked far too much like camo colors to do anything else with them. :)


I'm still not sure how other bloggers get such perfect and whole stamps, but I'm just happy to see more than half the stamp on my nails this time!

Friday, 16 March 2012

Wow! Could this week have gone any faster?


Capitol Colours are here!! I wanted to have these swatches posted for you guys mid-week but it was just one thing after another! Sadly, I still have only three of the six polishes I want from this collection. I've checked most of the local shops, and they're all sold out. I think if I want them I'm going to have to splurge and order them online. I just hate paying shipping costs and then having to wait for them to arrive. I'm not good with waiting! However, if the other colors are anything like these three the collection is certainly worth the effort and extra money.


The first polish I have to show off is the one I was most interested in, oddly enough. This is Fast Track, a gorgeous beige/tan color chock full of gold shimmer. I'm the kind of girl made for bright colos so I'm not a fan of nudes, but I adore this polish. The shade is just different enough from other nudes to catch attention and the gold shimmer really makes it stand out in a crowd. Fast Track is one of a kind in my opinion.


3 Coats in Sunlight


Next up is Harvest Moon. I'm a bit unsure as to how to discribe this color except stunning. I've heard it described as a copper color, but I would go with more of a tawny bronze. Truthfully, it's only a slight shade different, but I think it better manages to capture the near orange tint that mixes with the copper. Harvest Moon is a hidden gem in this collection that puts me in mind of Autumn, pumpkins, and the golden orange of turning leaves. You know me with shimmering metallics; there's no question that I adore this, both formula and color.


2 Coats in Full Sun


Last, but not least, is Stone Cold. This color certainly brings to mind stone: caves and caverns with thick stone walls. It's dark grey bordering on black in some lights with a thick silver shimmer. This is a matte polish so the shimmer doesn't shine or really sparkle but mixes perfectly with the deeper, darker background. I manage to get my nails covered in one coat, but my coats tend to be a bit thicker than most people use. This polish starts to dry very quickly as the matte sets so work quickly if you don't want it pulling up with your brush.


1 Coat in Full Sun

Stone Cold Close-Up


Can I just say I am stunned and so very thankful to all you followers, new and old? You guys are amazing!!